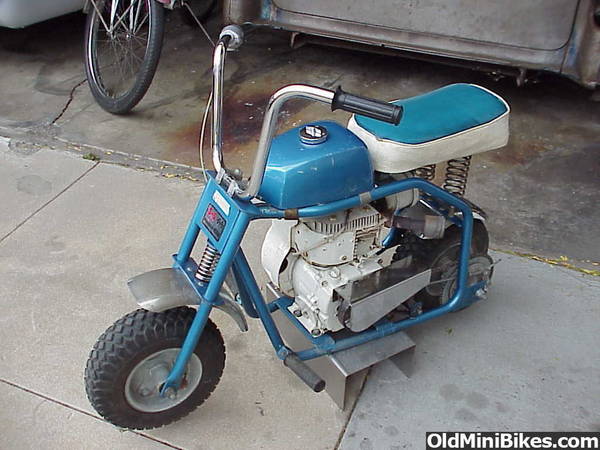
c.1970 Ding How, Taiwan Mini-Bike: Information, Specifications, & Restoration Project

Thanks! labor of love bringing back old machines and tools to function.
I think the neoprene will work good as it is very dense and not soft at all. You can pinch it as hard as you can and it barely dents in. Plus, I ended up going with thinner pieces which won't flex as much as the really thick pieces earlier in the post (using those on an engine stand instead).
That P100 mask works great! Also filters out light fumes, it was a great investment and proved handy with some mold cleanup I had to do, too.....you don't want to play with that black mold here in Oregon-nasty nasty stuff. :001_tongue:
Nice work Bunny :thumbsup: I'm not sure about those engine mounts though :shrug: Hw much do you think that neoprene will flex :shrug: Nice to see you using a mask :thumbsup: I have a 3M I use too
28SEP2013 UPDATE-Gas Lines, Filter, Valve Install + Clutch & Chain Fitting
28SEP2013 Was Another Good Night of Work Done and Getting Very Close to Running Time!

Stayed up way late last night getting a lot of stuff done. First up, I fitted the gas tank on/off valve using a brass adapter for 1/4 pipe (tank bung) to 1/8NPT (old Briggs & Stratton OEM gas tank valve). This replaced the previous owner's bulky iron adapter and china gas valve. I Measured out the gas line and hooked it all up also using a Briggs gas filter. Just need to make a new gas tank cap gasket out of that super handy neoprene scrap and the fuel system is good to go!
Next, before I put the clutch on, I went ahead and chased the case threads for eventual chain guard usage-on this Tecumseh, the threads are 5/16" x 24tpi. Good thing I did as they were kind of full of dirt, paint, etc. and now should easily accept a bolt for when I pick up a chain guard.

Next up, I cleaned up the Max Torque centrifugal clutch, 5/8" with 12 teeth, and put it on the shaft. Then, I had to actually shorten the #35 Made in Japan chain (from previous owner) so the rear axle adjusters wouldn't be maxed out (like they were when I got it). I used a cheapie but effective Harbor Freight chain breaker. The breaker's pin was too big but I pressed the chain pin flush and then drove it out the rest of the way with a pin punch. I hooked it up with a new master link and then spent quite a while getting the rear axle, chain, and sprocket all adjusted and lined up right. Now it is all nice and straight with proper chain slack and still plenty of room left on the adjusters. :smile:
After that, I worked on routing the throttle cable but I am going to have to cut it shorter before the final hook up. It is very close to run time! Just a few small things and some carb tuning plus a really cool exhaust I need to put on and it should be running, then off to OldMiniBikes warehouse to order a few odds and ends to wrap it all up. Then, I will do some detailing like cleaning up the seat a bit more and coloring in the cool Ding How logo on the back of the seat.
Here are a couple of pictures of it almost ready:


DING HOW! :thumbsup:
28SEP2013 Was Another Good Night of Work Done and Getting Very Close to Running Time!
Stayed up way late last night getting a lot of stuff done. First up, I fitted the gas tank on/off valve using a brass adapter for 1/4 pipe (tank bung) to 1/8NPT (old Briggs & Stratton OEM gas tank valve). This replaced the previous owner's bulky iron adapter and china gas valve. I Measured out the gas line and hooked it all up also using a Briggs gas filter. Just need to make a new gas tank cap gasket out of that super handy neoprene scrap and the fuel system is good to go!
Next, before I put the clutch on, I went ahead and chased the case threads for eventual chain guard usage-on this Tecumseh, the threads are 5/16" x 24tpi. Good thing I did as they were kind of full of dirt, paint, etc. and now should easily accept a bolt for when I pick up a chain guard.
Next up, I cleaned up the Max Torque centrifugal clutch, 5/8" with 12 teeth, and put it on the shaft. Then, I had to actually shorten the #35 Made in Japan chain (from previous owner) so the rear axle adjusters wouldn't be maxed out (like they were when I got it). I used a cheapie but effective Harbor Freight chain breaker. The breaker's pin was too big but I pressed the chain pin flush and then drove it out the rest of the way with a pin punch. I hooked it up with a new master link and then spent quite a while getting the rear axle, chain, and sprocket all adjusted and lined up right. Now it is all nice and straight with proper chain slack and still plenty of room left on the adjusters. :smile:
After that, I worked on routing the throttle cable but I am going to have to cut it shorter before the final hook up. It is very close to run time! Just a few small things and some carb tuning plus a really cool exhaust I need to put on and it should be running, then off to OldMiniBikes warehouse to order a few odds and ends to wrap it all up. Then, I will do some detailing like cleaning up the seat a bit more and coloring in the cool Ding How logo on the back of the seat.
Here are a couple of pictures of it almost ready:
DING HOW! :thumbsup:
Thank you! been really excited with this project as it didn't require anything really major.....almost done, too!
The muffler setup is getting changed to something very kewl. . .he hehe. . .just wait. Yes, the clutch guard is on my mind no doubt, after I just saw that post (but wish I didn't) with the chunk taken out of the guy's leg....yikes!
Yep, the mule is next up after I wrap this up....it has gotten me all motivated again to work on it. I can ride the Ding How around when I need a break from working on the 'Mule. :thumbsup:
you have impressed me and i want to tell you that i dont impress easy. damn good job , please make a guard for your muffler and one for the clutch before you ride it very far, im sure you saw the pics on here recently damn they were nasty :blink: now get crackin on that mule :laugh:

Hey, that is a kewl idea! I see that done on motorcycles a lot.
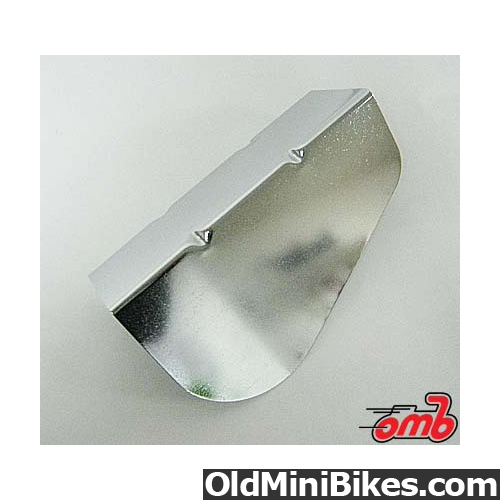
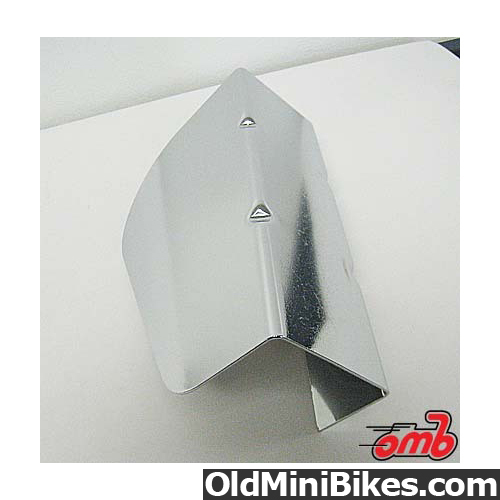
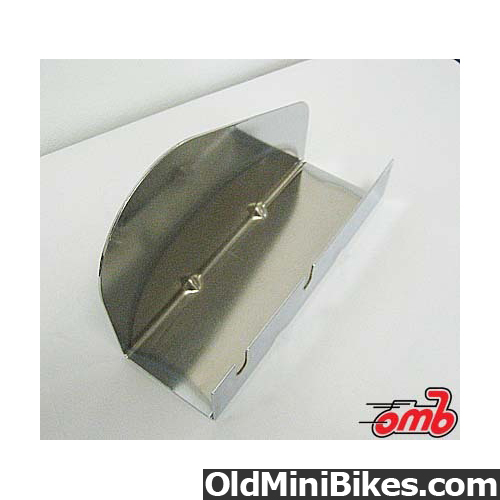
I have been trying to think up something using a curled around piece of aluminum or stainless, for a pipe guard, but mounting it is proving tricky. I should be fooling around with the final things, in the next few days, but with a swap meet this weekend I might not have much time until next week, to finish up the Ding How. :thumbsup:
I have been trying to think up something using a curled around piece of aluminum or stainless, for a pipe guard, but mounting it is proving tricky. I should be fooling around with the final things, in the next few days, but with a swap meet this weekend I might not have much time until next week, to finish up the Ding How. :thumbsup:
Ordered a neat clutch / chain guard from OldMiniBikes warehouse on eBay last night (after viewing the grisly leg injury post from running a mini without one!) ....looked like the best option as I had already seen a Ding How with this type on it and it looked original.
Here is the guard (Bonanza style replica):
Here is the eBay auction link:
http://www.ebay.com/itm/Bonanza-Vintage-Mini-Bike-Chrome-Clutch-Cover-/170683348120?
Here is the OldMiniBikes link:
http://www.OldMiniBikes.com/Bonanza-Clutch-Cover-Chrome.html
Here is a picture of a Ding How / Nova S-S I found that is using this type guard. Looks good, as if stock (I don't know yet if the Ding How or Nova came with a guard or not originally nor what it might have looked like):
DING HOW! :thumbsup:
02-23 OCT2013 UPDATE-Clutch / Chain Guard, Neoprene Gaskets, & Throttle Assembly
Here is what completed the last few weeks:
(I have been kinda focused on other outdoor stuff before the rains set in for winter, but found a bit of time for the mini project. . . .It has just been so nice in normally rainy this time of year, Oregon, I've been outside as much as possible and not in the shop, much!)
First up, I ordered the Bonanza style clutch cover from OldMiniBikes-wOw, what a nice piece! good chrome and solid construction, it bolted right up to my Tecumseh H35. I got it installed all nicely with the necessary 5/16" x 24tpi (sae fine thread) bolts and washer. No nasty routed leg injury for me, now!

Also in this picture, I have all the gas line routed along with a nice Briggs & Stratton gas valve and B & S mini gas filter. The light springs keep the fuel line from getting pinched up.
Next up, I had to replace the base plate of the air cleaner assembly after finding the original was warped and not sealing right. I tried to hammer it flat but it just wasn't right still so I found a replacement in our spares.

Here I am fabricating a new gasket for the baseplate to carb from neoprene. I paint the surface that needs the gasket with a good amount of black sharpie. Then, I press it firmly against the neoprene and put a weight on top of it. I let it dry for a few minutes and then trim to fit - voila! custom neoprene gasket!
Here is the other gasket I had to fabricate, the gas cap gasket. The original was all hard and crumbly and replacements were unavailable, to the best of my searching, so I just made a new one out of a thick neoprene.

I measured the diameters I needed and matched that up with the appropriate size sockets from the tool set, to use to trace and cut around. A little Dremel sanding drum work and the gasket is real nice and smooth and more importantly, seals up nice on the gas tank.
The next issue addressed was to modify the stock throttle mechanism to work with the cable from the mini bike throttle. I basically followed this VERY helpful post on Tecumseh throttles here: (thanks! Randy ) http://www.oldminibikes.com/forum/tecumseh-engines/23110-advice-hooking-up-your-tecumseh-carb-throttle-linkage-small-h-hs-engines.html
Here is a close up of the mechanism:

I had to sand the lever flat (there was a ridge on the bottom half) and then drilled out the existing hole a bit. Then I pried up the throttle plate a bit to work a modified screw from behind (I bench ground it to a smaller diameter head) and into a washer and then the barrel screw, with a touch of Loctite red. Then I installed a small bracket to hold the return spring and lined everything up straight and smooth. It's a real nice firm but smooth throttle now.
Here is a view of the whole engine area around the throttle setup:

So, after all this and filling up with some gas, I HAD THE DING HOW RUNNING AND I DROVE IT UP AND DOWN THE BLOCK LAST NIGHT! WOO HOO! However, the fun was short lived as I realized no matter how much I adjusted the carb, it wouldn't idle low enough. It ran like a champ at speed but at idle it needed the choke on a bit and was a bit too high as the clutch kept trying to engage. :cursing: Sooooo, next up will be a carburetor cleaning, rebuild, and re-installation!
Here is what it looks like for now! Almost forgot, but I installed an engine kill-switch by the throttle, too.

After the carb rebuild, I still plan on putting a fancier exhaust on the mini plus I hope to touch up the seat a bit.....but, that's DING HOW :thumbsup: for now!
Here is what completed the last few weeks:
(I have been kinda focused on other outdoor stuff before the rains set in for winter, but found a bit of time for the mini project. . . .It has just been so nice in normally rainy this time of year, Oregon, I've been outside as much as possible and not in the shop, much!)
First up, I ordered the Bonanza style clutch cover from OldMiniBikes-wOw, what a nice piece! good chrome and solid construction, it bolted right up to my Tecumseh H35. I got it installed all nicely with the necessary 5/16" x 24tpi (sae fine thread) bolts and washer. No nasty routed leg injury for me, now!
Also in this picture, I have all the gas line routed along with a nice Briggs & Stratton gas valve and B & S mini gas filter. The light springs keep the fuel line from getting pinched up.
Next up, I had to replace the base plate of the air cleaner assembly after finding the original was warped and not sealing right. I tried to hammer it flat but it just wasn't right still so I found a replacement in our spares.
Here I am fabricating a new gasket for the baseplate to carb from neoprene. I paint the surface that needs the gasket with a good amount of black sharpie. Then, I press it firmly against the neoprene and put a weight on top of it. I let it dry for a few minutes and then trim to fit - voila! custom neoprene gasket!
Here is the other gasket I had to fabricate, the gas cap gasket. The original was all hard and crumbly and replacements were unavailable, to the best of my searching, so I just made a new one out of a thick neoprene.
I measured the diameters I needed and matched that up with the appropriate size sockets from the tool set, to use to trace and cut around. A little Dremel sanding drum work and the gasket is real nice and smooth and more importantly, seals up nice on the gas tank.
The next issue addressed was to modify the stock throttle mechanism to work with the cable from the mini bike throttle. I basically followed this VERY helpful post on Tecumseh throttles here: (thanks! Randy ) http://www.oldminibikes.com/forum/tecumseh-engines/23110-advice-hooking-up-your-tecumseh-carb-throttle-linkage-small-h-hs-engines.html
Here is a close up of the mechanism:
I had to sand the lever flat (there was a ridge on the bottom half) and then drilled out the existing hole a bit. Then I pried up the throttle plate a bit to work a modified screw from behind (I bench ground it to a smaller diameter head) and into a washer and then the barrel screw, with a touch of Loctite red. Then I installed a small bracket to hold the return spring and lined everything up straight and smooth. It's a real nice firm but smooth throttle now.
Here is a view of the whole engine area around the throttle setup:
So, after all this and filling up with some gas, I HAD THE DING HOW RUNNING AND I DROVE IT UP AND DOWN THE BLOCK LAST NIGHT! WOO HOO!
However, the fun was short lived as I realized no matter how much I adjusted the carb, it wouldn't idle low enough. It ran like a champ at speed but at idle it needed the choke on a bit and was a bit too high as the clutch kept trying to engage. :cursing: Sooooo, next up will be a carburetor cleaning, rebuild, and re-installation!Here is what it looks like for now! Almost forgot, but I installed an engine kill-switch by the throttle, too.
After the carb rebuild, I still plan on putting a fancier exhaust on the mini plus I hope to touch up the seat a bit.....but, that's DING HOW :thumbsup: for now!
cool man... I have one too. It was missing everything though...so this is what it ended up as..
it has a 5 horsey power that scoots my kaboodle
it has a 5 horsey power that scoots my kaboodle
Also, did you get those tires with the white walls already or did you mod existing tires?
Good work so far on your bike, keep it going MoTo!!!
I can't believe how fun my brief ride was just up and down the street-it REALLY moves for just a 3.5HP engine. When I get the carb rebuilt and dialed in I can't wait to see it go, then!
wOw! that is REAL sharp.. . .nicely done! :thumbsup: Where did you get the white grips-are they regular motorcycle grips or shorter mini grips? I would really like to go white on the grips, foot pegs, and brake pedal.
Also, did you get those tires with the white walls already or did you mod existing tires?
Also, did you get those tires with the white walls already or did you mod existing tires?
The grips were NOS motorcycle off ebay, the tires I did myself with Krylon plastic paint. They do yellow after a year or so though.
Received these yesterday, Tecumseh OEM 3.5HP engine gasket set and carburetor rebuild kit!

I won't get back to the Ding-How for a few days, too busy trying to wrap up a "headache rack" installation on my "new" 1973 GMC Vandura work van, before the winter rains set in. (won't fit in the garage)
I'm going to ultrasonically clean the present carb and then rebuild it, hopefully allowing it to (finally) idle correctly as I have tried everything else. Presently it runs like a champ at speed but just won't idle worth a crap. No biggie, looks to be a real simple carb to rebuild.
DING-HOW! :thumbsup:
I know your carb will be clean. I have experience with the way you clean a carb. Still working perfectly.:thumbsup:
I have another Tec carb that looks like it spent a decade or two buried in a bucket of pig slop-we will see if the ultrasonic can resurrect THAT carb!


Last edited: