Hello guys i just found a bike in my father in law garage and i am trying to figure out what year and model it is so i can restore it. I think the engine is "tecumseh" and there is a model number and serial number on the engine, and also some number under the seat. Also if someone can tell me where i can find parts because i will need a diaphragm for the carburetor for sure and some other parts.I dont know why but its not leting me upload my pictures so i cant show it to you...  Thanks
Garage found fox mini bike
- Thread starter bohero
- Start date
This is the pictures i uploaded in the gallery i cant put them here i dont know why...
https://www.oldminibikes.com/forum/photopost/showgallery.php?ppuser=59808&username=bohero
https://www.oldminibikes.com/forum/photopost/showgallery.php?ppuser=59808&username=bohero
That bike was called a Condor, model number 1429 seen here on the bottom:
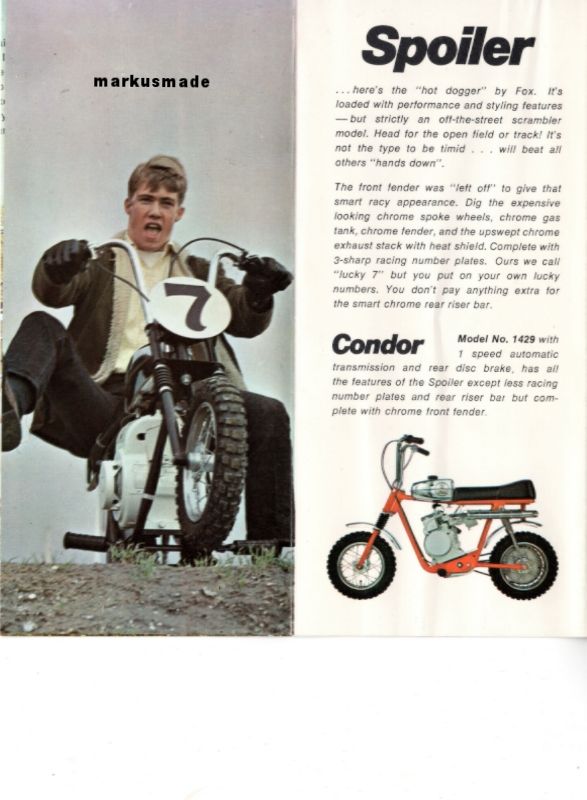
On the engine, the model number is what you use to find parts for that particular setup (assuming its original parts) the Serial number will give you the year and day of the year it was built, and if original to the bike, will be very close to the time the bike was built (they kept up pretty good with each other back then)
your engine tag model number should start with HS40 55--- and the serial number should start with 9--- (first digit the last digit of the year it was made (9=1969) next two or three digits are the day of the year it was built.
Those bikes were available in 1969 and 1970
wanted to add this info as it may help you if doing a proper restore or survivor save reguarding the carbs those early "slanted" engines ran. it looks like you have a nice complete example to work with so its definitely worth the attempt to get it correct. This info below is kinda hidden away in a thread about a smaller 3.5hp engine I built so when doing a search you would problaby miss it. Its very important on those to remove all welch plugs to get into the ports to clean, replace throttle shaft (if worn), and definitely try and find OEM Tecumseh replacement parts like the needle and seat,the china made replacement parts don't match up well to these, they are finiky carbs and dont do well unless everything is right and tight.
Thanks everyone :thumbsup: That silver is kinda hard to photo, It has a different (I think better) look in person. I was pretty relieved it came out alright, this was my first time doing a single stage paint with metallic in it and I was kinda sweating it. It actually laid down and covered thinner than some of the solid colors I have been spraying from the same brand/paint line (Nason Fulthane).
Re guarding the Diaphragm Carbs, as capgun said they were used till early 1971, These were specific to Slanted engine applications only which began when Fox corporation introduced the angled engine plate design on their 1969 bike lineup.....Everyone quickly jumped on the bandwagon for 1970. In 1971 they created the slanted intakes so the bowl carbs could be used and they got phased out. I am not sure why the change was made at that time, from what I can tell a choke lever and air cleaner placement dilemma may have played a part in it, they had the same problem with standard horizontals and bowl carbs at the same time and made a revision during 1970 on those to better accept Header type systems that were becoming the norm.
There were only 2 versions of this carb that I can find, one for the H30/H35 and one for the HS40 and again their soul purpose was for the slanted application so you wont find them setup like this on anything else. Looking at Tecumseh service carburetor lists, they never offered a suitable replacement for it either. These mini bike/cycle specific carbs look virtually identical externally so you want to look at and decipher the stamped numbers found on the intake side flange of the carb body to know which one you are working on.
The H30/H35 part number is 631595, the stamp number on that body will start with 379
The HS40 is part number 631588, the stamp number on its body will start with 356
One rather unique thing that makes them stand out over most others and easier to spot is the choke lever and detent, Rather than the common spring rod detent it is a stainless sort of clip looking bracket that screws into the body, the lever is pretty standard but it has a flat spot on the upper shaft to help lock the shutter in the open position.
This is a 631588 version I just completed for a 1969 HS40 that I am currently finishing up:
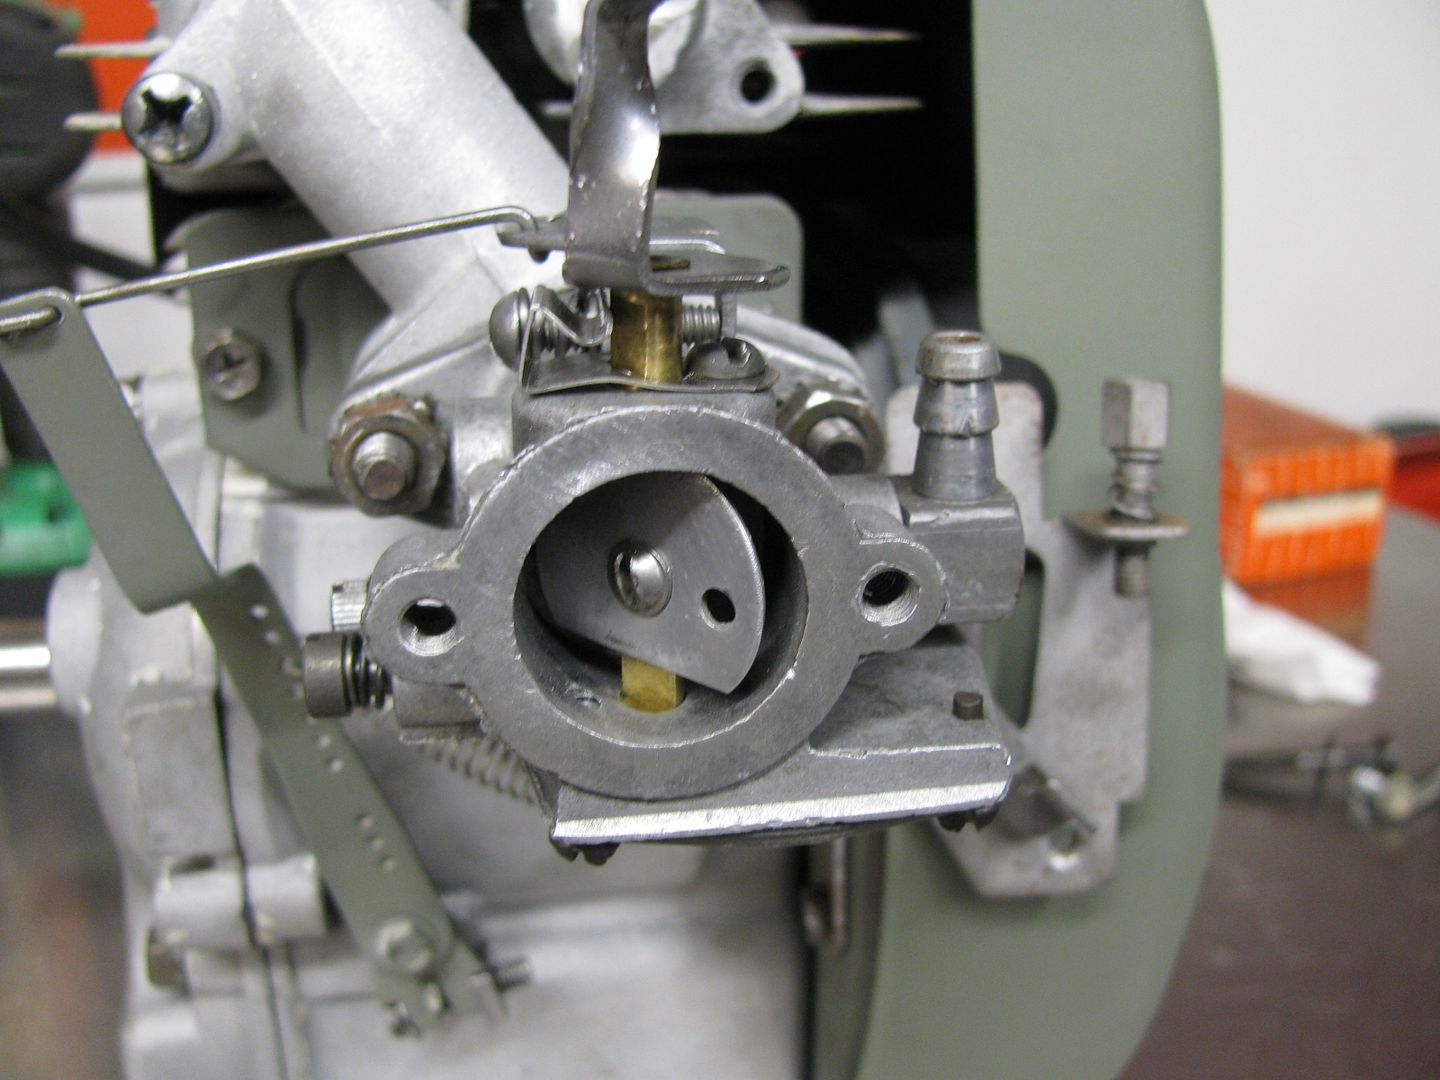
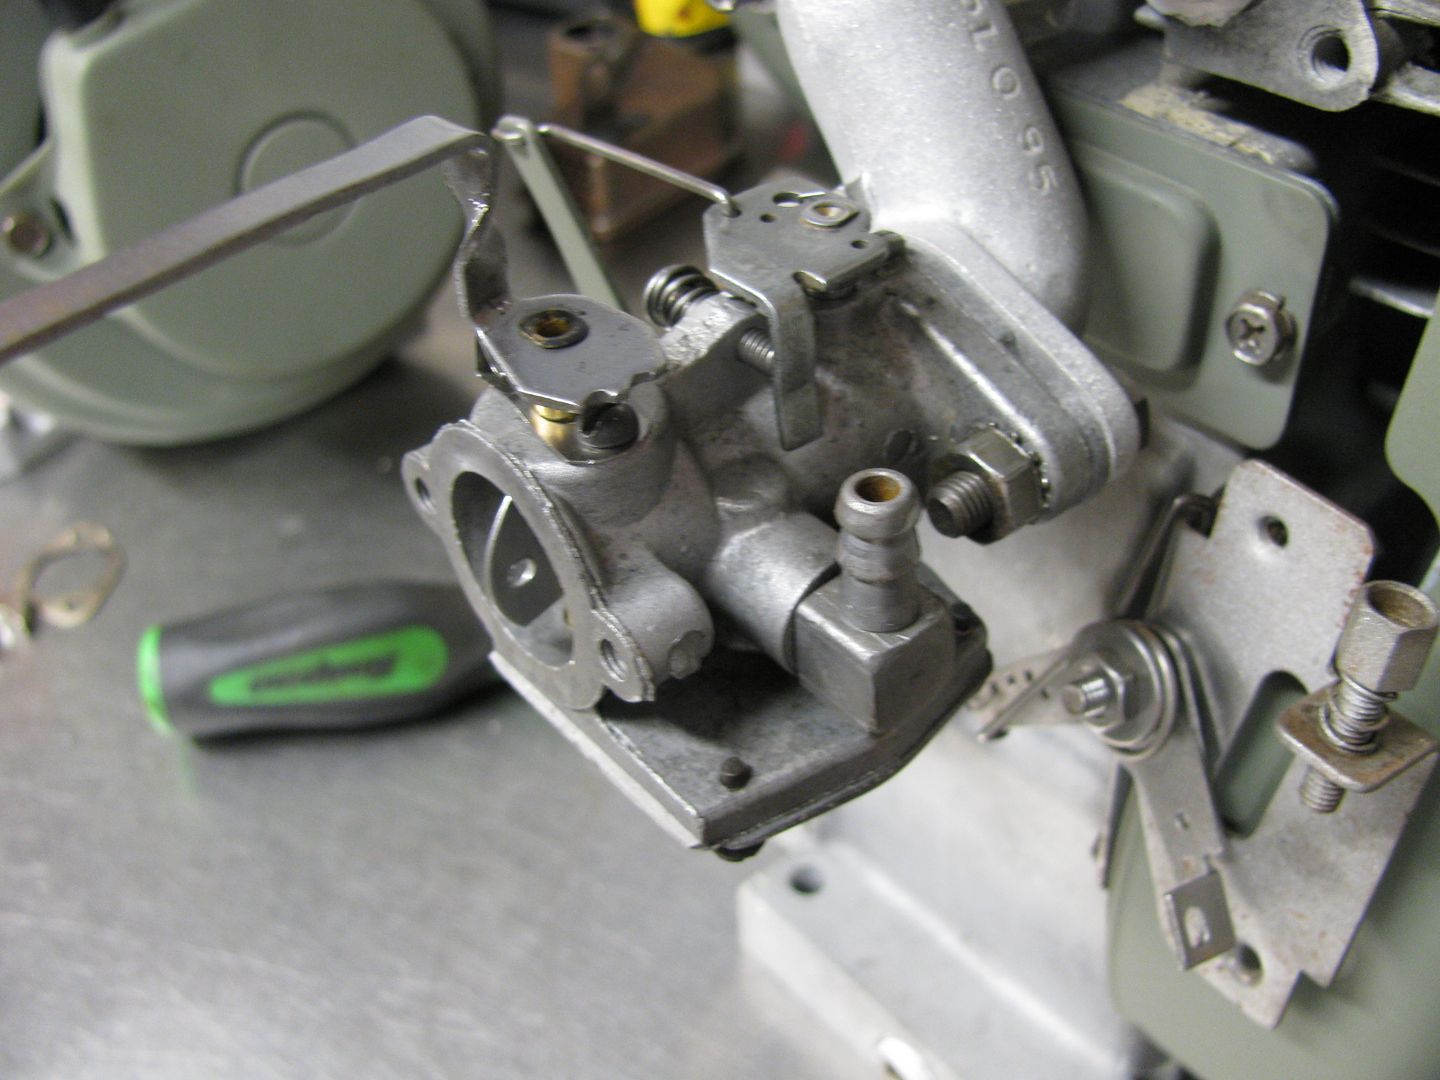
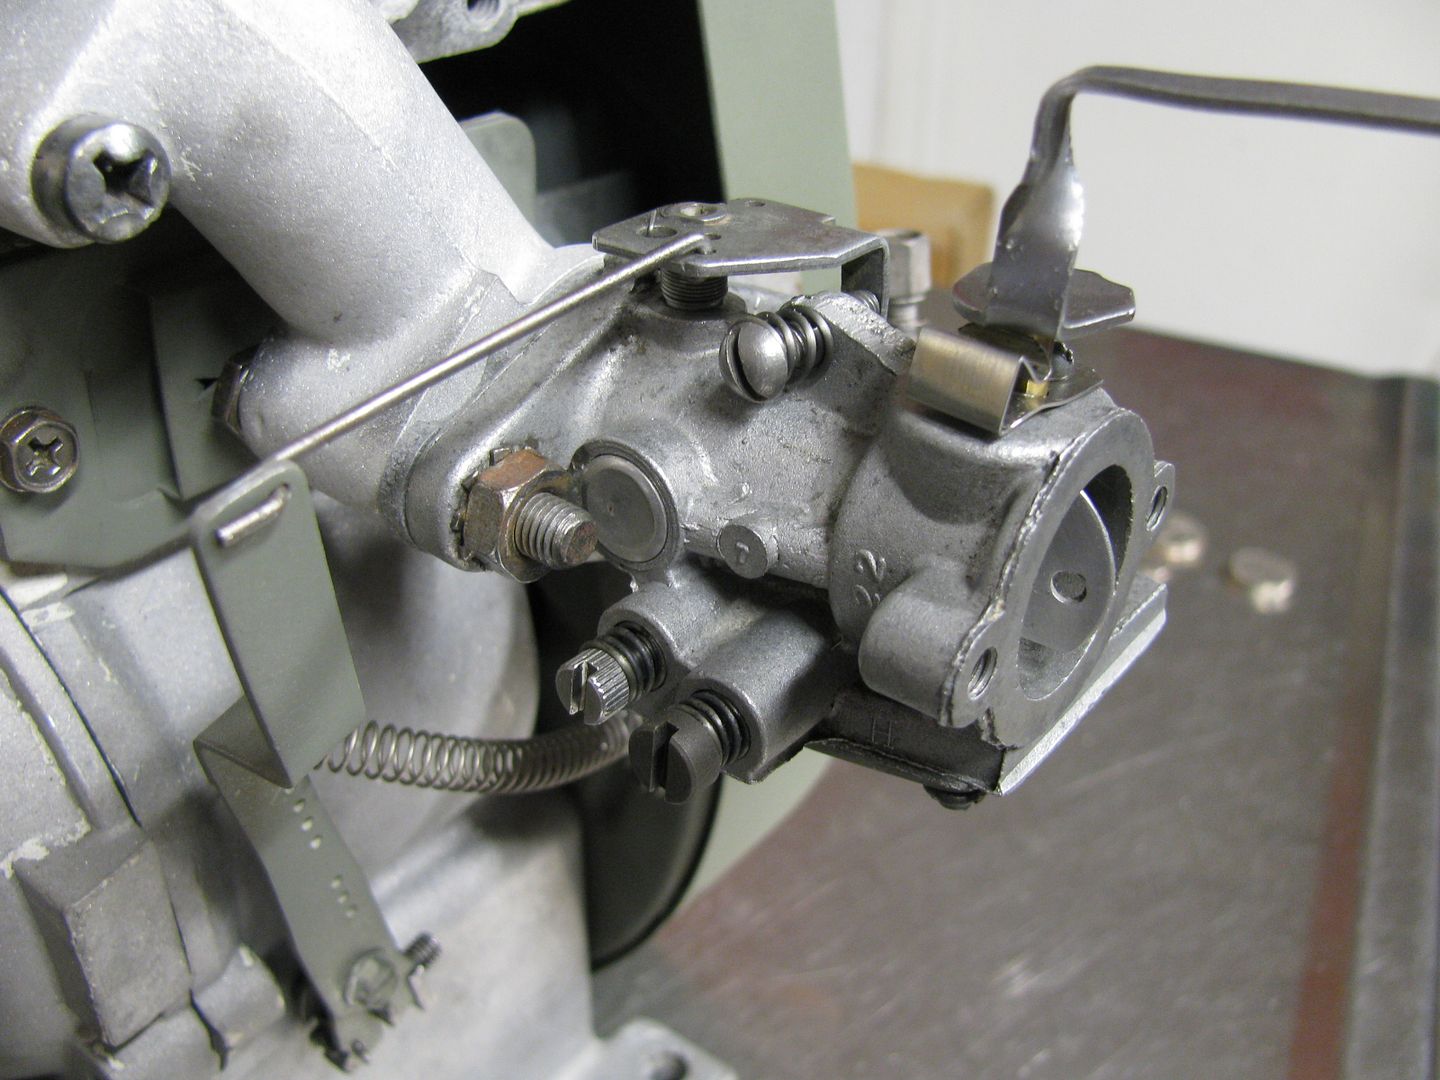
Here is that carbs body from above in comparison to the H30/35 631595 version on the engine I just did:
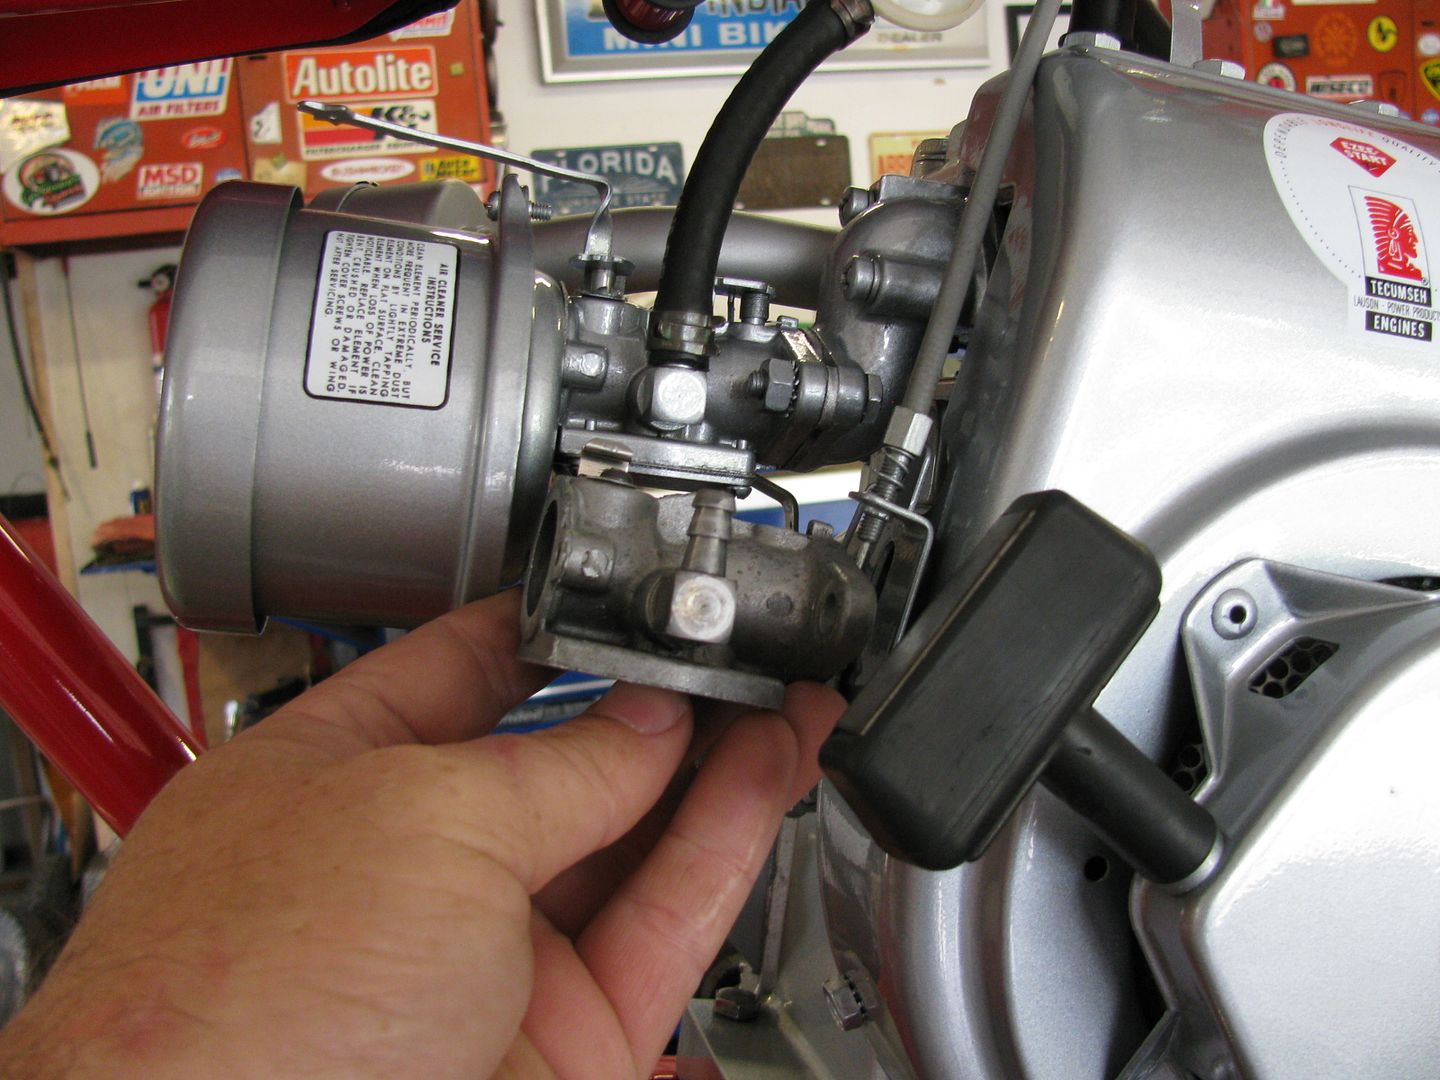
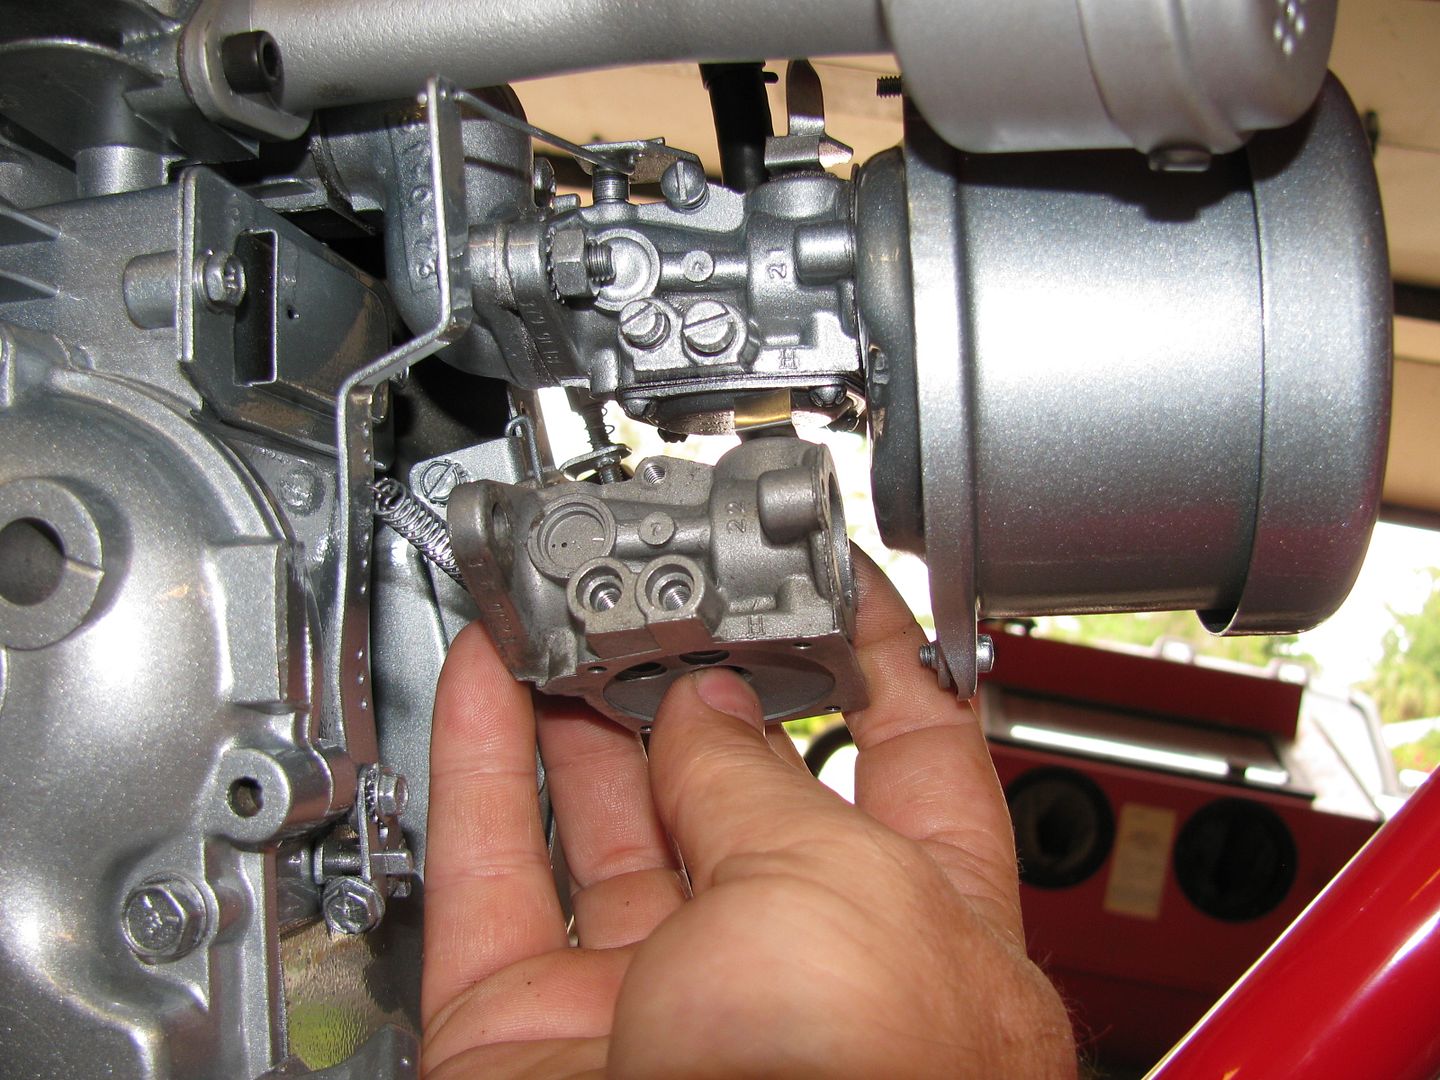
As you can see, your really cant tell them apart externally, so it is important to refer to the stamped numbers on the flange. Only other difference I see (and I dont know if you can depend on that) is the cast number on the left (needle) side just in front of the air cleaner base mount lug which you may be able to make out in the one photo above. the H30/35 had a 21 cast in where the HS40 has a 22
I had intended to do an actual comparison build thread of the 2 carbs but that didnt work out and I needed to get the H35 finished and out of my way. Hopefully the shots I took though as I rebuilt the HS40 version the other day may help show what I did find as differences between the 2 carbs.
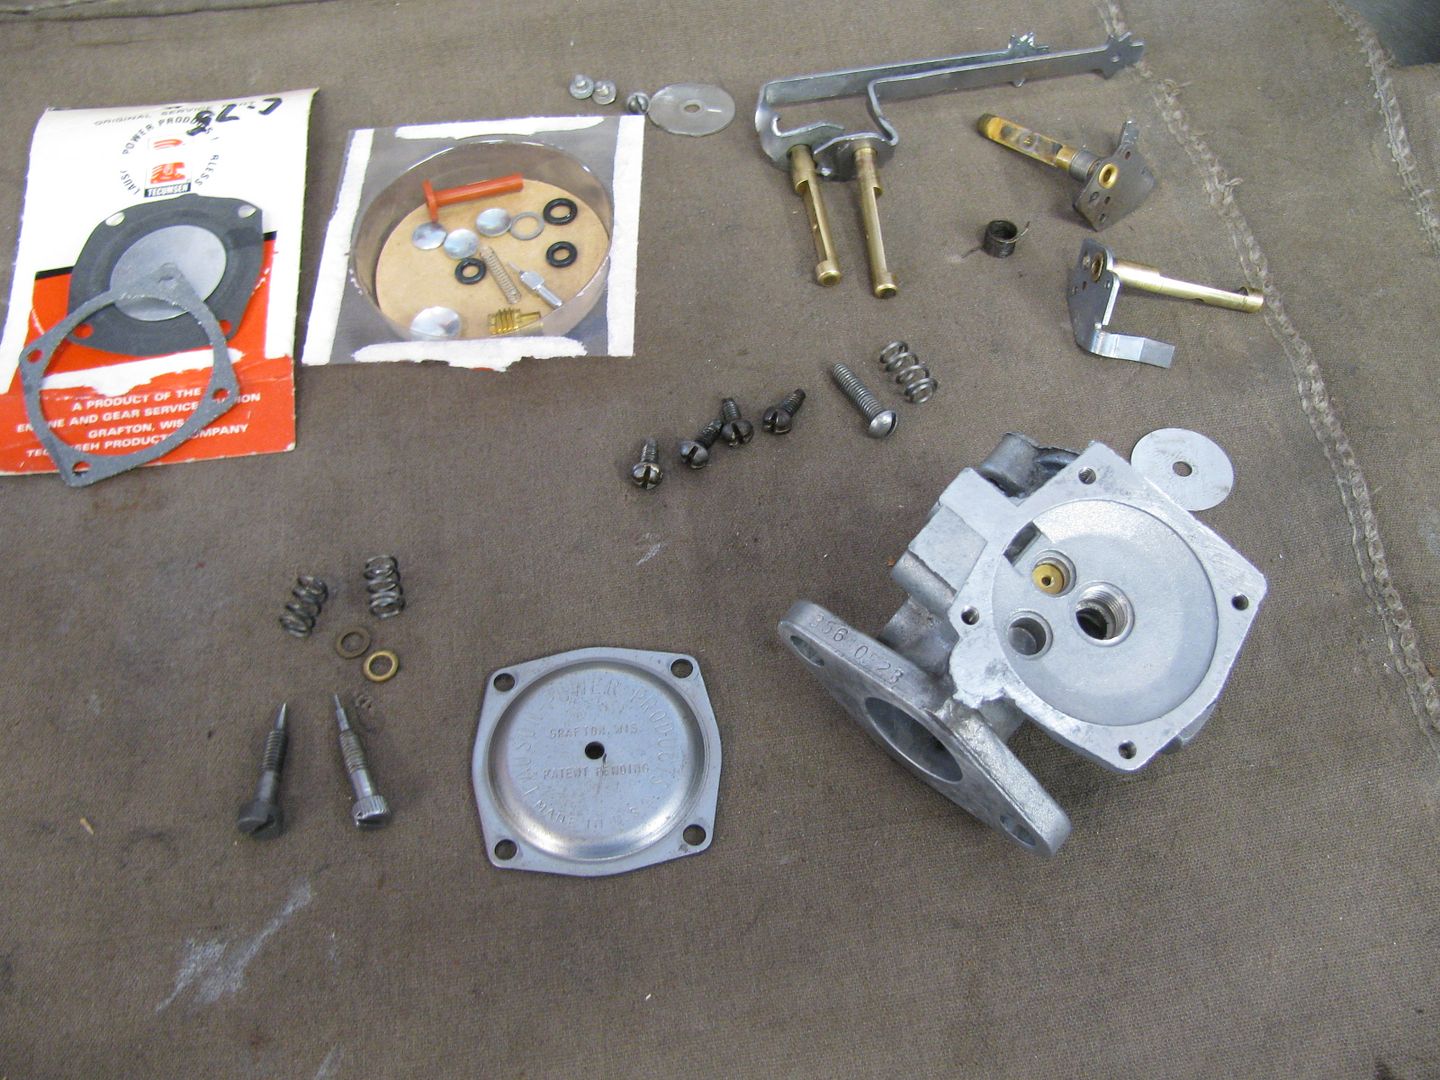
Key difference i found between the 2 that you will spot is under the diaphragm. above the carb body has been gutted as far as you can take it (all welch plugs and needle assembly removed)
I found the H30/35 to have welch plugs covering both the High and low speed circuits, where the HS it was covering only the High speed circuit and the low was just left open. On the H30/35 they drilled a passage connecting the 2 reservoirs where the HS did not have the passage drilled
I put this cleaning needle across on the HS body about where that passage was drilled on the H30/35:
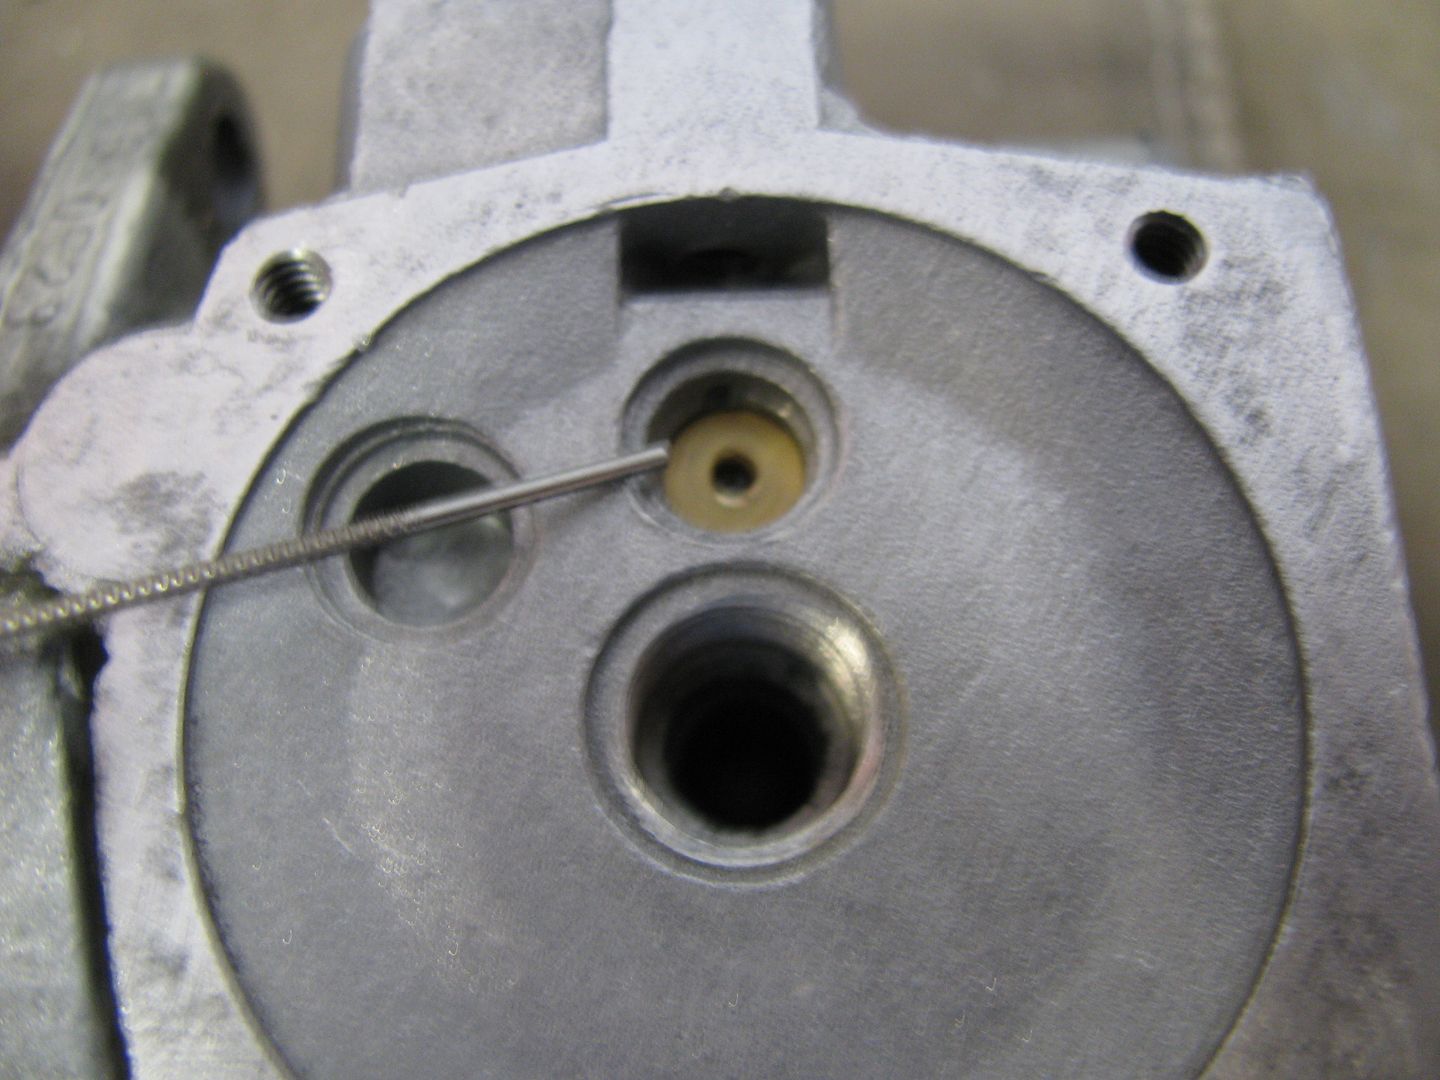
the passage was small and angle drilled but in about that same line. OEM tecumseh rebuild kits for these cover an array of versions, so there are more parts than needed, So don't go plugging holes just because the welch plug is in the kit, If that passage is not drilled you will take the low speed circuit directly out of the picture if you plug that port up. Low speed is the one to the left of center with nothing in it but a tiny hole, High speed is the centered one with the non serviceable brass check ball assy in it.
Parts listings show that both carbs use all the same rebuild and bolt on parts, I dont see anything else visually different between the 2 bodies other than the port passage, I did forget to measure the bore on the H30/35 though :doah: The HS40 version I got about 11mm at the choke point. Thats a little smaller than the stock HS bowl carbs, but dont let that fool you. When they are cleaned correctly, worn out parts like the throttle shaft replaced, getting clean fuel supply, and on a decently tuned engine they run pretty dam good.
Re guarding the Diaphragm Carbs, as capgun said they were used till early 1971, These were specific to Slanted engine applications only which began when Fox corporation introduced the angled engine plate design on their 1969 bike lineup.....Everyone quickly jumped on the bandwagon for 1970. In 1971 they created the slanted intakes so the bowl carbs could be used and they got phased out. I am not sure why the change was made at that time, from what I can tell a choke lever and air cleaner placement dilemma may have played a part in it, they had the same problem with standard horizontals and bowl carbs at the same time and made a revision during 1970 on those to better accept Header type systems that were becoming the norm.
There were only 2 versions of this carb that I can find, one for the H30/H35 and one for the HS40 and again their soul purpose was for the slanted application so you wont find them setup like this on anything else. Looking at Tecumseh service carburetor lists, they never offered a suitable replacement for it either. These mini bike/cycle specific carbs look virtually identical externally so you want to look at and decipher the stamped numbers found on the intake side flange of the carb body to know which one you are working on.
The H30/H35 part number is 631595, the stamp number on that body will start with 379
The HS40 is part number 631588, the stamp number on its body will start with 356
One rather unique thing that makes them stand out over most others and easier to spot is the choke lever and detent, Rather than the common spring rod detent it is a stainless sort of clip looking bracket that screws into the body, the lever is pretty standard but it has a flat spot on the upper shaft to help lock the shutter in the open position.
This is a 631588 version I just completed for a 1969 HS40 that I am currently finishing up:


Here is that carbs body from above in comparison to the H30/35 631595 version on the engine I just did:


As you can see, your really cant tell them apart externally, so it is important to refer to the stamped numbers on the flange. Only other difference I see (and I dont know if you can depend on that) is the cast number on the left (needle) side just in front of the air cleaner base mount lug which you may be able to make out in the one photo above. the H30/35 had a 21 cast in where the HS40 has a 22
I had intended to do an actual comparison build thread of the 2 carbs but that didnt work out and I needed to get the H35 finished and out of my way. Hopefully the shots I took though as I rebuilt the HS40 version the other day may help show what I did find as differences between the 2 carbs.

Key difference i found between the 2 that you will spot is under the diaphragm. above the carb body has been gutted as far as you can take it (all welch plugs and needle assembly removed)
I found the H30/35 to have welch plugs covering both the High and low speed circuits, where the HS it was covering only the High speed circuit and the low was just left open. On the H30/35 they drilled a passage connecting the 2 reservoirs where the HS did not have the passage drilled
I put this cleaning needle across on the HS body about where that passage was drilled on the H30/35:

the passage was small and angle drilled but in about that same line. OEM tecumseh rebuild kits for these cover an array of versions, so there are more parts than needed, So don't go plugging holes just because the welch plug is in the kit, If that passage is not drilled you will take the low speed circuit directly out of the picture if you plug that port up. Low speed is the one to the left of center with nothing in it but a tiny hole, High speed is the centered one with the non serviceable brass check ball assy in it.
Parts listings show that both carbs use all the same rebuild and bolt on parts, I dont see anything else visually different between the 2 bodies other than the port passage, I did forget to measure the bore on the H30/35 though :doah: The HS40 version I got about 11mm at the choke point. Thats a little smaller than the stock HS bowl carbs, but dont let that fool you. When they are cleaned correctly, worn out parts like the throttle shaft replaced, getting clean fuel supply, and on a decently tuned engine they run pretty dam good.
Markus , ole4 , Havasu Dave thanks for the help guys. Now i know what i have hopefully tomorrow i will have time to get the engine out and starts preparing it for paint, i think i will keep up with red again and i want to put the front fender upper like a dirt bike. Markus my serial number on the engine is 9177 so i assume it is a 1969 but after it there is a number L3035 i think if you know what that is and i cant find out what is the number under the seat for also it say B-010856 and in the down right corner 53545. Thanks for all the help one more time guys i will keep you posted with pictures and how my restoration is going.
Markus , ole4 , Havasu Dave thanks for the help guys. Now i know what i have hopefully tomorrow i will have time to get the engine out and starts preparing it for paint, i think i will keep up with red again and i want to put the front fender upper like a dirt bike. Markus my serial number on the engine is 9177 so i assume it is a 1969 but after it there is a number L3035 i think if you know what that is and i cant find out what is the number under the seat for also it say B-010856 and in the down right corner 53545. Thanks for all the help one more time guys i will keep you posted with pictures and how my restoration is going.
Far as the serial number on the bike, your guess is as good as mine. I have never spent any time on Fox serial numbers to see if you can make a connection between it and year made or particular model. Just more of an individualized number possibly a somewhat numerical system. the earlier bikes I have had all started with a 0 as the first digit as well, One was a 1964 timeframe and the current one I have Is a 1967 (verified with motor vehicle title)
I found online a place to order the engine rebuilt kit and the carburetor rebuild kit i just cant find where to order the new wheels because mine are too rusty and i want to change them but i think i will need tires too.
Or, you can strip the spokes from the wheel, remove the rust with acid (there are products) including remedies like aluminum foil and Coca-Cola and wire brush the spokes with a powered wire wheel and retrue the wheels and use some after market tires and have it looking pretty decent, which given the rest of the bike, is the way I would do it.
[MENTION=5969]markus[/MENTION] great carburetor information. I had been looking for that post, as I am going to go from :censure: float to diaphragm on grandkid's H35 kart.
Used wheels come up for sale on ebay from time to time. There's one on there now. Also, the Rupp$ use those wheels, and you can buy new spoke$ from those vendors. You can strip the wheel and get it rechromed, then install new SS spokes and true the wheel. Not cheap.
Or, you can strip the spokes from the wheel, remove the rust with acid (there are products) including remedies like aluminum foil and Coca-Cola and wire brush the spokes with a powered wire wheel and retrue the wheels and use some after market tires and have it looking pretty decent, which given the rest of the bike, is the way I would do it.
[MENTION=5969]markus[/MENTION] great carburetor information. I had been looking for that post, as I am going to go from :censure: float to diaphragm on grandkid's H35 kart.
They are not the same as the Rupp wheel. Same spoke count if I am not mistaken but wider bands, different hubs and bolt patterns. The fox wheels on that series bikes were very skinny and used dinky 2.50 sized tires-not sure how much wider you can pull off on the frame and forks without running into other problems so watch that if replacing with something different.
So i will need help again guys i made the bike to start but i am going to need a new rear break which i think i saw in the OldMiniBikes wearhouse but the bigest problem is my tank is in very bad condition from the inside do you have any ideas how i can clean it.
Apple cider vinegar, with the tank removed, fill to the top, put the cap on and let it set a couple days. Prior to emptying, put a couple tablespoons of baking soda in to neutralize the acid in the vinegar. It will flash rust really quick after emptying the tank, I usually put some small nails in with some oil then shake the tank for a few minutes then dump and rinse with alcohol. This method works for me on heavily rusted tanks but be careful, you may find leaks you weren't counting on.
Okay perfect i will fill it up tonight after work and let it sit till sunday.
Also, if the rust damage is severe enough to cause you concern over strength of the metal, or if you are worried about re-occurance of corrosion, say, when the tank is half full, and the alcohol in the fuel condenses into a water vapor, (this WILL happen) the best tank sealant to use it Caswells epoxy. When I say "best," I mean I have been screwing around with motorcycles, then later on, mini bikes for decades, and have used all of these products at one time or another. Others have their opinions, no one wants to be told they have an ugly baby, Caswell's sealer will go over flaky rust and still be good to go.
If you’re going to leave it for more than two days, I would check on it occasionally, perhaps draining it into a container so you can pour it back in if it’s still rusty. One thing I don’t like about using vinegar is the flash rust afterwards, it solves one problem but creates another. The flash rust is easier to deal with than major rust in your tank though, that’s why I use a handful of roofing nails and oil then shaking afterwards, it cleans up the flash rust and gets rid of any other rust particles and the oil keeps the bare metal from flash rusting so quick. One of these days I’ll get some ceramic abrasive media and make a vibrating parts cleaner, until then, I’ll keep using the stinky vinegar method.


