Got a new electric Go Kart ''winter'' project idea rolling around in my head.

I74

Well-Known Member
#21
Modified a few more things on ''Wile -E''...

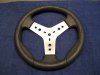
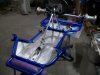
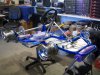
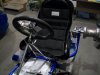
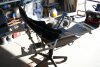
Cut down & profiled the seat to my liking,, & knocked out ''well over'' a lb. of weight out of it.
Will paint that probably matt black or semi gloss black.
It looks ''lot's better ,& is pretty comfortable now.

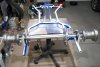
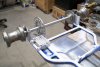
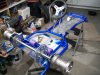
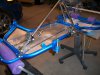
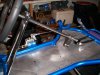
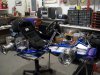
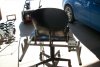
Cleaned up /cut, & reworked the seat post mounts & tubes, & did a temp. rough mock up on all that stuff.

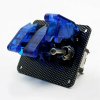
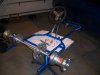
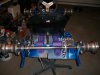
Next I cut down the motor mount plate for clearance of the right side seat post assy. mounting.
Cutting the plate down, also shed another 1/3 lb.+ of weight.
The mount assy. slides about 1 1/4 inches for chain adjustment.

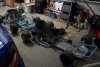
Figure I better do this before laying more paint down on the frame , & painting the seat.

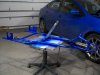
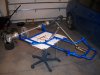
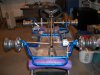
Frame is going to be ''candy raz blue metallic''.

Think it's really going to pop, with the chrome & polished natural metal color parts ect.

It's super cold here,, & am going to have to wait a bit before doing more paint work.

I

100_6464.JPG 100_6463.JPG 100_6462.JPG
 
Last edited:

I74

Well-Known Member
#23
Thanks for the likes Guys !!! :)

It & Fred's are definitely winter projects,, & will probably be late March/ April,, before we see the finished ''results''.
Still have yet to order batt. packs, motors & controllers ect.,, tires,,,, misc. hardware,,,,, & all the other little elect. stuff,, for both Karts.

They will for sure be ready to go in the spring though. ;)

Here's what I came up with for switch panel assy's.
Mine, I will be making a mount & box off the right frame ahead of the waist bend.
Freds, I 'am going to make a panel that mounts on his right nerf bar/ frame.
There will be light up volt meters also.
Meter in pic is good for up to 90v.

Left switch will be ign.
Middle sw. - forward/reverse.
Right sw.- 2 speed. '' Off will be 100%, on will be 115%''

I
61G10YYwevL__SL1163_.jpg $_12.jpg w.jpg
 
Last edited:

I74

Well-Known Member
#24
Started cutting down my axel this eve.
I ordered a 36',, but they sent me a 40''

Actually cut down one side already 2 1/2.

Which means,, the total axel will be 35'' when I get the other side done.

That will also shed another 1/4 lb. off the total weight, cutting down both sides

Total weight of the axel all said & done ,, should be around 2.75 lbs.

You don't need x -tra ''un used'' axel sticking through the ''out board centers'' of the rims,, & it's ''plus dead weight',,, & - also looks like '' $hit.''

It's the little bits,,, but ''definitely'' all adds up in the end. ;)
 
Last edited:

I74

Well-Known Member
#25
Added,,
Being just a street cruiser,, there is a couple of reasons why I didn't configure a standard Race Kart ''wheel base'' in my build.

Transportability,, will still have to disassemble it some,, but will take a bit less space.

Less likely to hit obstacles. ;)
 
Last edited:

I74

Well-Known Member
#26
Made some more progress...
Went & got some new hardware & bolted a few things together.
Also finished cutting & dressing the axel. Actual weight of it now is bit lighter than I figured,, only 2 1/2 lbs. !
Next I made a brace out of aluminum, for the right side cassette / axel hanger cradle.
Also painted the bottom with left over blue, & just need to find a window to paint the rest of it,, with the really cool blue .;)

Added,,

Once I get the last bit of paintwork done,, then I can start final chassis assy. & go from there …. :)

Am thinking that I will finish my Kart first,, & then concentrate on building Fred's.
Mine will be the prototype.

I
100_6466.JPG 100_6467.JPG
 
Last edited:

I74

Well-Known Member
#28
Got myself a Grant steering wheel for my Kart the other day from E- bay.
It was pretty jacked up,, as the foam rubber had ''a lot ''of excess & was not finished properly.
Also,, I ordered silver spokes & they sent all black.
They refunded my money, & let me keep it,, so I then proceeded to fix it up.
First I trimmed & cleaned up the foam rubber,, & then sanded off the black paint ect..
I then ''hand'' drilled & finished the center hole, plus the 6 other spoke holes.
It only came with the 3 long gated holes.

Think it looks pretty pimp now,, & is also a bit lighter. ;)
100_6478 (2).JPG
 
Last edited:

I74

Well-Known Member
#32
Dollied, dressed/ spiffed,,, & installed the pan.
Also made the 3 gang switch mounting & face plate assy.
Hope to cut off around an inch of the face plate outer edge, for clearance.
Am just going to get switches now ''without'' the included face plates.
Can get 6 of those for the price of a 3 gang assy. that comes with the face plate. ;)
have to config the 3 switches first, to see how much of the outer edge I can remove.
100_6522.JPG
100_6526.JPG
 

I74

Well-Known Member
#33
Reworked & modified my brake pedal, linkage,, plus the MS pivot arm,, & pretty much got it all installed & set to my liking.

Have yet to make an alum. bracket for the motor cut/ brake light switch.
The bracket will be mounted between the MS & frame.
There will be a bolt going thru one of the holes in the MS pivot arm,, for the switch contact to rest against in the closed position.
Supposed to have my new king pin /spindle bearings early this next week.
Will get those pressed in & then do final assy. on the steering. ;)
I

100_6528.JPG 100_6527.JPG
 
Last edited:

I74

Well-Known Member
#35
Pressed in the new king pin bearings, finished milled the urethane king pin/spindle spacers,, & pretty much have the steering buttoned up.
Made the brake switch bracket also, just have to drill the mounting & switch holes yet.
Ordered the packs yesterday, & will be ordering the motors & controllers ect. next week.

The gang & brake switches are on their way.
100_6538.JPG
100_6543.JPG
100_6540.JPG
 

I74

Well-Known Member
#38
Been plugging away at it …...
Painted the seat, reworked the seat bracket tubes & mountings some more,, & got that all installed.
It was a pretty tedious installation to get it just right, as the seat has 5 adjustable mountings.
Also got the axel assy. pretty much buttoned up, & the brakes mounted, bled,, & adjusted..
'F'n' master cyl. started seeping though,, so I took that all back apart & have a seal kit ordered.
Installed the 3 gang safety switches, & was only able to remove 1/2 inch more from the outer edge of the mounting plate, because of room needed for the container cover on the bottom to protect the switches & wiring from the elements.
The plastic container is an old Gerber baby food one, & will be secured by Velcro. lol
Ordered the tires also, & they should be here in a few days...
I


100_6553.JPG 100_6547.JPG 100_6555.JPG
 

I74

Well-Known Member
#39
Tires showed up today.
They are a bit distorted & squished from being probably stacked with a lot of heavy stuff on top of them ect., but for around 15 bucks ea.,, I will gladly deal with them.
Might have to get an inner tube to stick inside ea tire & inflate it for awhile before mounting,, to spread the tires out & help get them back in shape,, with also putting them out in the sun for awhile, as it's ''finally'' starting to warm up here,,& the temps are supposed to get into the 60's this week. :)
Have foam pool noodles in a couple of them already,, trying to get them into shape.

They are very light compared to the 4 ply regular Turf saver ones, & lighter than I thought they would be.
Think we will get a pretty good ride with these.;)
 
Last edited:
Top