Help Starting HS40

#61
Yes, and bounce the needle up and down a few times, because Tec carbs are notorious for having finicky needle valves, especially after sitting.

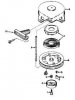
About your pull starter- That tiny torsion spring that fell out is supposed to provide tension to the little metal pawl that fits in that plastic slot. The center screw is supposed to have a tiny coil spring that retains the tension on it. Sorry Eric, no locktite on that. :)

A lot of people here would be glad to help you. I'll volunteer to rebuild, derust and prime it including replacing any missing parts, for the price of shipping and any parts. (cheap) But you might find someone nearby willing to lend a hand. When I rewind those, I have a couple of plastic clamps handy that allows me to tie the figure 8 knot within the pullstart handle.
That's very generous of you, I may take you up on that!

The center screw does have a coil spring on it but it may just be worn out, not sure, but it does not want to stay in place. If it's anywhere near tight, the rope will not retract. Does that have something to do with the torsion spring not being on there?
 

CarPlayLB

Well-Known Member
#62
Dear Dave,
if I am not mistaken, the screw in the center that holds the plate to the housing is a shouldered bolt that bottoms into the housing. The spring merely keeps tension on the cap to keep the pawls in place. Loctite should not any effect on its usage, just merely keeping the screw in place. If I am wrong, school me! Do you have a schematic you can post? I am wrestling with a couple of them right now myself!

TwinCity,
can you post a pic of what ya got going on? Dave is a master of most things Tec and can certainly head you in the right direction!
 
#63
Dear Dave,
if I am not mistaken, the screw in the center that holds the plate to the housing is a shouldered bolt that bottoms into the housing. The spring merely keeps tension on the cap to keep the pawls in place. Loctite should not any effect on its usage, just merely keeping the screw in place. If I am wrong, school me! Do you have a schematic you can post? I am wrestling with a couple of them right now myself!

TwinCity,
can you post a pic of what ya got going on? Dave is a master of most things Tec and can certainly head you in the right direction!
You're not wrong, only saying I've never had to use Loctite there. That compression spring sits inside the cup, and the shoulder bolt gets installed on the outside of the cup. That compression spring keeps the cup up and off the main spring, and everything else, including the pawls as you say, and prevents the shoulder bolt from working out. And yes, it is cinched in place.

If it's binding when tightening, it's assembled with the spring on the outside, or it's the wrong hardware. I doubt that spring could wear to the degree you could cinch down the starter cup.

I seriously doubt I am any better at this than you are, but thanks for the lies! :laugh: By the way, I have a complete H30 (older style) rewind with new rope and handle available. Also have the shroud. All bare metal. You can deduct recent laser engraving charges.

TwinCity, I'm no one's mini bike hero, and mostly an asshole, but here to lend a hand if you need it. Hard as hell to fix stuff over the internet.

00043044-00003.jpg
 
#64
Well I am probably as close to the op as anyone so if you want to sent it to me or depending on just how far south of Chicago you could probably just drive it over and I can fix it for you-will offer same service as Dave did. PM me for my address if you want to see if you are close enough to just come by with this. Bill
 
#65
Well I am probably as close to the op as anyone so if you want to sent it to me or depending on just how far south of Chicago you could probably just drive it over and I can fix it for you-will offer same service as Dave did. PM me for my address if you want to see if you are close enough to just come by with this. Bill
:thumbsup: This guy knows Tec inside and out. I would just STFU now, but I went out and dug through parts and painstakingly took photos! LOL! Far be it for me to recommend TwinCities flips you a couple bucks to get the whole damn thing running. (I know I have!)

This is the order of assembly.

Compression Spring sits in the hole.


Preassembled recoil mechanism (main spring and rope) in place.


Pawl and Torsion Spring installed.


Starter Cup Placed over pawl and recoil assembly.


Shoulder bolt installed and tightened.

 
#66
You guys are the best! I had the spring outside the cup. Doh.

So the pawl is the silver "lever" and it sits on top of the torsion spring?
 
#67
So the pawl is the silver "lever" and it sits on top of the torsion spring?
Yes. And be sure when you install it, that it "grabs" (extends) as you "pull" the rope, not the other way around. (don't install it backwards)

Alternative method with rope threading, and the way I do it:

Manually rotate the starter mechanism with your kung-fu grip until the main spring bottoms out. At that point, clamp the whole thing together with cheap hardware store clamps. (Not a vice) Back it off a bit until the rope holes line up in the rotating plastic piece, and the exit hole on the metal starter assembly itself.

At that point, I thread the rope in and tie the knot so it wont slip out of the plastic piece. Slowly release the clamps and let the rope get sucked in until it stops. Now pull the rope back out maybe one revolution. Mark the rope. Now pull it out some more, clamp it again, thread the rope into your pull start handle and knot it using that mark as a guide. Done.
 

CarPlayLB

Well-Known Member
#68
nice tutorial Dave! I knew you wrote for Hallmark, but I had no idea you wrote such wonderful "do-it-yourself" guides. Thank you!:thumbsup:
 
#69
Yea I could probably fix up his carb fairly easy as well. Probably is an issue with the seat-maybe a lack of one or was overlooked since it still leaks fuel but I guess time will tell.
 
#70
Oh and Dave please don't STFU (Took me a bit to figure out what that stood for) Honestly. You are always a big help and go out of your way to help folks out. :thumbsup:
 
#71
Yea I could probably fix up his carb fairly easy as well. Probably is an issue with the seat-maybe a lack of one or was overlooked since it still leaks fuel but I guess time will tell.
The seat is the tiny "donut" gasket that goes in the hole right? And the needle is what is supposed to make a seal to it? If so, I put a new one in there and pushed it down as far as it would go.

There is one gasket looking thing with a tiny tiny hole that I didn't use from the rebuild kit, but I don't remember seeing that when I took my carb apart. I can take some more pics when I get home.
 
#72
The recoil is working now, and I was able to tighten the rope successfully. Thanks again for your help!

I pulled the carb off, and it does seem like the valve is sticking.

I also noticed a tiny hole in the carb where gas was leaking out after I pulled it and was draining it. You can see it in one of the pics, is this normal?

Valve Pics and Hole In Carb
 
#74
I made the float level with the bowl and adjusted the valve needle, and it seems good now. I'll reinstall it tomorrow.

Should I be using silicone on these orings and gaskets?
 

capguncowboy

Well-Known Member
#75
To test your float and seat, connect a fresh piece of fuel line to the inlet. Blow on it and it should let air in. Turn it upside down and it should prevent air from coming in.
 
#76
Thanks for the tip, I tested the carb with a new fuel line and it seems to be working how it was designed.

I received the parts for the governor, but I'm not sure where to start with it. Does anyone have a good diagram that shows how the governor is supposed to be hooked up on this engine?
 

capguncowboy

Well-Known Member
#80
I'm still intimidated by the governor, and I don't really understand how it works yet. I'm going to give it another shot tonight!
on the inside of the engine, there is a little gear that sits against the cam. If your engine revs up to the limit amount (about 3500-3800 RPMS), a leg attached to the gear kicks the back part of the governor arm and forces it back to idle position. Without this governor arm in place, your engine can rev up to a limitless RPM, which will eventually blow the engine (throw a rod, bust the piston, bend the crank, crack the block, etc).

On my HS40, I just let the governor mechanism fall to the default position (like the photo you posted) and attached the arm at 12 o'clock. Then I connected all of my linkages.

I'm glad you're hooking all of that back up. We're starting to run low on mini bike engines, and it'd be a shame to lose another to lack of desire to do things right.
 
Top