
Thanks Dave. I'm by no means a bodyman and I'd probably make them worse if I went any farther:laugh:
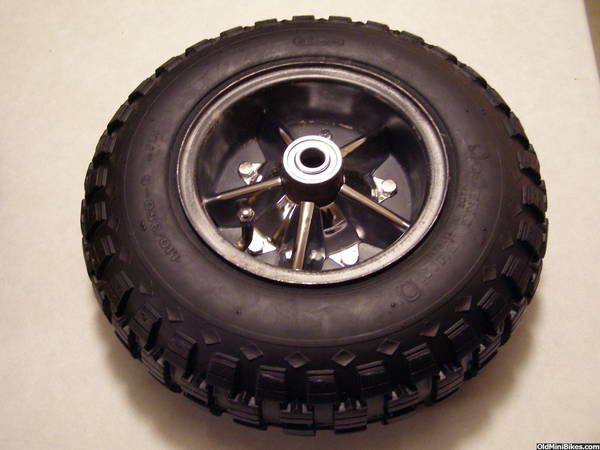
Cleaned up the wheels. Both tires were junk, and when I took the back one apart the tube was for an 8" tire:doah:


Scrubbed off the dirt and loose rust, and the outsides look OK. The inside of both wheels were rusty however, so I had to do something.


Normally I would just bead blast the whole wheel and repaint but not in this case. I just wanted to stop the rust from eating the wheel from the inside out so I brushed off all of the loose scale with a wire brush, slid a toilet paper tube over the centers and brushed on a coat of POR 15. I've used this stuff for years and have had it on equipment that gets worked hard, and it stands up to extreme conditions. It dries rock hard, almost like porcelain and encapsulates any rust and prevents it from traveling any further.


I only painted the insides of the wheels, then just buffed (what was left of) the outside paint. Soaked the stars and hardware in evaporust and polished everything. I had these tires on hand from other endeavors, they are not new but in very nice, not cracked correct size used shape:thumbsup:
After:

I still have to put the brake and sprocket back together (more on that later). Bearings are new:

Cleaned up the wheels. Both tires were junk, and when I took the back one apart the tube was for an 8" tire:doah:
Scrubbed off the dirt and loose rust, and the outsides look OK. The inside of both wheels were rusty however, so I had to do something.
Normally I would just bead blast the whole wheel and repaint but not in this case. I just wanted to stop the rust from eating the wheel from the inside out so I brushed off all of the loose scale with a wire brush, slid a toilet paper tube over the centers and brushed on a coat of POR 15. I've used this stuff for years and have had it on equipment that gets worked hard, and it stands up to extreme conditions. It dries rock hard, almost like porcelain and encapsulates any rust and prevents it from traveling any further.
I only painted the insides of the wheels, then just buffed (what was left of) the outside paint. Soaked the stars and hardware in evaporust and polished everything. I had these tires on hand from other endeavors, they are not new but in very nice, not cracked correct size used shape:thumbsup:
After:
I still have to put the brake and sprocket back together (more on that later). Bearings are new:
That's what I was thinking, however (I just did a set like these myself) Ceriani is/was an Italian company. All I could find on them was "made in Spain."
What's funny about that is, I only just started thinking that because I read it in your Endura thread. I guess you can't believe everything you read on the internet:laugh:
Today, I looked at this thread again, seen that I had already commented on it, and then kicked myself in the ass for not remembering the part about how easily the shocks unscrew.
No, I'd rather forget about it, and grab the big-ass channel locks and a rag. It buffed out. :laugh:
Now I am confused. I hope I didn't say they were Ceriani shocks. Tote Gote shocks appeared to be. I was eyeballing the heck out of the shocks trying to figure it out.

I just re-read your thread, and unless you edited it I don't know where I got that info....Maybe I read it somewhere else:wink:
Might have been on my Gote thread. Nice job dollying out those fenders. With the chrome, you don't get much leeway with the ripples.
I was actually surprised how easily the fenders (and bars and forks for that matter) bent back into shape, it's no wonder not too many of these Cat's survived.
I've got the bike back to roller status, the seat is half fixed (read: tore apart on my desk:laugh
and I just have some hardware, the gas tank and the engine to clean up. Should be done in a year or so:doah:
I think you're right....I've been on minibike website overload lately and my internal computer needs to be de-fragged...
I was actually surprised how easily the fenders (and bars and forks for that matter) bent back into shape, it's no wonder not too many of these Cat's survived.
I've got the bike back to roller status, the seat is half fixed (read: tore apart on my desk:laugh and I just have some hardware, the gas tank and the engine to clean up. Should be done in a year or so:doah:
I was actually surprised how easily the fenders (and bars and forks for that matter) bent back into shape, it's no wonder not too many of these Cat's survived.
I've got the bike back to roller status, the seat is half fixed (read: tore apart on my desk:laugh
and I just have some hardware, the gas tank and the engine to clean up. Should be done in a year or so:doah:
I keep thinking about that 12 year old in 1972, whose chain came off a mile from his house. The part where he shrugs his shoulders, and rips off the rear fender and chain guard, and jams the chain back on, then tosses the old tin in the weeds by the side of the road.
Your clean-up jobs have been motivational to me. That fine line between cleaning up and restoring, you do a good job of it.
What a save those were.:thumbsup:
I love evapo rust.
I love evapo rust.
Thanks Tom, me too. I know there are other de-rusting processes available but I really like the stuff.
Yeah, but the GOOD thing about those bars is that they easily bend back. :laugh:
I keep thinking about that 12 year old in 1972, whose chain came off a mile from his house. The part where he shrugs his shoulders, and rips off the rear fender and chain guard, and jams the chain back on, then tosses the old tin in the weeds by the side of the road.
Your clean-up jobs have been motivational to me. That fine line between cleaning up and restoring, you do a good job of it.
Although I haven't touched the bike in quite a while I was digging around and found some more pics.
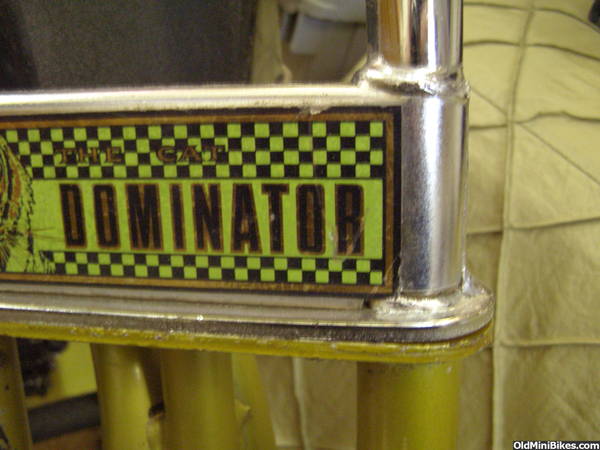
The front decal was starting to peel up at the corners:
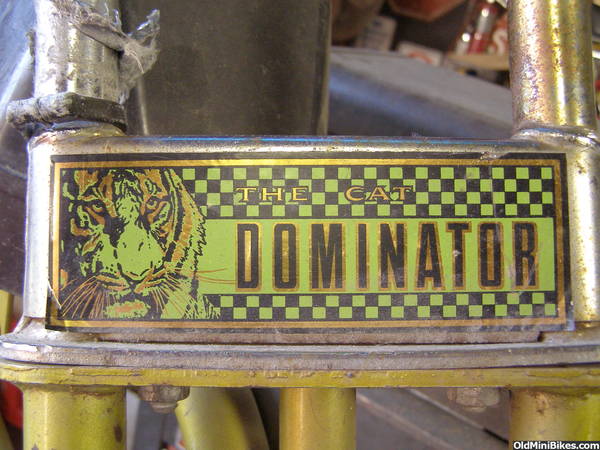
So after cutting off the duct tape and a soak in some evaporust, I needed to glue the corners back on. They needed to be held down while the glue was drying, but if any of it squeezed out then it would stick...So I used a couple light dabs of Duco cement under each corner, and placed a small piece of wax paper over the decal. After I squeegeed the air pockets out with a credit card, I wrapped both ends around the bars with Scotch tape to hold it in place.


After drying overnight:


Still haven't done much to the bike, but I was messing around with the clutch cover over the summer in between working on the Hauler and everything else. I've been looking for a long cover for a while now with no luck, so I decided to try to make my own. I started with a NOS med length one:
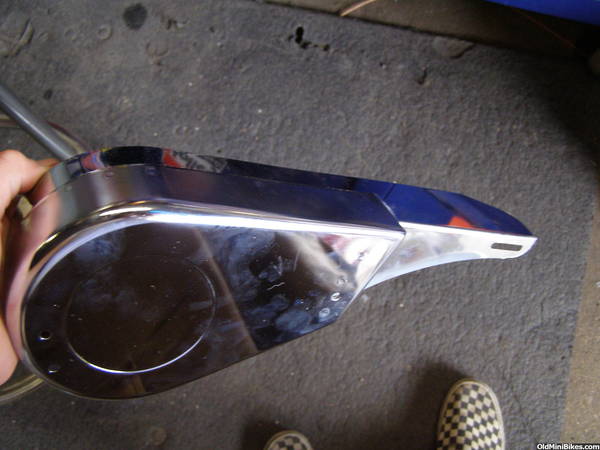
A while back I bought a chrome dress up kit for a semi tractor. Basically it was strips of mirror polished stainless steel, about seven inches wide and VERY thin (about as thick as a beer can or two) with a 3M double sided tape on the back. My plan was to make an extension and slap it on.
Wit some measurements I made a quick pattern:
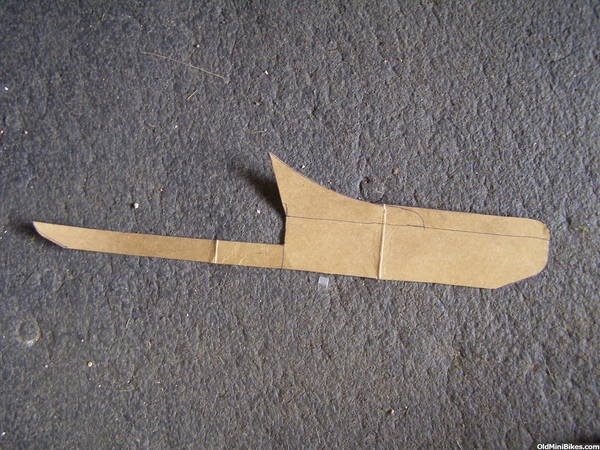
Transferred the pattern to the stainless and since I don't have a brake I clamped it to my press with a piece of 1" square tube. I figured it would help spread the load for a nice clean bend.

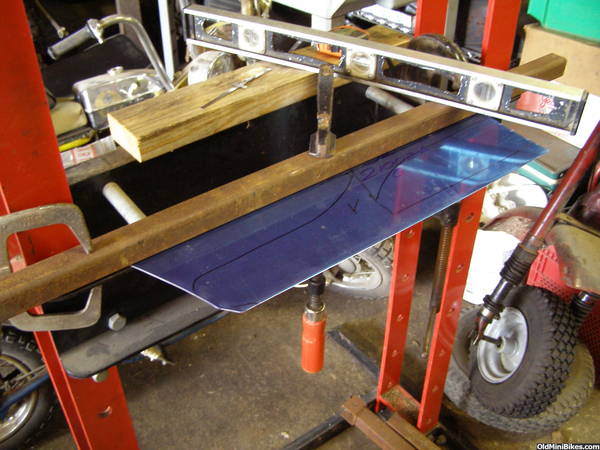
Using a 3' level I carefully bent the stainless to a nice sharp 90 degree. That I was happy with, until I un clamped it and and there was a sharp crease along the top edge, the whole length. Turns out the 1" tube wasn't wide enough and it when I bent the front the back side lifted:doah:
luckilly the stainless was wide enough for two patterns so I flipped it over and tried again with a wider piece clamped to the top.

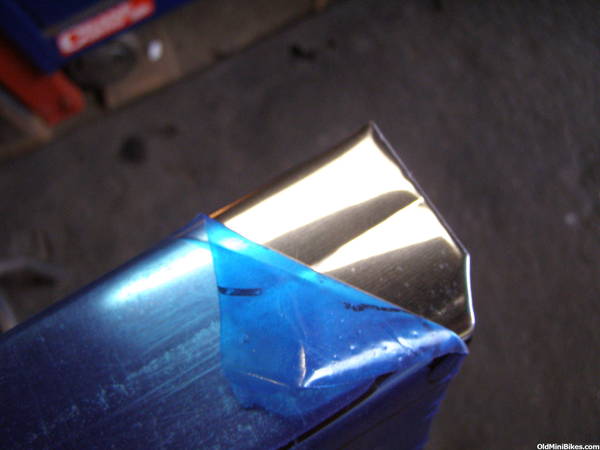
Carefully trimmed it out, then bent the front curl by wrapping it around a small coffee can. When I drilled out the slot on the back edge, the bit slipped and walked a little making the slot look like total crap. This stainless is real thin and a total pain to work with.

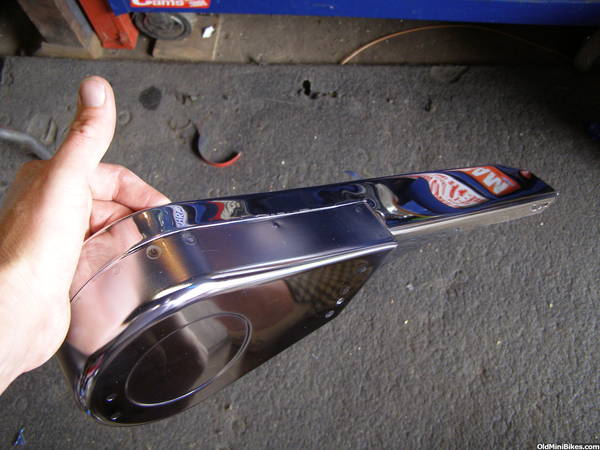
After three attempts and about an hour and a half this is what I came up with. I'm not happy with it at all and my eyes keep going to the crappy drill job on the slot. By this time I was getting pretty frustrated and quickly running out of polished stainless, so I shelved it and haven't touched it since. That was in July:laugh:
A while back I bought a chrome dress up kit for a semi tractor. Basically it was strips of mirror polished stainless steel, about seven inches wide and VERY thin (about as thick as a beer can or two) with a 3M double sided tape on the back. My plan was to make an extension and slap it on.
Wit some measurements I made a quick pattern:
Transferred the pattern to the stainless and since I don't have a brake I clamped it to my press with a piece of 1" square tube. I figured it would help spread the load for a nice clean bend.
Using a 3' level I carefully bent the stainless to a nice sharp 90 degree. That I was happy with, until I un clamped it and and there was a sharp crease along the top edge, the whole length. Turns out the 1" tube wasn't wide enough and it when I bent the front the back side lifted:doah:
luckilly the stainless was wide enough for two patterns so I flipped it over and tried again with a wider piece clamped to the top.
Carefully trimmed it out, then bent the front curl by wrapping it around a small coffee can. When I drilled out the slot on the back edge, the bit slipped and walked a little making the slot look like total crap. This stainless is real thin and a total pain to work with.
After three attempts and about an hour and a half this is what I came up with. I'm not happy with it at all and my eyes keep going to the crappy drill job on the slot. By this time I was getting pretty frustrated and quickly running out of polished stainless, so I shelved it and haven't touched it since. That was in July:laugh:
Aww man, thought ya gave up on this one.:laugh:
Nice stuff Mark.:thumbsup:
Nice stuff Mark.:thumbsup:
Mark, I dig your work shoes in your 1st. guard photo. Classic:thumbsup:
Lmao he is wearing vans.:thumbsup:
Aloha Mr. Hand!
So, if I'm here, and you're here, doesn't that make it our time?:lol:
I've been sportin' Vans since the 80's, super comfy:thumbsup:
I needed a sissy bar for a while and finally found one in nice survivor shape. I've been looking for years, I also needed one for my Eliminator project and they hardly ever come up for sale. So when this one was available, I jumped on it, even though it was more than I wanted to pay I figured when would I see another.....
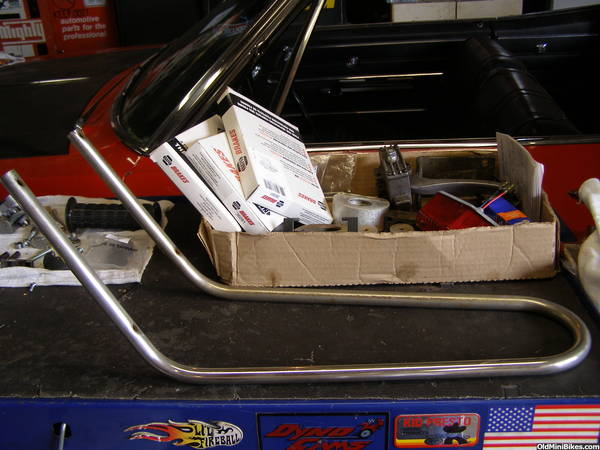


There were some small pits, but it was nice and straight. A lot of these broke at the rear mount holes and this one has survived intact. A little bit of buffin, and it polished up nicely:thumbsup:


So not more than a couple of weeks after I bought this used bar, Mean Dean text me a pic of a whole pile of NOS ones that his buddy just picked up. And he wanted roughly half of what I paid for the used one:doah: