New but already in love!
- Thread starter Lumberjack24
- Start date

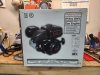
I ended up pulling the trigger tonight! $99 with the fast track membership. Here goes nothing!
View attachment 300551
rod bolts
side cover bolts
head bolts
flywheel nut
set valve lash to .003" on intake and exhaust.
Ain't nothing worse then getting it mounted, and down the road have a rod knocking, oil leak, head gasket blown, or starter cup loose.
These engines are mass produced and quality control is not perfect.
Jus my 2 cents, from experience.
I recommend getting it on the work bench and double check bolt torque specs.
rod bolts
side cover bolts
head bolts
flywheel nut
set valve lash to .003" on intake and exhaust.
Ain't nothing worse then getting it mounted, and down the road have a rod knocking, oil leak, head gasket blown, or starter cup loose.
These engines are mass produced and quality control is not perfect.
Jus my 2 cents, from experience.
I would be happy to do all of these things. Do you happen to know tq specs on these mentioned nuts and bolts? Also should mention that 18 lb valve springs are arriving tomorrow in the mail. Have a few other goodies set aside for it too.
I would be happy to do all of these things. Do you happen to know tq specs on these mentioned nuts and bolts? Also should mention that 18 lb valve springs are arriving tomorrow in the mail. Have a few other goodi
es set aside for it too.
es set aside for it too.
They are actually small studs that will break at 17 ft/lbs.
18 lb springs is a good upgrade. I would break the cam in with the stock springs. Then change em after a good hr or so on a test stand.
Did you get the hemi or non hemi???
They are different.
Thank you for all of the info! Yeah 17 ft/lbs sounds like a bit much to me. Will do. I got the non hemi.
A simple head gasket change to a .009" thickness x 70mm dia. head gasket, will bump it up to 9.0:1, bringing the ft/lbs torq up too, in the same rpm range. The piston sits .020" (+/-.004"), in the cylinder at TDC outta the box, so adding the .009" gasket will still have plenty of room for crank flex.
Drilling the main jet, out from .028" to .031" with a 1/32" drill bit will get it more fuel, and not be overly rich, runs really good with stock air box and muffler. The .028" is way too lean.
Adding a +4 degree advance timing key, will be a nice compliment for the CR bump and extra fuel. They usally around 21-23 degrees advanced, outta the box.
These together will be a very noticeable difference in performance, pull more weight, then any of the stage 1 crap kits supplier's are selling. Jus my opinion, and my experiences. But CR makes torq, torq moves weight, not overly exaggerated hp numbers. Again, jus my opinion.
red beards garage you tube road to housepower 212
Please don't get hung up on those hp numbers, you will be buying useless parts that you dont need anyways. All dynos can be set up to lie, you can make a stock 3hp show it makes 12hp.
What you need to be looking at is where RPM is, at peak torque and peak hp. This is the power band.
I like to bring peak torque in early and get the weight to move off the line, ouuta the hole, from the dig, and not have to run ridiculous gear ratios, and screaming rpm, to get weight to move, especially on mini bikes.
I dont mean to high jack the thread. Theres jus WAY too many over priced, over rated parts that suppliers are making seem like its a "magic part"and works in every size engine, in every build, it's total bs and all they want is for you to keep sending in that card #.
")
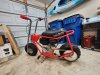
Had a pretty eventful weekend so far. Started out Friday night with stripping the frame down and cutting off some unwanted brackets. Ended up painting the bare metal with some black paint I had laying around. Going to be doing the whole bike a different color here soon.
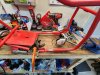
This morning I started out with laying out some new holes for my engine plate. I should know better than to belive the words no cutting necessary.

I then got the engine mounted up. Moved on to the chain and the exhaust. Put the grips back on and hooked the throttle cable up. Put some oil and gas in and and I was about good to go. Lastly I put the seat back on. That dang seat covers the fuel cap for the most part. Going to have to figure something out for that. I decided to take it for a rip around the neighborhood and man did this thing impress me compared to the stock engine. I ended up taking the trumpet style exhaust off and put the stock one back on after the first lap for my neighbors sake.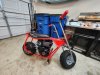

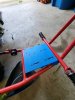
This morning I started out with laying out some new holes for my engine plate. I should know better than to belive the words no cutting necessary.
I then got the engine mounted up. Moved on to the chain and the exhaust. Put the grips back on and hooked the throttle cable up. Put some oil and gas in and and I was about good to go. Lastly I put the seat back on. That dang seat covers the fuel cap for the most part. Going to have to figure something out for that. I decided to take it for a rip around the neighborhood and man did this thing impress me compared to the stock engine. I ended up taking the trumpet style exhaust off and put the stock one back on after the first lap for my neighbors sake.