Vintage Taco 44
- Thread starter MSPTREX
- Start date

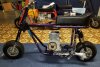
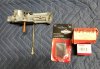
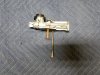
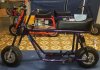
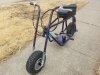
Earlier this week I got the wheel spacers back from being powdercoated and was able to make the bike a roller. Feels good to finally use parts I've had in a box for a couple years. I had the jackshaft set up a couple of different ways and the way in the picture I added was the only way I could get the clutch sprocket to line up with still using a lock collar.
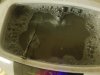
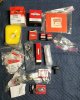
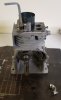
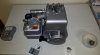
Few small things to finish on the roller but already started on the engine rebuild. Tossed the carb in the ultrasonic cleaner for a couple hours to get it cleaned up. Then threw some genuine Briggs parts at it for a rebuild. Still need to add the modern throttle linkage to it.
Few small things to finish on the roller but already started on the engine rebuild. Tossed the carb in the ultrasonic cleaner for a couple hours to get it cleaned up. Then threw some genuine Briggs parts at it for a rebuild. Still need to add the modern throttle linkage to it.
Attachments
-
 5.6 MB Views: 70
 -
 5.7 MB Views: 72
 -
 4.6 MB Views: 62
 -
 4.2 MB Views: 59
 -
 3.5 MB Views: 56
 -
 4 MB Views: 51
 -
 4.7 MB Views: 50
No big updates on the build right now although I did get a little farther on engine rebuild I will make another post after I am a little farther along with it.
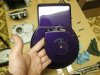
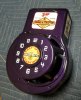
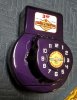
But I would like to share something else I made for a member here sonerenos. Justin has helped me out a ton with my steens bike builds. I actually got this 44 from him plus almost all the hard to find original parts. We have built a great friendship the last couple years and I wanted to show my appreciation somehow.
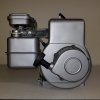
When I had the 44 painted I gave my friend Danny an 3hp pull start cover I had laying around to paint as well. I've made quite a few clocks using old covers so figured I would do a nice taco themed one for Justin. And boy am I glad I did, this thing turned out amazing. Maybe the nicest one I've done yet! (I've made a ton of these)
Couldnt of turned out this good without my buddy Danny laying down the beautiful taco purple, my talented friend Jamie for making the number vinyl, minibikepaul for the awesome water slide decals, and JV Design Co for the reproduction taco sticker on the right side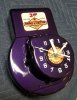 .
.
But I would like to share something else I made for a member here sonerenos. Justin has helped me out a ton with my steens bike builds. I actually got this 44 from him plus almost all the hard to find original parts. We have built a great friendship the last couple years and I wanted to show my appreciation somehow.
When I had the 44 painted I gave my friend Danny an 3hp pull start cover I had laying around to paint as well. I've made quite a few clocks using old covers so figured I would do a nice taco themed one for Justin. And boy am I glad I did, this thing turned out amazing. Maybe the nicest one I've done yet! (I've made a ton of these)
Couldnt of turned out this good without my buddy Danny laying down the beautiful taco purple, my talented friend Jamie for making the number vinyl, minibikepaul for the awesome water slide decals, and JV Design Co for the reproduction taco sticker on the right side
.Attachments
-
 3.3 MB Views: 22
 -
 3.3 MB Views: 23
 -
 2.7 MB Views: 23
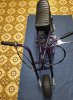
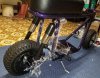
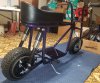
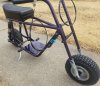
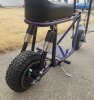
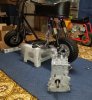
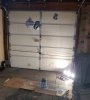
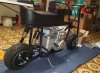
Was a busy weekend for the build. Got a ton done and will make a couple posts this week highlighting it all. Earlier in the week I completely finished the rolling frame. Got everything tightened up, drilled holes in seat base for inserts to install the awesome seat by manchester1, made the rear chain, and removed all the plastic I had covering it from getting scratched.
Had some decent weather over the weekend so took the roller outside for a few pics in natural light. It was overcast outside but still can see everything on the bike much better when not in the basement with not the best lighting. Motor rebuild pics to come.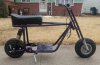
Had some decent weather over the weekend so took the roller outside for a few pics in natural light. It was overcast outside but still can see everything on the bike much better when not in the basement with not the best lighting. Motor rebuild pics to come.
Attachments
-
 4.7 MB Views: 24
 -
 5 MB Views: 24
 -
 6.4 MB Views: 23
 -
 5.2 MB Views: 22
 -
 5.4 MB Views: 26
 -
 6.4 MB Views: 22
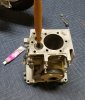
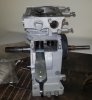
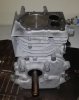
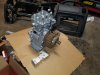
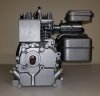
Throughout the week last week I slowly got the motor cleaned up and rebuilt. I bought this engine and was told it ran but never did try it since I planned to rebuild it anyways. The cylinder wall is in pretty good shape but you can tell some moisture might have got into the valvetrain at some point. Finally get to use all these original Briggs branded and NOS parts!
There was some pitting around the exhaust valve seat so I gave both valves a light lapping to be sure they would seal up. After a light hone I got the new rod, piston, and rings installed. Then the rest mostly just fell together after that. I will suggest the cheap $5 valve spring tool off of Ebay. Works great for installing stock springs/retainers in flatheads, doubt it would do an aftermarket set without bending.
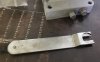
I did use a pto sidecover from an newer engine. It really helps simplify mounting the clutch cover using one of tacominibikes clutch cover brackets instead of using side cover bolts like they did originally. Over the weekend I was able to get it all painted and assembled. Pictures of that to come!
There was some pitting around the exhaust valve seat so I gave both valves a light lapping to be sure they would seal up. After a light hone I got the new rod, piston, and rings installed. Then the rest mostly just fell together after that. I will suggest the cheap $5 valve spring tool off of Ebay. Works great for installing stock springs/retainers in flatheads, doubt it would do an aftermarket set without bending.
I did use a pto sidecover from an newer engine. It really helps simplify mounting the clutch cover using one of tacominibikes clutch cover brackets instead of using side cover bolts like they did originally. Over the weekend I was able to get it all painted and assembled. Pictures of that to come!
Attachments
-
 4.5 MB Views: 23
 -
 2.9 MB Views: 23
 -
 2.1 MB Views: 21
 -
 2.9 MB Views: 19
 -
 3.1 MB Views: 21
 -
 3.3 MB Views: 20
 -
 2.2 MB Views: 20
Excellent work as always Kyle. I'd love to get pictures of our bikes together somehow if mine is ever finished!
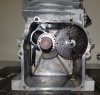
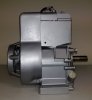
Over the weekend I convinced a friend to let me use his garage to get the Briggs painted. Some pitting here and there that the paint didnt fill in but all in all it turned out pretty good. I didnt get many pictures of the assembly process but it is pretty straight forward.
I ended up buying a Magnetron coil so I didnt have to mess with the points. But I also installed new points and will keep the original coil for a back up. Next up water decals from minibikepaul!
I ended up buying a Magnetron coil so I didnt have to mess with the points. But I also installed new points and will keep the original coil for a back up. Next up water decals from minibikepaul!
Attachments
-
 4 MB Views: 17
 -
 3.2 MB Views: 18
 -
 3.4 MB Views: 17
 -
 2.6 MB Views: 17
 -
 2.5 MB Views: 15
 -
 2.2 MB Views: 15
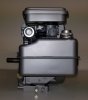
Got the water slide decals from mini bike paul put on, great quality as always. Not a whole bunch left to do to button the build up. Soon I will put oil and gas in the Briggs and run it for a heat cycle, if everything goes well I will set it on the bike where it will stay for a long time, and button up the last few details.
Attachments
-
 2.7 MB Views: 5
 -
 2.7 MB Views: 5
 -
 4.4 MB Views: 5
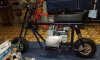
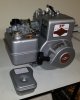
I've been slacking on finishing up the bike. But I did set the motor on the bike for mock up. My next updates will most likely be a completed bike with some more pics.
View attachment 258800
View attachment 258801