Upgrading MM E -1000 electric bikes to Lithium ion batteries.

I74

Well-Known Member
#61
Haven't messed with this bike in quite some time ....
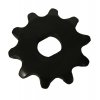
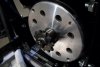
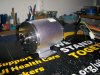
Just ordered an 11t 1/2 bore, #35,, finished B sprocket from Grainger.
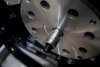
Motor shaft size is 10mm, & I have a finished ''stout'' aluminum bushing, that will fit absolutely perfect between the sprocket & motor shaft.
Will have to mark & drill 2 holes thru the bushing for the set screws,, to contact the motor shaft.

There is no offerings out there for #35 chain 11t - double D slot sprockets for these motor shafts, so I' am going fabricate my own.

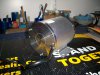
Once I get the bushing holes drilled ect. for the set screws to go thru, I will then mark the motor shaft were they will contact, & use my Dremel for making 2 notches for them,, so the sprocket ect. will be pinned good.

Gear ratio will go from 7.5-1, to 6.8 - 1.
I will step the motor timing back to the stock marks also, & that will help in keeping it from drawing to many amps, & getting hot,, because it will be under more load, with the new gear ratio.

It should give the bike around 2 1/2 - 3 mph more top speed, & definitely tame it down some out of the hole, so ''maybe'' the Wife might ''finally'' take it for a spin. :rolleyes: ''LOL''.

I should have the sprocket Thurs., & will take pics. ect. then ,& give my thoughts on how I like it,, after taking it for a ride.

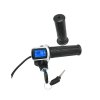
Also am going to hold off for awhile on getting a brushless set up, as this brushed motor & controller that I tweeked & reworked,, work just fine,,, ''for now''.

I
 
#62
What's wrong with the 10T #35 double "D" bore on FleaBay?, just have to get a split sprocket adapter to run your choice of sprockets for the gear ratio that works best for you.

10T Sprocket.jpg
 

I74

Well-Known Member
#63
What's wrong with the 10T #35 double "D" bore on FleaBay?, just have to get a split sprocket adapter to run your choice of sprockets for the gear ratio that works best for you.

View attachment 254029
What's wrong with the 10T #35 double "D" bore on FleaBay?, just have to get a split sprocket adapter to run your choice of sprockets for the gear ratio that works best for you.

View attachment 254029
It's got that ''stock'' 10 tooth on it already, & the B sprocket is only around 9 bucks with tax,, compared to 60+ bucks for the hub, split sprockets,, shipping,,, & hardware ect.

The ratio I was looking for comes out about the same also.;)
 

I74

Well-Known Member
#64
Added,,
Also going with the 11t, & the rear being a 75t,, both sprockets will then be odd numbers, which will make the chain run even smoother, & more efficient. ;)
 
#65
Gotcha, I tried ordering a stock sprocket from MM a while back and they sent me one for the little 250w motor. I totally forgot it came with the 10T, I bought one of those 48v 2000w motors, still haven't done anything with it!.
 

I74

Well-Known Member
#66
The little 250w one is probably for the #25 chain ?

Also in doing this 11t, I won't have to mess with my chain.;)
P/S
If & when you get around to working with your 48V stuff,, you are ''more than welcome'' to post your progress & pics ect. on here.:)
I
 

Itype2slo

Well-Known Member
#67
Scrolled passed this thread forever. Then yesterday for the only 5 minutes I was outside. I spotted my neighbor wheeling one of these into a dumpster in front of his house. I grabbed it he said the battery was dead. This thing seems brand new still has the plastic on the seat. I put it in my garage and went back to football. I will post a pic later and reread this thread.
 

I74

Well-Known Member
#68
Scrolled passed this thread forever. Then yesterday for the only 5 minutes I was outside. I spotted my neighbor wheeling one of these into a dumpster in front of his house. I grabbed it he said the battery was dead. This thing seems brand new still has the plastic on the seat. I put it in my garage and went back to football. I will post a pic later and reread this thread.
''Score''!! :D
 

I74

Well-Known Member
#69
Here is a group of pics of fabricating bushings ect. for the sprocket & shaft.
The shaft is 12mm, & the double D step down is 10mm, with the sprocket bore of 5/8.
The sprocket is actually very nice quality for 9 bucks !
Have just a smidge of fine finishing on the bushings yet, to hit the sweet spot for running 100% true.
I
100_5869.JPG 100_5871.JPG 100_5886.JPG 100_5889.JPG
 

I74

Well-Known Member
#70
I goofed on the sprocket bore size explanation, & lost my edit time limit before I could correct it.
The bore on the sprocket is 1/2 , ''not'' 5/8.
For some reason I must of had 5/8 on the brain. :rolleyes:
''What a stupe'' ''LOL'' :D
 

I74

Well-Known Member
#71
Got it all buttoned up this afternoon & also made a tensioner roller from a skateboard wheel.
Took it for a 10 min. spin, & it is ''very'' smooth.
Seems like it picked up around 3 mph, & when on a flat, or down hill,, it spools up longer.
Since I knocked the timing back to stock,, it doesn't draw anymore than it did with the timing advanced & the stock gearing.:)
Think the wife will have a good time on it, & I won't have to worry about her popping wheelies now.:D
Just got to get her to ride it once, & after that,, I think she will be hooked. ;)
I
 

I74

Well-Known Member
#72
Well,,
Am finally getting ready to order the brushless set up.
Am going with the 36v -1000w ''MY1020'' motor, 1000- 1500w 36 - 48v controller,, & the combo also comes with a 3 spd. switch,,, & full width twist throttle with LCD display, & key switch.
If I get it ordered in the next week, I should have it around the 3rd. week of July,, & have build info & pics. by the end of July.
Here is some pics...
HTB1mvmmaIfrK1RkSnb4q6xHRFXaw.jpg 24V-36V-48V-ebike-throttle-with-LED-display-Indicator-ON-OFF-Key-Lock-for-electric-bike.jpg s-l640.jpg
 

I74

Well-Known Member
#73
Did some more research....

First,
The 3 speed switch is just an upper rpm switch.
The first position is like 80% rpm. the second is the default 100%. & the 3rd, is around 110%.
There is 3 wires out of the controller for this, & all you have to do is jump 2 of the specific wires to get the around 110% top rpm.
Making a jumper wire is a lot more cost effective ect. , just use throttle management.;)

2nd,

The 1020 ''BLDC'' Brushless motor that I'am getting, is rated @ 4Nm. of torque.
The brushed 1020 that's in it, is rated @ 2.8 Nm. of torque.
That's a difference of around 30%.
A Honda GX -100 engine has a torque rating of 4.1Nm.

3rd,,

The gearing I'am running in it right now, is an 11t. motor sprocket ,& 75t for the rear.
That is a ratio of 6.818-1.

With the new motor, I plan on trying a 10t on the motor, & 65t on the rear.
That will give a ratio of 6.5-1.

The current 6.8-1 set up pulls my 205+ lbs. just fine.
With the extra torque & added ''much better'' efficiency of the BLDC motor & controller, I think the 6.5-1 ratio will be the cats @$$.
If that motor spools up like the specs say,, I should be able to hit around 30mph, & not break a sweat.

I will get an infrared rpm meter on it when all hooked up, plus the watt meter,, & share the findings.

Am just going to get the motor & controller ''for now'', & that will save me almost 40 bucks.
Actually found them in Cali. from 2 different vendors, plus cheaper, & ''free'' shipping is within 2 weeks,, supposedly ….
Also found a ''cooler'' throttle/read out assy, for around 19 bucks shipped.
The LCD display is all blue & will match my volt meters, plus it has a speed read out.

I
 
Last edited:

I74

Well-Known Member
#75
Just ordered the motor, controller,, 65t sprocket,, blue display twist throttle,,, & 3 spd. switch.:)

Motor, controller,, & sprocket ,,, should be here within a couple of weeks.
The rest is from China,, & will probably take 3 - 4 weeks.

I
 

I74

Well-Known Member
#76
There is a lot of questions about the ''electric lock'' wire on brushless ESC's.
Am going to make it clear on how ''easy'' it is to wire this up.

The controller that I'am getting has 12 Mosfets.
It is a 36 - 48 volt controller, that will do either.
The Fets & circuitry are stout enough to handle 60 volts.
I'am going to be running a 36 volt set up, with a max charge of 43.2 volts.
The controller should not be working much to full cap. with my set up,, ''which is good''.

The Electric lock wire, a bunch of people are having troubles figuring out....

That wire on my controller is orange, & basically,,, the ''Fets''are the only ones that get powered up when you plug in the batt's.
That is the only part of the circuitry that gets powered up on a Brushless ,, until you power up the ''Elect. lock ''orange'' wire'', which is also called the ''Ign. wire''.
You have to wire in a lead with your + batt. ''feed'' lead @ the controller, & run that wire to your on off switch, & back down to the orange
lead on the controller.

The switch will kick on the rest of the circuitry of the controller.

I will post a pic. of how this runs back & forth @ the controller.

I
 
Last edited:

I74

Well-Known Member
#78
Got burned on my motor order from China. :mad:

Have to be ''real'' careful this point & time, on orders from there ….
Fortunately my Credit card Company put the funds back on my card & will deal with it.

''Do not'' order anything from ''DH-GATE .com''., & make ''Damn'' sure if you order from ''Ali Express'',, that the Vendor has ''real good'' ratings.

Over there,, ''some'' vendors are taking advantage of the Pandemic, & taking Peoples money,, & listing stuff that they don't even have,, ''or had''...
They make their sites look really legit, but they aren't....

''Be careful''.

PS,,
If you really want something from there,, make sure it ships ''DHL''.

I
 
Last edited:

I74

Well-Known Member
#79
7/18/20,

Well,, the motor is in Chicago. The controller is in NY.. Throttle w/ display, is on a plane headed for the US,, as is the 3 spd. switch..
Should see most of it by mid week.

Got the 65t sprocket last week, & it's not as nice as the MM Go kart one that I put on my GX- 200,, but it will work.

I
 

I74

Well-Known Member
#80
Motor arrived this morning.
It is ''tons '' lighter than the brushed one !

Noticed the micro cooling holes on each end were in need of attention.
Took the whole thing apart & pin drilled the holes that need opened up, relieved ,, & dressed.
Also found a few aluminum slivers inside, & cleaned everything up.
Lastly,, I hit the bearings a smidge with some high speed bearing lube.

I also pull the dust seals on the axel bearings on the bikes,, & give them a couple of drops once in a while, when I take the wheels off.
The high speed Skate board lube that I use, works ''great'',, & thins the grease a ''wee bit''.
You can definitely tell the less rolling resistance when you do that. ;)

Couldn't believe how strong the magnetic fields are in this motor !!!
Had to wrap a thin piece of plastic sheet around the armature,, just to get it back in !:eek:

Still looking good for the rest of the stuff by the end of the week. :cool:

I
100_6219.JPG 100_6220.JPG
 
Top