I am in the process of rebuilding a briggs 3 hp. I need some more info on shaving the eyebrows and port and polishing. Where do I polish and what do I leave alone? Where are these eyebrows...? what do I use to polish with..? I have a dremel but what do I use...? I think I would benefit from pictures greatly from pictures... I cannot afford to screw my block or head.... thanks in advance for the help.
eyebrows and port and polish
- Thread starter rimfirekyle
- Start date
- Tags eyebrows polish port
I am in the process of rebuilding a briggs 3 hp. I need some more info on shaving the eyebrows and port and polishing. Where do I polish and what do I leave alone? Where are these eyebrows...? what do I use to polish with..? I have a dremel but what do I use...? I think I would benefit from pictures greatly from pictures... I cannot afford to screw my block or head.... thanks in advance for the help.
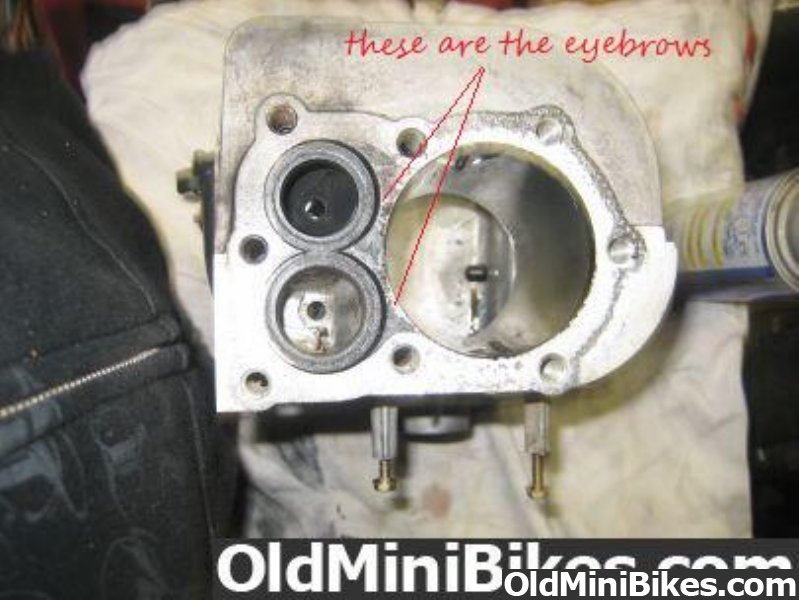
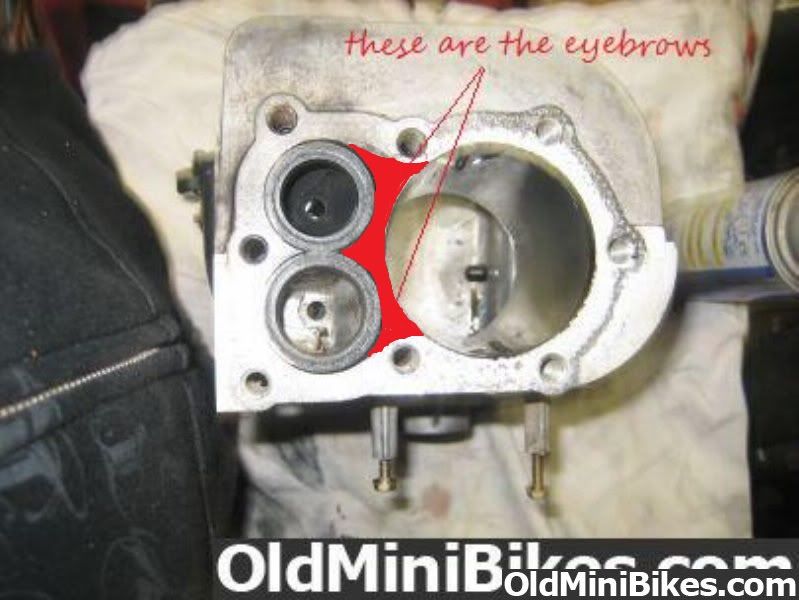
There are some good photos in the OldMiniBikes archives that you can search for that will help you see what it looks like. for the porting just try and smooth out the rough spots in the casting then in the top of the port round off the square edge where it makes the turn up into the valve . What you are trying to do is make the fuels 90 degree turn up to the valve better.Eyebrows are the material around the valves where they seat in the block. What you want to do is make a smooth ramp down into the cylinder from the valves. Be careful not to go below the top piston ring. All of this helps increase the fuel flow through the engine. Try and look at some pictures before you start.
http://img.photobucket.com/albums/v521/65ShelbyClone/deckported2.jpg
http://img.photobucket.com/albums/v521/65ShelbyClone/deckported2.jpg
Last edited:
Leave the intake a little rough to get the fuel to atomize better, and get the exhaust nice and shiny.
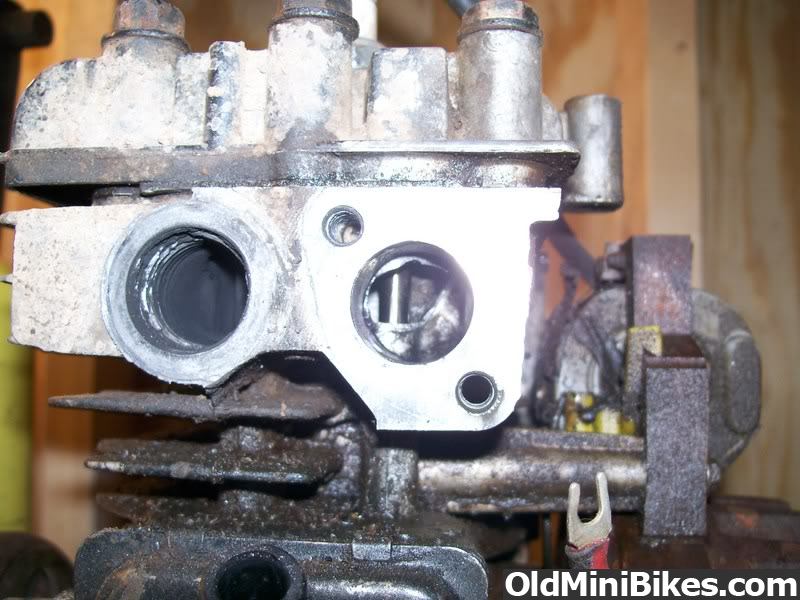
You want to remove material mostly from the 9 to 12 o'clock area of the intake. (while looking straight at both ports)
DO NOT touch the bump on the right side of the intake.
The exhaust port is already too big, file any casting flaws, AND THAT'S IT.
This is not entirely true.
You want to remove material mostly from the 9 to 12 o'clock area of the intake. (while looking straight at both ports)
DO NOT touch the bump on the right side of the intake.
The exhaust port is already too big, file any casting flaws, AND THAT'S IT.
You want to remove material mostly from the 9 to 12 o'clock area of the intake. (while looking straight at both ports)
DO NOT touch the bump on the right side of the intake.
The exhaust port is already too big, file any casting flaws, AND THAT'S IT.
I should have been more specific. That bump is carb support right? And the upper left area has the most flaws.
EDIT: And the bump further back in the block helps direct air towards the left-hand side where it needs to be.
Attached pic is an untouched motor. You can really take A LOT out of the upper left to really smooth it out.
Since the carb is at a slight angle while in place, you want to make it as straight a shot as possible.
Last edited:
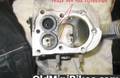
the port on the right has been "polished". basically cleaned real good. the exhaust side hasn't been.
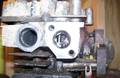
the "eyebrows" have to filed down a tiny bit, maybe 1/16" to 2/8". you can'y go below where the valves are seated. be careful here.
the "eyebrows" have to filed down a tiny bit, maybe 1/16" to 2/8". you can'y go below where the valves are seated. be careful here.


I was thinking about that too,just making a sloped ramp in front of each valve.It might help to separate the intake and exhaust flow through the engine. This is something that would need to be professionally tested to see if it is better.That high spot could also become a hot spot in the chamber as the engine runs. Your best bet is to stay with what is proven to work and that is sloping the whole area. This can be made flat or you can do it rounded. What you are doing is making it a easier turn for the fuel flow down into the cylinder. The little bit that is removed won't lower your compression enough to make any difference
Ok so I have ported and polished woot woot. I took the engine up to the local small engine shop and got a stamp of approval.:thumbsup: I got the eybrows shaved and head milled too. i will be picking up the gasket set tomorrow to start putting this thing back together. i really do appreciate all the help from everyone... i would have been very lost without the help.
Next... I am wanting to run a bigger carb on this engine and make a straight pipe. I have got the straight pipe under controll but I do not know what to do about the carb. I can build a manifold and would love to have a mikuni on it. Can i jet a mikuni down enough to work.... any suggestions on the mikuni or other carbs..... i really dont want a gas tank mounted to my engine...
Next... I am wanting to run a bigger carb on this engine and make a straight pipe. I have got the straight pipe under controll but I do not know what to do about the carb. I can build a manifold and would love to have a mikuni on it. Can i jet a mikuni down enough to work.... any suggestions on the mikuni or other carbs..... i really dont want a gas tank mounted to my engine...
