Mounting a Bike Sprocket on a Stepper Motor

Hymn

New Member
#1
I have a stepper motor with a 18 mm shaft and a 6mm keyway cut into the shaft.

I want to mount a sprocket on the motor shaft that can use a bicycle chain. The chain my bicycle sprocket will use is 1/2" pitch by 1/8" width. I believe this chain is also known as ANSI 43.

My problem is that so far I haven't been able to find a bicycle sprocket that I can mount on my 18 mm shaft. I have come up with a few alternatives, which I will describe below, but if anyone has dealt with this problem or similar I would greatly appreciate the advice.


1)

I take an ANSI 40 sprocket that does mount on my 18 mm motor shaft, and I grind down the teeth on the sprocket until they are narrow enough for the ANSI 43 chain to be slipped over.

This has the advantage of simplicity, but the sprockets are made of 1045 Carbon Steel with hardened spurs. Grinding down the teeth could end up difficult, time consuming, and if I ever want to change the sprockets on my motor to something different I'll have to grind down a new sprocket.


2)

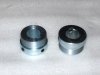
I get a flanged shaft collar (some are sold at McMaster Carr), get an ANSI 40 machinable plate sprocket, and drill holes in the plate sprocket so that I can bolt it to the flanged shaft collar. I would also need to grind down the teeth of the ANSI 40 sprocket until the bike chain could fit on the sprocket.

Below is a picture of the flanged shaft collar.

Flanged Shaft Collar.gif


3)

I get a flanged shaft collar, and then I try to find a bicycle socket whose holes happen to align with the flanged shaft collar's and hope it works.

Seeing as a lot of bicycle sprockets don't list things like bolt hole diameter, I'm not sure how I'd do this besides ordering stuff and hope I get lucky, or buy the flanged shaft collar, visit bike shops, and hold it up to bike sprockets.


4)

I buy a fixed gear hub, take out the axle and all the internal components, slide the hub onto my motor shaft, and then find a way to affix it to my motor shaft. Probably by drilling holes into the hub and installing set screws. Then I just install a normal fixed gear on the hub.

The main problem here is that my motor shaft has an 18 mm diameter, which is significantly wider than most bike axles. Which would mean I'd need to attach a smaller axle to the motor shaft, and then mount the hub on the smaller axle.


These are the main ideas I've come up with so far. Does anyone have any suggestions, or their own ideas? If anyone has any kind of experience with this sort of work, I'd be very interested to hear their advice. Or if you foresee any problems with these methods.

If anything needs to be clarified, just ask. Thanks in advance for any feedback you can give.
 
Last edited:
#2
i would either find a hub that fits and weld a sprocket on it like #3 or grind down a sprocket like you say in #1 . going from #40 down to bicycle size is quite a bit of grinding. iv done 40 to 41 and even that seems excessive but itll work. just dont get it too hot and ruin the temper. machining it down on a lathe would be nice but adapting a bicycle sprocket seems the best method. If you dont have access to a welder then bolting it will obviously be a challenge. but you can drill youre own holes pretty accurately rather than finding pre drilled ones
 

bikebudy

Banned - Must pay $500
#4
BTW, just to help out,

18mm slightly less than 3/4 Inch 0.708

6mm slightly less than 1/4 inch 0.236

What you are looking for should be in this list of pages Staton Inc
 

Hymn

New Member
#8
i would either find a hub that fits and weld a sprocket on it like #3 or grind down a sprocket like you say in #1 . going from #40 down to bicycle size is quite a bit of grinding. iv done 40 to 41 and even that seems excessive but itll work.
Yeah, it's the time-consuming option but we do have our own lathe and the sprockets to grind down. This route has the advantage of requiring parts and equipment we already have.

just dont get it too hot and ruin the temper. machining it down on a lathe would be nice but adapting a bicycle sprocket seems the best method. If you dont have access to a welder then bolting it will obviously be a challenge. but you can drill youre own holes pretty accurately rather than finding pre drilled ones
We do have the sources to weld them on, but we'd probably try bolting it on first. Either by finding a compatible bike sprocket, or by drilling our own holes. That way we would have the option of more easily swapping out sprockets in the future. Still, welding is on the table if we run out of options.

Thanks for your help!

Look at Three Wheel Tricycle hubs. You can also use a threaded hub and then install a bmx hub.

EX; Drive Sprocket For Hollow Hub Trikes


Husky Bicycles: Tricycle Hub & Axle Parts

5/8" ID

It will take some search but, its likely out there.
Huh. These parts in particular don't match, but with a little work we might be able to do something with them.

If nothing else I've never visited these sites before or seen parts like these, so I will definitely be looking closer into them.

BTW, just to help out,

18mm slightly less than 3/4 Inch 0.708

6mm slightly less than 1/4 inch 0.236

What you are looking for should be in this list of pages Staton Inc
What the heck I did some looking around

Hub Here;
Staton Inc

Sprocket choice;
Staton Inc

Good luck :thumbsup:
That hub looks exactly what I'm looking for! I mean it says it's for freewheels but it looks like a solid piece of metal. That should work just fine for fixed gears/track cogs. It'd be nice if they had listed the threading on the adaptor just so I can be sure (although I'm guessing it's 1.37" by 24 tpi), but this ought to be perfect!

Thank you so much for finding this!
 

bikebudy

Banned - Must pay $500
#9
I had been through a lot of this searching already a while back and knew basically where to look.

So I was glad to pass it along and help out. Good luck :thumbsup:
 
#10
Well, I got the 18 mm adapters, plus some track cogs and lock rings.

Results were mixed. Overall successful, but it took some work and I'm not entirely happy with what I was sold. I figured I'd share here, in case anyone is interested or if they're planning similar projects.

I bought four adapters, four track cogs, and four lock rings. The first thing I tried to do was slide the adapters onto my motor shaft.

It didn't work. Four adapters, two motor shafts, and not a single adapter would slide on. That was not a promising start.

Staton 18 mm Adapter Image.jpg

There were several problems with the adapters. First that I couldn't get them over my 18 mm shaft. It was a very close thing, but the ID of the adapter just seems too small. I'm reasonably certain my motor shaft is sized right because I can fit other sprockets sized for 18 mm onto it just fine.

Second was that the 6 mm keyways all had a jagged edge of metal, like they weren't smoothed down afterwards. This was easily fixed with a file, thankfully.

Third was that the keyways were cut to varying depth. The keyways have the right width of 6 mm, but it was plainly visible to the naked eye that some of these keyways have different depths. Furthermore, not a single keyway was sized to fit snugly over the parallel key of my motor shaft. This was tolerable, since I could just tighten down the setscrew onto the key, but it was still sloppy.

And fourth was that despite being advertised as 0.9" wide, the width of the adapters varied from 0.863" to 0.916", which meant some adapters had more or less threading than others. Seeing as I use all of the available threading for the lockrings, I'm rather annoyed by this.


Then I tried putting the track cogs on the adapters. I eventually got two of the cogs on two of the adapters, but the other two were grinding and resisting from the first thread. The lock rings, thankfully, all screwed on smoothly. So at least one thing was going right.


Now, to fix these parts:

For the adapters I had an 18 mm drill bit on hand, so I used it and a lathe to drill through the center of two of the adapters. Simple solution, and it worked.

It's a damn tight fit though. I have to force the adapters onto the shaft with the aid of a mallet, and getting them off pretty much isn't happening without the aid of a gear puller.

Oddly enough, it's easier to slide the adapters on by leading with the threaded end of the adapter. That slid on much more easily than the unthreaded end of the adapter. After fitting more than half the adapter on the shaft, resistance is encountered, but resistance is pretty much immediately encountered by sliding on the unthreaded end first.

This may be because I pushed the drill bit through the threaded end of the adapter first. Not sure why it'd make a difference since I pushed the drill through the entire length of the adapter, but it's possible. Maybe by repeating the process, and drilling through the unthreaded end first, I'll get the entire adapter to slid on smoothly. I'm loathe to mess with a workable product though.


My other choice is to heat the adapters up, get the metal to expand, and then maneuver it onto the motor shaft. I'm not too keen on this since getting it off the motor shaft could be a real pain once the metal shrinks, but the option is there. I'm also worried about the heat causing damage, and getting my hands burnt.


For the track cogs....honestly, I think I might give it up as a lost cause. Two of the track cogs screw on and off, and two of the track cogs don't. Technically two is all I need, for now. Forcing these things onto the adapter and hope they cut new threads into each other just doesn't seem worth it. Plus then I'll probably make the adapters and cogs unusable for anything but each other. I don't think forcing a solution is worth it right now.


So yeah, that's how things are going so far. Successful, usable, but these adapters seem pretty sloppily made. If I put two adapters next to each other I can clearly see how one adapter is wider, how one keyway is deeper, et cetera.

These adapters are cheap at $14 a pop so I can't say I haven't gotten my money's worth. I'm a little peeved that half of the product I bought ended up being useless to me, and that the parts aren't at very least mostly identical to each other. If I can see the problems with my naked eye, someone done goofed.

Where I talked to a customer representative, the only option they had for me was to return the parts and get a refund. So I could return about $50 worth of parts, but I care less about the money and more about getting a set of parts that actually works.

If you guys ever need to buy this kind of product, I'd suggest you be careful about your purchases, consider buying more than you need, and be ready to return what you buy. Odds are if I haven't overbought just in case, I would not have gotten a set of parts that work with each other.


Thanks to everyone for their help, I'll try to update this with future progress in case this is relevant to anyone's interests.

Also, if anyone has any ideas of suggestions, I'm always listening.
 
Top