Back in the day one of the most commonly used taillights for minibikes, both in battery operated kits and stock on "fully loaded" bikes was the PMCO 428 series taillight. All these are were the standard trailer taillight of the times except they were hit with industrial chrome for good looks.
the fact that they are chrome make them really hard to find, not alot of people were going to pimp out thier trailer and spend a couple extra bucks for the chrome so they are not something you can just go pick up, in fact peterson did away with metal housings all together now and went with a plastic housing on the ones they offer now.
Awhile back I was searching vintage trailer parts looking for a taillight lens for a 1968 Apache camper I had, as I also have a thing for compact campers, and came across a set of Doray taillights that were NOS and chrome!!!! Doray was the same vintage as Peterson/pmco in fact probalby earlier, they are the same lights in size shape even the clear lenses were the same as used for the PMCO.
I had to have them, even if I didnt use them for a mini they were gonna be great on an antique camper!! So I bid and won them paid about $50 for the pair.
The downside to these were they have the flat universal base on the bottom which does no jive with what the mini bike companies used. The upside though is the chrome is 10 times better than what PMCO used, I have actually bought and resold probably 4 orginal PMCO lights both original off bikes and NOS ones since I have had these Doray's and nothing came close to the shine and depth.
one on the left I modded already, on the right is how they looked out of the box:

this mod probably wont help alot of people, I have kept a lookout trying to locate more of these and they are just as hard to come by as the PMCO's but if you do come across a cool chrome light with this mount and want to retrofit it to your ride heres what I did to make it work:
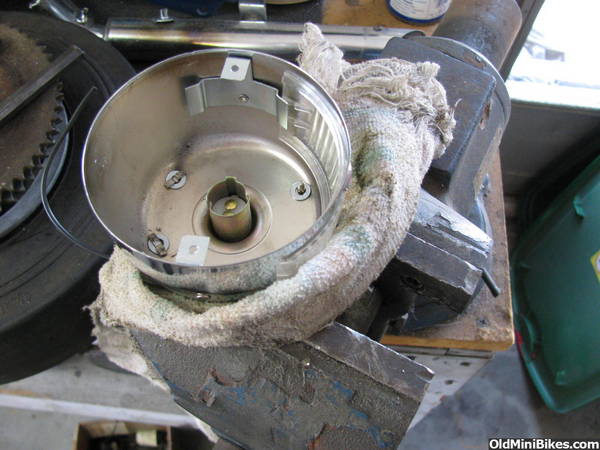
First I used the correct sized bit and drilled out the rivets form the inside to remove the bracket:


so you simply place the rivet in the hole, add the washer and peen over the edges of the rivet. Easier said than done actually as your working in tight quarters and trying not to mar the chrome!!!

I could not hold the light and peen the ends over at the same time so you don't get to see that :wink: But I used a small chisel and tapped into the cut of the rivet to spread it a little then used a round blunt to flatten it out. They are Aluminum so not alot of force is needed but enough that a small hammer helps so be gentle and watch that you dont slip!!!!!!!!!!!!!!
now that thats done, how are you gonna mount it to the bike :doah:
I placed the bracket back onto the light and marked where holes should be, you want to make sure you position it correctly so the plate light (if equipped) is centered on the bottom as well as the stamping needs to be on the top.

I had an optional bonanza taillight bracket on hand to re-verify that everything would line up (spacing was all the same between bike makers/kits)

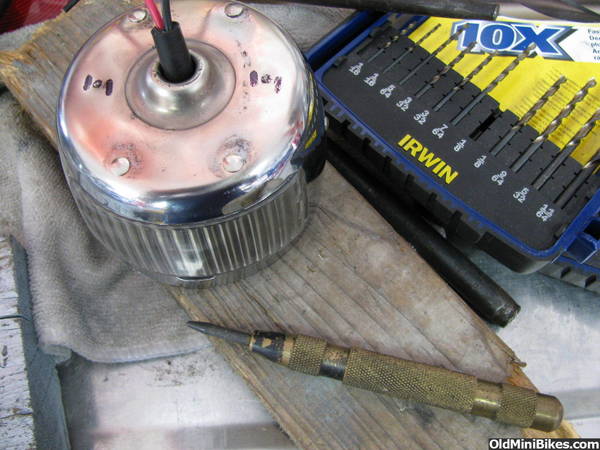
After being sure where to drill the holes I center punched them and drilled
Now the hardware to mount these lights were carriage bolts (square holes),
so I broke out a small file and squared the holes, and it files easier than you think so you want to just square the hole at first and slowly open it up till the bolt barely goes through with some force.

the carriage bolts usually come with the taillights, they are actually the same as the ones that come pre-installed on the lights without the universal mount. They are just peened over on the corners so they dont slip out-I dont have a tool for that :doah: thats one reason for making the square hole a real tight fit.
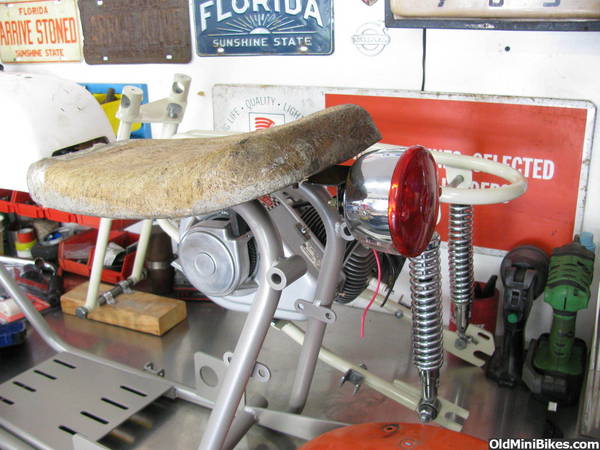
Shazam! all done and test fitted on the bike :thumbsup:
This mod worked out good, as stated above I bought the pair for $50, I modded them for about $3-4 bucks in parts, I sold one and cleared about $112 after ebay and PP fees, and I am using the other on my MX rebuild :thumbsup:
the fact that they are chrome make them really hard to find, not alot of people were going to pimp out thier trailer and spend a couple extra bucks for the chrome so they are not something you can just go pick up, in fact peterson did away with metal housings all together now and went with a plastic housing on the ones they offer now.
Awhile back I was searching vintage trailer parts looking for a taillight lens for a 1968 Apache camper I had, as I also have a thing for compact campers, and came across a set of Doray taillights that were NOS and chrome!!!! Doray was the same vintage as Peterson/pmco in fact probalby earlier, they are the same lights in size shape even the clear lenses were the same as used for the PMCO.
I had to have them, even if I didnt use them for a mini they were gonna be great on an antique camper!! So I bid and won them paid about $50 for the pair.
The downside to these were they have the flat universal base on the bottom which does no jive with what the mini bike companies used. The upside though is the chrome is 10 times better than what PMCO used, I have actually bought and resold probably 4 orginal PMCO lights both original off bikes and NOS ones since I have had these Doray's and nothing came close to the shine and depth.
one on the left I modded already, on the right is how they looked out of the box:

this mod probably wont help alot of people, I have kept a lookout trying to locate more of these and they are just as hard to come by as the PMCO's but if you do come across a cool chrome light with this mount and want to retrofit it to your ride heres what I did to make it work:
First I used the correct sized bit and drilled out the rivets form the inside to remove the bracket:

so you simply place the rivet in the hole, add the washer and peen over the edges of the rivet. Easier said than done actually as your working in tight quarters and trying not to mar the chrome!!!


I could not hold the light and peen the ends over at the same time so you don't get to see that :wink: But I used a small chisel and tapped into the cut of the rivet to spread it a little then used a round blunt to flatten it out. They are Aluminum so not alot of force is needed but enough that a small hammer helps so be gentle and watch that you dont slip!!!!!!!!!!!!!!
now that thats done, how are you gonna mount it to the bike :doah:
I placed the bracket back onto the light and marked where holes should be, you want to make sure you position it correctly so the plate light (if equipped) is centered on the bottom as well as the stamping needs to be on the top.

I had an optional bonanza taillight bracket on hand to re-verify that everything would line up (spacing was all the same between bike makers/kits)

After being sure where to drill the holes I center punched them and drilled

Now the hardware to mount these lights were carriage bolts (square holes),
so I broke out a small file and squared the holes, and it files easier than you think so you want to just square the hole at first and slowly open it up till the bolt barely goes through with some force.

the carriage bolts usually come with the taillights, they are actually the same as the ones that come pre-installed on the lights without the universal mount. They are just peened over on the corners so they dont slip out-I dont have a tool for that :doah: thats one reason for making the square hole a real tight fit.
Shazam! all done and test fitted on the bike :thumbsup:

This mod worked out good, as stated above I bought the pair for $50, I modded them for about $3-4 bucks in parts, I sold one and cleared about $112 after ebay and PP fees, and I am using the other on my MX rebuild :thumbsup:
Last edited:
