Champion Rocker Cracked intake, Vacuum leak at intake manifold (RTV RED?)

#1
Hello all,

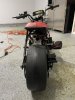
Decided to open up the cylinder head to check for any issues since during this seasons start up noticed putting the choke / enrichment circuit off the engine would die. I figure it’s a lean condition caused from a vacuum leak at the intake manifold.

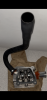
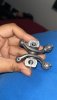
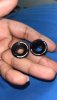
I open the cylinder head up, and notice the champion rockers are cracked by the intake valve base / shaft. What could cause this? I was running 60 lb dual springs going down to 37 lb singles now. My thought were too much spring pressure or pushrod gemotry (push rods bit long due to milling of head .065” possiblity? Also put up a picture of the retainers showing that the rocker arm was not centered. The champion rockers were hitting on the bottom side of the retainer IMG_4172.jpeg
IMG_4173.jpeg
IMG_4176.jpeg
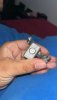
I got a new cylinder head on the way, red RTV sealant (to use around the outside of gasketed areas / on bolts) , and a new intake manifold as well.

Are there any other common areas for vacuum leaks? My engine works strong with choke on, but once I turn it off it dies (I went through the carb 24mm pwk 140 main 32 pilot needle in needle 2 1/2 turns on adjustment screw) could there be a leak somewhere at the carb gaskets? The carb was cleaned before start up. Appreciate anyone’s insight this is the final stretch, and need to get this thing air tight!!!

IMG_4103.jpeg IMG_4101.jpeg
 

SAS289

Well-Known Member
#2
For the rocker issue you may want to get a push rod length tool to get a more accurate push rod you need once you get new rockers. By the looks of the adjusters your push rods may be a little too long like you said. You may be able to afford 100 thou less than your current push rods. But the tool is better than me guessing. And you would still need to have a close look at the clearance between the keepers and the rockers.

Not sure about the vacuum leak.

Bike looks like it's going to be pretty bad ass when done. What cam did you use?
 
#3
For the rocker issue you may want to get a push rod length tool to get a more accurate push rod you need once you get new rockers. By the looks of the adjusters your push rods may be a little too long like you said. You may be able to afford 100 thou less than your current push rods. But the tool is better than me guessing. And you would still need to have a close look at the clearance between the keepers and the rockers.

Not sure about the vacuum leak.

Bike looks like it's going to be pretty bad ass when done. What cam did you use?
That’s exactly my guess on the pushrods needing to be 100 thou less in length! That would get the proper valve train geometry, and correct the rocker issue. I have another set of champion rockers on the way. Hoping that combined with less spring pressure will take care of unneeded strain on those components.

Appreciate the kind words it’s an extended motovox 6” (mini bike Larry extension tabs) with bigger hydraulic brakes. I used the 308 camshaft love the sound of it, and it pulls like a bear. Got this motor on a previous set up to 60.8mph, and that’s with the vacuum issue / cracked intake rocker shaft. I’m hoping after I seal her up, replace the rockers that I can get her up to 65/70mph I’d be more than happy with that.

My engine build:
Pwk 24mm flat slide carb
140 main/32 pilot/silver needle middle
Af 2.5 Turns out

212cc stock bore/stock stroke
27/25mm cylinder head stainless steel valves
37 lb Valve Springs
Aluminum retainers
Split locks
Light weight lash caps
Chrome moly push rods 5.260” (needs bit shorter)
Champion rockers
.010” head gasket
308 dyno cams camshaft
Arc +.020 billet rod
Flat top piston .550 compression height
24mm pwk carb (140 main, 32 pilot, silver needle middle)
12/60 - 5.0 gear ratio
15x6.00-6 Kenda K404 Read Slick

IMG_8485.jpeg
 
#4
Are you aware that for proper rocker arm geometry with a fixed fulcrum rocker you need to set both valve side geometry and then the pushrod side. For the stanchions to break took some force or they were bad to start. Did you check for min of .060 coil spacing at max lift? What is hitting the retainers? the bottom of the rocker?
 
#5
Are you aware that for proper rocker arm geometry with a fixed fulcrum rocker you need to set both valve side geometry and then the pushrod side. For the stanchions to break took some force or they were bad to start. Did you check for min of .060 coil spacing at max lift? What is hitting the retainers? the bottom of the rocker?
Set both valve side geometry? By adding washers under the rockers or by longer / short valves? Not quiet sure what you mean here? As for valve length they're stock 2.580" on both intake / exhaust. Push rods stock length 5.260", but head was milled .065" with .010 thin gasket. Difference of about .095" from stock configuration. I'm going with 5.160 chrome moly pushrods to remedy this so the rockers will actually hit the lash caps and not retainers. Could I always add a washer under the champion rockers to shim it a bit if needed?

The springs were installed at correct heights I do not think it was coil bind. There was a couple of start ups with no load I hit high rpms without the throttle control set up (might have damaged rockers?). I'm thinking that is what might have broke the stanchion / base of the champion rocker at the intake side. I believe the bottom of the rockers are hitting the retainers due to long push rods. The adjustment points on the champion rockers were almost turned all the way out. .100 shorter push rods may help.

As for the intake manifold area I went with M6 25mm studs instead of using m6 bolts to hold the intake manifold to cylinder head. The M6 x 25MM studs along fresh gaskets with red rtv silicone around the outside & bolt heads will take care of my vacuum leak issues hopefully.
 
Last edited:
#6
I went to regular intake manifold bolts (allen head style), and used RTV red on the outside of my intake manifold gaskets / manifold / bolt heads. I also used the red rtv silicone on my exhaust gasket, and it turned out awesome! I shimmed the bottom of the champion rockers, played around with head gasket thickness (went to fire ring .040), and got the valve geometry spot on with .002 on intake .0025 on exhaust valves. Started up first pull!

I have to get the pilot changed out as its too lean at 32.

140 main (probably rich, but now its testing time)
32 pilot, but changing to 42 pilot (worked on previous build not sure why 32 pilot is in here)

I'll keep updating the thread so if anyone else has these issues they can troubleshoot it.

p.s. rtv red totally worth it just don’t overdo it on intake manifold I just used on exterior of gasket / intake manifold to seal it in. May look a bit messy, but it got the job done. IMG_9507.png IMG_9508.png IMG_9510.png
 

panchothedog

Well-Known Member
#7
I think with you changing to the 37 lb springs you will be fine running the champion rockers. I was told by Eric Adams ( the Grey Goat ) that most anything over 50 lb is cause for using the Gage rollers. The way yours cracked on the bottom looks more like poor valve train geometry rather than spring pressure. BTW I like your bike. I have 4 built engines. 2 196cc clones, and 2
212cc predators. 3 of them run the champions, and 1 has the Gage rollers.
Love the champions. Great product for the money.
 
#8
I think with you changing to the 37 lb springs you will be fine running the champion rockers. I was told by Eric Adams ( the Grey Goat ) that most anything over 50 lb is cause for using the Gage rollers. The way yours cracked on the bottom looks more like poor valve train geometry rather than spring pressure. BTW I like your bike. I have 4 built engines. 2 196cc clones, and 2
212cc predators. 3 of them run the champions, and 1 has the Gage rollers.
Love the champions. Great product for the money.
Yeah I feel a lot better going with the 37 lb red stripe instead of the 60 lb dual springs. I shimmed up the intake valve side to get the proper spring height for the lbs needed. I agree valvetrain geometry was the culprit here & adjustments with head gasket thickness / shimming champion rockers at the studs got this dialed in.

I love the champions can’t beat it for the price I had the 1.3 gage roller rockers before they’re a pretty piece!! What cam you running in the build with the 1.3?

Ty for the kind words I love the motovox frame!!
 
Last edited:
#9
I'm surprised nobody has mentioned this, yet. RTV gets soft and slimy when exposed to gasoline. It may seem to work for a while, but if you start getting weird idle issues your RTV might be failing.
 
#10
I'm surprised nobody has mentioned this, yet. RTV gets soft and slimy when exposed to gasoline. It may seem to work for a while, but if you start getting weird idle issues your RTV might be failing.
Yeah the red RTV is on the outside of the intake manifold / gasket area to prevent any leaks not sandwiched between the gasket to intake manifold.

I only put the red rtv on the exhaust side cylinder head exit to exhaust gasket / then on gasket to exhaust.
 
#11
Set both valve side geometry? By adding washers under the rockers or by longer / short valves? Not quiet sure what you mean here? As for valve length they're stock 2.580" on both intake / exhaust. Push rods stock length 5.260", but head was milled .065" with .010 thin gasket. Difference of about .095" from stock configuration. I'm going with 5.160 chrome moly pushrods to remedy this so the rockers will actually hit the lash caps and not retainers. Could I always add a washer under the champion rockers to shim it a bit if needed?

The springs were installed at correct heights I do not think it was coil bind. There was a couple of start ups with no load I hit high rpms without the throttle control set up (might have damaged rockers?). I'm thinking that is what might have broke the stanchion / base of the champion rocker at the intake side. I believe the bottom of the rockers are hitting the retainers due to long push rods. The adjustment points on the champion rockers were almost turned all the way out. .100 shorter push rods may help.

As for the intake manifold area I went with M6 25mm studs instead of using m6 bolts to hold the intake manifold to cylinder head. The M6 x 25MM studs along fresh gaskets with red rtv silicone around the outside & bolt heads will take care of my vacuum leak issues hopefully.
Watch this video to get the concept then keep in mind you do not have rollers but adjusters on the valve side. You want to check your mid lift geometry so that a imaginary line thru the center of the axle to the tip of the adjuster is parallel to the gasket surface. Your valve side geometry is adjusted by a combination of pedestal height and adjuster position. Bing Videos
 
Last edited:
#12
Watch this video to get the concept then keep in mind you do not have rollers but adjusters on the valve side. You want to check your mid lift geometry so that a imaginary line thru the center of the axle to the tip of the adjuster is parallel to the gasket surface. Your valve side geometry is adjusted by a combination of pedestal height and adjuster position. Bing Videos
Appreciate the advice & video.

I did make sure the contact point from the champion rocker adjusters to the lash caps were as close to the center as possible during all stages of lift (mid lift/max lift/0 lift), and with the shimming (one .0625" washer) on each side of the champion studs it helped the geometry along with the thicker head gasket (.030+).

This gave me an additional .0925" of increased height, and helped correct my geometry. The rocker arm does not contact the retainers at all, and the contact points are centered of the lash caps. She's purring!!!!
 
#14
It seems a crack in the rocker could affect valve performance enough to require help from the enrichener/choke. None of my business but I would have held off on the sealant.
Could of been a possibility, but in my case it was the small pilot I had in which was 32. I bumped it up to 42 pilot and starts idles with choke off. The sealant was a bit extra if I find it to cause any issues I can always peel it off no big deal. In my case everything is operating smoothly, and it wasn't a vacuum leak it was too lean of a pilot jet.

140 Main
42 pilot
Is installed currently, and just hit 62mph on first test ride @ 6990 rpm few burnouts in there too. I still need to tune it main is a bit rich, but riding real niceee
 

Davis

Well-Known Member
#15
I went to regular intake manifold bolts (allen head style), and used RTV red on the outside of my intake manifold gaskets / manifold / bolt heads. I also used the red rtv silicone on my exhaust gasket, and it turned out awesome! I shimmed the bottom of the champion rockers, played around with head gasket thickness (went to fire ring .040), and got the valve geometry spot on with .002 on intake .0025 on exhaust valves. Started up first pull!

I have to get the pilot changed out as its too lean at 32.

140 main (probably rich, but now its testing time)
32 pilot, but changing to 42 pilot (worked on previous build not sure why 32 pilot is in here)

I'll keep updating the thread so if anyone else has these issues they can troubleshoot it.

p.s. rtv red totally worth it just don’t overdo it on intake manifold I just used on exterior of gasket / intake manifold to seal it in. May look a bit messy, but it got the job done. View attachment 312896 View attachment 312897 View attachment 312898
I’m sorry man and I see everyone else is being nice but that hack job you just caked on your motor is just wrong. If youre going to go to the measuring valve lengths to make thing correct you should go the extra gasket mile.
 

panchothedog

Well-Known Member
#17
Not very relevant to your thread, but to answer your question, I am using the
1.2 to 1 Gage rockers. The cam has a lift .310", and the 1.3 to 1 rockers was going to cause coil bind. That particular engine has dual valve springs, I think they're 55lb, so I use the Gage as much for the added strength. For me, the biggest drawback is I like to check head bolt tightness every so often and with the Gage you have to remove them. With the Champions, the socket first right in.
 
#18
Not very relevant to your thread, but to answer your question, I am using the
1.2 to 1 Gage rockers. The cam has a lift .310", and the 1.3 to 1 rockers was going to cause coil bind. That particular engine has dual valve springs, I think they're 55lb, so I use the Gage as much for the added strength. For me, the biggest drawback is I like to check head bolt tightness every so often and with the Gage you have to remove them. With the Champions, the socket first right in.
.372 lift sounds fun!! The gages are a quality piece better then the ones EC offers. I’m done with this build for now might do a 263 build next building these little motors are addicting hah
 
Last edited:
Top