I recently picked up this '71 Kawasaki MT1 from a coworker.
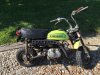
His dad bought it new in the spring of '70 when he was stationed in Nebraska. It traveled with him to about 6 or 7 different states and has been to Germany and back. It still has California license plates on it. His dad passed away 2 years ago. He told me about it several years back, but I had never seen it. I asked him to ask his mom if she'd be interested in selling it and here it is. It needs a some TLC all the way around, but I think it'll all be minor. He said he had it running a couple years ago and the fuel had been treated. It had good compression, but I wanted to check some things out before trying to fire it up.
I'd guess this thing is about 98% complete. The only thing that I can really see that it's missing is the right side throttle grip and the right foot peg rubber. The other thing that I'm noticing is that parts are scarce for this thing and the guys that have the NOS parts are very proud of them. $95 for a throttle cable, $35 for ONE steering stem bearing, $45/set of brake shoes... no thanks. I worked a motorcycle parts counter for 5-6 years and got pretty good at finding the 'unobtanium'. It's all about cross referencing. I've found that, at times, manufacturers like to assign a different part number based on model, but the part is identical.
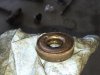
When I got it home the tires were flat, but I aired them up and they've been holding air for several weeks now. The front suspension was very loose. I suspected worn steering bearings, so I pulled the front end. I had a bit of trouble getting the steering stem out because the bearing races had cut a groove in the stem, on top and bottom bearings, basically knurling the stem. I had to file off the knurl to get the top washer off. The bearings were dry and rusty, so I sprayed them out with some brake cleaner as best as I could and packed them with grease as well as I could. The other day I actually replaced them with a tapered roller bearing. I used a pair of 30203 tapered bearings I found online for $4 each. The stock bearings have a 3mm thick washer underneath them, which were too thick to use with the tapered bearings. I made new thinner washers from a piece of scrap 16 gauge sheet steel (~1.5mm thick) and cut to approx diameter on the bandsaw. I drilled a 1/4" hole in the center and chucked them in the drill press and used a file to true up and reduce the outer diameter to the correct size. I then enlarged the center holes with a 3/4" step bit. With the thinner washers, the tapered bearings work perfectly and really firmed up the front end. Here's what the old bearings looked like. The upper race is crimped into the lower race and there's basically no inner race. It's a pretty terrible design for a bearing but I bet they are cheap to produce...:facepalm:
The fuel tank was still mostly full of fuel and I was told that the fuel had stabilizer added (when?). As far as I can tell, there's no rust in the fuel tank, but I didn't strike a match to provide better lighting. :laugh: I pulled the carb off as it looked as though it had 20 years of fuel soaked dust caked on it. The float bowl still had fuel in it, but I was pleasantly surprised that the inside of the carb looked as good as it did. The fuel in the tank must have been before they started lacing the stuff with ethanol - which turns the insides of carbs green after sitting for just a few months. I disassembled the carb and soaked it in carb cleaner for a little while and then scrubbed it clean with an old toothbrush. Blew through all the passages with compressed air and reassembled. I verified that the float height was set 13/16" above the bowl gasket surface.
I drained the fluids - oil, transmission, and fuel and replaced them with fresh. I also found that the short section of the split cable that goes to the carb was frayed and catching on the cable ferrule. I spent many years building custom length cables, so there's no way I'm paying $95 for a NOS OEM cable. I got in touch with a former co-worker who happened to have the brass carb side cable ends. I stopped by Walmart and grabbed a brake/shifter cable kit for a bicycle ($7) that I use as donor bulk wire and cable housing. I just needed to replace the inner wire for this repair, as the splitter and housing were fine. I made a video of that process.
https://www.youtube.com/watch?v=CuQJCDgPMFs
I stopped by the fabric store to grab some 1/2" thick seat cushion foam to make a new air filter. The foam they sell there is the same exact foam that UNI sells as bulk filter foam, only it's way cheaper than buying from UNI. I just used scissors to cut it to width to fit the filter cage, wrapped it around the cage and marked where the ends overlap. Cut to length and then used hot melt glue to stick the ends of the foam together. I only bought 12" of foam, but I have enough for probably 10+ filters.
With new fluids and an air filter, I was getting close to trying to start it for the first time. I decided to verify that it had fire, so I pulled the plug. The plug looked pretty dark, but it still should have been ok. Hooked the plug wire up and grounded the plug to the head and kicked it. No spark.
I started preliminary checks, no shorts in the ignition coil windings, but the secondary winding was 25k ohm which was too high. I pulled the plug cap off and remeasured - 6k ohm. That's better, but that means the plug cap was almost 20k ohm resistance. From what I have found, it's only supposed to be ~5k ohm. I grabbed a new plug and spark plug cap from the local shop. No dice. I verified that the points were opening, but had no way to check the condenser. I found specs for the source coil (1.6 ohm) and measured it - 0.4 ohm. Low resistance indicates a short within the windings. :censure:. I pulled the flywheel off and found this.
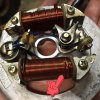
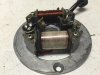
I decided that instead of shelling out $$, I'd try to rewind it myself first. If I failed, then I'd spend the money. I can happily say that I successfully rewound the coil myself using stuff I already had laying around. It cost me $0 for this repair and only took about 2 hours start to finish. Here's the repaired coil mounted to the stator plate. I made a video of that process too.
https://www.youtube.com/watch?v=632U6YPChQA
After repairing the coil and reinstalling the stator, the thing fired up after just a few kicks. Not bad for a 45 year old bike that has been sitting dormant for several years.
His dad bought it new in the spring of '70 when he was stationed in Nebraska. It traveled with him to about 6 or 7 different states and has been to Germany and back. It still has California license plates on it. His dad passed away 2 years ago. He told me about it several years back, but I had never seen it. I asked him to ask his mom if she'd be interested in selling it and here it is. It needs a some TLC all the way around, but I think it'll all be minor. He said he had it running a couple years ago and the fuel had been treated. It had good compression, but I wanted to check some things out before trying to fire it up.
I'd guess this thing is about 98% complete. The only thing that I can really see that it's missing is the right side throttle grip and the right foot peg rubber. The other thing that I'm noticing is that parts are scarce for this thing and the guys that have the NOS parts are very proud of them. $95 for a throttle cable, $35 for ONE steering stem bearing, $45/set of brake shoes... no thanks. I worked a motorcycle parts counter for 5-6 years and got pretty good at finding the 'unobtanium'. It's all about cross referencing. I've found that, at times, manufacturers like to assign a different part number based on model, but the part is identical.
When I got it home the tires were flat, but I aired them up and they've been holding air for several weeks now. The front suspension was very loose. I suspected worn steering bearings, so I pulled the front end. I had a bit of trouble getting the steering stem out because the bearing races had cut a groove in the stem, on top and bottom bearings, basically knurling the stem. I had to file off the knurl to get the top washer off. The bearings were dry and rusty, so I sprayed them out with some brake cleaner as best as I could and packed them with grease as well as I could. The other day I actually replaced them with a tapered roller bearing. I used a pair of 30203 tapered bearings I found online for $4 each. The stock bearings have a 3mm thick washer underneath them, which were too thick to use with the tapered bearings. I made new thinner washers from a piece of scrap 16 gauge sheet steel (~1.5mm thick) and cut to approx diameter on the bandsaw. I drilled a 1/4" hole in the center and chucked them in the drill press and used a file to true up and reduce the outer diameter to the correct size. I then enlarged the center holes with a 3/4" step bit. With the thinner washers, the tapered bearings work perfectly and really firmed up the front end. Here's what the old bearings looked like. The upper race is crimped into the lower race and there's basically no inner race. It's a pretty terrible design for a bearing but I bet they are cheap to produce...:facepalm:
The fuel tank was still mostly full of fuel and I was told that the fuel had stabilizer added (when?). As far as I can tell, there's no rust in the fuel tank, but I didn't strike a match to provide better lighting. :laugh: I pulled the carb off as it looked as though it had 20 years of fuel soaked dust caked on it. The float bowl still had fuel in it, but I was pleasantly surprised that the inside of the carb looked as good as it did. The fuel in the tank must have been before they started lacing the stuff with ethanol - which turns the insides of carbs green after sitting for just a few months. I disassembled the carb and soaked it in carb cleaner for a little while and then scrubbed it clean with an old toothbrush. Blew through all the passages with compressed air and reassembled. I verified that the float height was set 13/16" above the bowl gasket surface.
I drained the fluids - oil, transmission, and fuel and replaced them with fresh. I also found that the short section of the split cable that goes to the carb was frayed and catching on the cable ferrule. I spent many years building custom length cables, so there's no way I'm paying $95 for a NOS OEM cable. I got in touch with a former co-worker who happened to have the brass carb side cable ends. I stopped by Walmart and grabbed a brake/shifter cable kit for a bicycle ($7) that I use as donor bulk wire and cable housing. I just needed to replace the inner wire for this repair, as the splitter and housing were fine. I made a video of that process.
https://www.youtube.com/watch?v=CuQJCDgPMFs
I stopped by the fabric store to grab some 1/2" thick seat cushion foam to make a new air filter. The foam they sell there is the same exact foam that UNI sells as bulk filter foam, only it's way cheaper than buying from UNI. I just used scissors to cut it to width to fit the filter cage, wrapped it around the cage and marked where the ends overlap. Cut to length and then used hot melt glue to stick the ends of the foam together. I only bought 12" of foam, but I have enough for probably 10+ filters.
With new fluids and an air filter, I was getting close to trying to start it for the first time. I decided to verify that it had fire, so I pulled the plug. The plug looked pretty dark, but it still should have been ok. Hooked the plug wire up and grounded the plug to the head and kicked it. No spark.
I started preliminary checks, no shorts in the ignition coil windings, but the secondary winding was 25k ohm which was too high. I pulled the plug cap off and remeasured - 6k ohm. That's better, but that means the plug cap was almost 20k ohm resistance. From what I have found, it's only supposed to be ~5k ohm. I grabbed a new plug and spark plug cap from the local shop. No dice. I verified that the points were opening, but had no way to check the condenser. I found specs for the source coil (1.6 ohm) and measured it - 0.4 ohm. Low resistance indicates a short within the windings. :censure:. I pulled the flywheel off and found this.
I decided that instead of shelling out $$, I'd try to rewind it myself first. If I failed, then I'd spend the money. I can happily say that I successfully rewound the coil myself using stuff I already had laying around. It cost me $0 for this repair and only took about 2 hours start to finish. Here's the repaired coil mounted to the stator plate. I made a video of that process too.
https://www.youtube.com/watch?v=632U6YPChQA
After repairing the coil and reinstalling the stator, the thing fired up after just a few kicks. Not bad for a 45 year old bike that has been sitting dormant for several years.
Last edited: