A couple of engines I picked up today

tomc

Active Member
#1
IMG_20230901_144420317_HDR.jpg
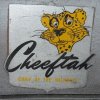
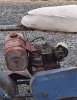
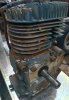
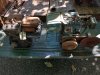
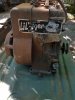
I picked up a Briggs and a Clinton today. I needed the Clinton for my Cheeftah project. IMG_20230901_144430318_HDR.jpg
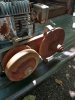
The little Briggs had an interesting decal that seems like a good name for a mini bike but it was an edger.
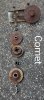
Look how the decal was applied, across the flywheel cover and the other piece of sheetmetal.
IMG_20230901_144454222_HDR.jpg
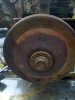
The Clinton has a strange clutch/brake set-up that I have not seen before. Anyone recognize it?
IMG_20230901_144526018_HDR.jpg
I have an old Clinton parts book and will look up the numbers on the Clinton to see if I can figure out the model year.
 

tomc

Active Member
#4
Yes. The pulley on the crank I have seen before but the extra disc has me puzzled. It looks like it could be a brake disc but???
 

tomc

Active Member
#9
Thanks all. I will watch for the missing parts to complete the Comet for a future project. For now I will be using the small Clinton on my Cheeftah with a centrifugal clutch.
.....................
 

tomc

Active Member
#10
IMG_20230907_170752610_HDR.jpg
I worked for a long time trying to remove the bolt holding the remaining parts of the Comet clutch on. The bolt is rounded so even a 6 point socket will not hold it. Tomorrow I will try a new socket and if that doesn't work I'll weld an old socket onto it. IMG_20230907_171123729_HDR.jpg
I don't know if I can fix the tank.
 
#12
I have good luck with a very small Snap On pipe wrench removing bolts like that. If that doesn't work, I weld a lugnut on it and wait for it to cool. That breaks the rust in the threads and I can usually remove it without tools.
 

tomc

Active Member
#14
I finally got the bolt out, using a new 14mm impact socket. All the bolts in this engine have been tighter than necessary. I'm surprised the gorilla that worked on it before didn't break any tightening them.
IMG_20230910_164420766_HDR~2.jpg IMG_20230910_164440586_HDR.jpg
I now have the engine down far enough to clean it for painting and probably clean the valves & seats before reassembly. I still have to remove the broken muffler from the exhaust port.
 

tomc

Active Member
#15
@tomc
Does this look like the same tank?
If you think it's the same let me know. I know this engine is seized but tank might be usable, it's yours if you need it.
View attachment 305745
I believe that tank is bigger than mine, and sits up higher above the cylinder head. IMG_20230910_165630515_HDR.jpg
Mine appears clean inside so I will try to repair the threads for the cap, or replace the "spout". Some patient work with pliers might get the threads back into shape.
Thanks though.
 

tomc

Active Member
#16
IMG_20230911_125159312_HDR.jpg IMG_20230911_125212392_HDR.jpg
I tried fixing the filler spout with pliers. No success. So I used my MAP torch and unsoldered it. After less than minute of heat it fell off.
I have a good clean "lip" left to solder a new piece onto. I'm glad the tank is made with the raised portion to solder back to. Now I need to find a donor the right size.
Meanwhile the tank will be filled with Evaporust to clean the inside.
 
Top