Arctic cat ssscat info needed

WrenchDad

Active Member
#1
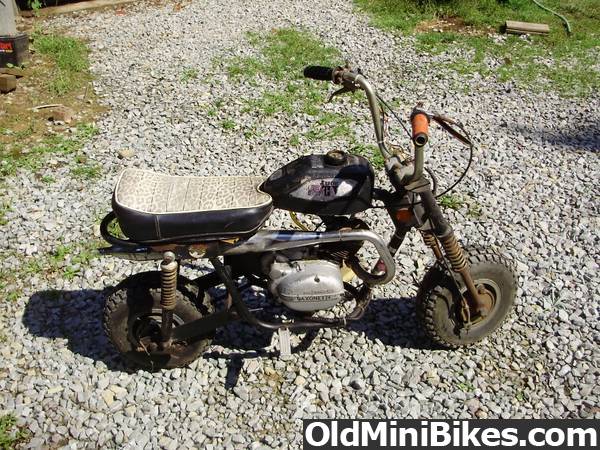
Hi guys, Just picked up an Arctic Cat SSSCAT. and I have a couple of questions.
50cc Sachs saxonette 2 speed automatic 2 cycle

A little back ground first, It is missing the pull start so the seller used a cordless drill turning CCW.to start it On his first try it wouldnt fire up and he said " it doesent have a choke so I usually give it a shot of fluid when starting cold. He did and on try #2 it started right up . but it ran at what seemed to me as pretty fast idle. He had it on a milk crate so the drive wheel started spinning. When I put my foot against it it stopped , it seemed to run smooth just at high idle (throttle was closed)

The user manual said 25:1 mix. He said he was using a universal mix so I dont know what his ratio actually was. I'm assuming he is running leaner than 25:1 which would explain hard to start without choke and the high idle.

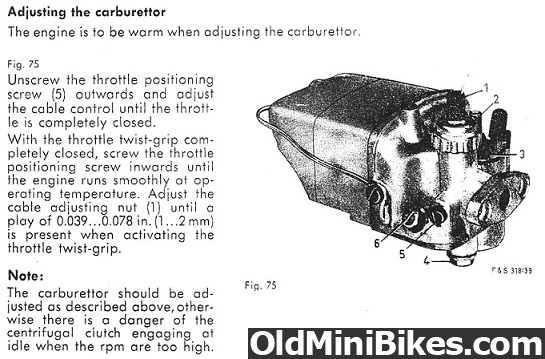
How critical is the 25:1 mix? Should I change out and reset the carb adjustments or just the idle?

What's your thoughts.
 
#2
25:1 is very important, but only to make sure the engine keeps running without damage long term. Some will say modern 2 cycle oils let you get away with less but why chance it with a rare bike and engine? The bike will smoke a little, as designed.

As for the high idle, you need to check a few things. It could be the throttle cable, the idle screw (throttle positioning screw on side of carb), dirty carb, throttle grip adjustment, or combination of them.

As for starting cold, these engines need a surprising amount of priming. Hold down the primer plumber for at least 4-5 seconds before you give it a try.

I'll post the official carb adjustment instructions when I get a chance.
 
#3
Here's the sound of a properly adjusted idle.

http://www.youtube.com/watch?v=poa8YtUes6I

If up on a crate, the wheel might move on its own slightly but should be easy to stop. I adjust it while it's on the ground. Must be set when warm. Run it up till it just starts to move, then back it off til it runs smoothly. The bike should sit still on its own without "walking". This assumes the throttle cable and adjuster on top of the carb slide housing are set. Again, detailed instructions are on their way...
 
#4
Bing Carb Adjustment

These are from the official Sachs 50 / AMAX engine repair manual - ver. Minibike. Follow the order they specify. It's a combination of cable adjustment and idle screw (slide position) adjustment. If your twist grip body has an adjuster on it as well, don't forget to check that too. You need a hair of play in the twist grip before it tugs on the cable. Unless you run out of adjustment on the carb slide, I'd leave that twist grip adjustment (if equipped) at it's minimum setting.

Try this and see what you get. Adjust it while it is on the ground. Try to get it as low an idle as you can but with it still running smoothly on its own. If you still have issues, we might need to check a couple other things.


WrenchDad

Active Member
#5
Websack,
Thanks for the info, I did dump the fuel and put in 25:1 and it immediatly ran better I adjusted the throttle position screw until it sounded smooth and it's not walking. It may need some cable adjustments but I havent gotten to that yet. I'm not sure if I'm getting all I should out of top end 2nd speed but I need to check some of the other stuff.
Petcok was FULL of debris the bike actually shut down. Is there supposed to be a small filter in the plastic resevoir or is there a screen in there? mine has a screen under the rubber resevoir seat. The carb might need cleaning also. Is there any thing specific to do or not do when cleaning the carb?

Oh hey I almost forgot I got a bull dog pull start for it and I need to install the cup Is the nut on the end of the crank regular thread or left handed. (seeing as it starts CCW) I wanted to know befor I break something?
again thanks for the help.
 
#6
Websack,
Thanks for the info... befor I break something?
again thanks for the help.
Good! Fresh 25:1 fuel is important. At some point you may want to clean out the tank if you have any rust or sediment. There are different schools of thought but I have used a cup or two of fuel and maybe 1/4 cup or less of small nuts or pea sized gravel. Close off the tank and shake until your arms fall off. :laugh: If you're worried about an explosion, use some Evaporust instead of fuel. Lots of other techniques and products. Search the forum for them. Shake at your own risk - if rusty, it might be what's holding the tank together. :laugh:

There were 2 or 3 types of fuel shutoffs used on these. Two of them had a plastic sediment bowl that threads off, one clear, the other opaque nylon plastic. Both had a screen up inside where it threads on. The unfiltered fuel drops down through the middle tube into the bowl, then pushes its way up through the donut-shaped screen and out the outlet into the tubing. The screen does not come out so don't try. Contaminants are on the exposed side.

The carb is pretty fool proof. You can disassemble it all. Use your cell phone to take pictures if you need to remember where it all goes, but it's really easy. Don't lose any parts. The most complicated part if not familiar with it is the slide assembly. It's spring loaded and there is a loose washer under the spring within the stack. The needle also has multiple grooves in it for altitude adjustment. There is a circlip snapped on one of the grooves to set the needle height. The standard setting is position #3, which is the 3rd slot from the blunt end of the needle. You can spray out all the pieces with carb cleaner or buy a can of carb soak. WalMart sells it for about $20 in a gallon can with a strainer basket inside. Make sure you remove all pieces, including the internal jets if you can. If you can't get them out, use a tiny wire to push through them and make sure they're clear. I like to use a heavy bristle from a nylon paintbrush. No risk of damaging the sensitive areas. Careful when reassembling and note the order of the way things come apart with the slide assembly. On the float, the stubby end goes down, long pointed end goes up.

As for the top end, don't let anyone tell you this bike will go 50 mph. That has been grossly exaggerated in some postings. Unless you're getting slippage in the second gear clutch disc, you can expect maybe 30 mph on flat pavement, but I have not officially tested mine against a speedometer. Because you're 8" off the ground, it will feel faster than it is. Maybe that's why it got exaggerated over the years. Plus, back when we were 10, everything was bigger, faster in our minds. :laugh:

At wide open, your engine is going to sound like it is about to fly apart. Weight of the rider and low inflation of the tires will slow it down. Pump up the tires and put a 80 pound 10 year old on it and it will fly pretty good. There were at least 2 different Saxonette engines used on the Ssscat. Internal gearing was slightly different, so depending on which engine you have, top speed may vary. They look the same from the outside. Can only tell by the serial number. I don't have info on that.

The nut on the crank is standard thread from what I recall. As you said, based on the non-standard engine rotation. BTW, there are many ways to deal without a recoil if you have to. Simplest is to wrap a rope around the recoil cup, if you have it. I haven't seen a bulldog recoil. Post a pic when you are done! Pulling the flywheel without the correct internally threaded tool is interesting, but doable. You can work a small puller down into 2 of the 3 slots. Just hope that your flywheel hasn't spun on the key.

Good luck!
 
#7
A couple more things you'll want to do....

Replace the transmission fluid. Always use automatic trans fluid. Some people actually used motor oil and found out the hard way.

250cc / 250ml of Dexron or Mercon. That's just over 1 cup (236ml). I use Valvoline Dex/Merc and it seems to work fine.

Note that to drain it, there are plugs under the engine as well as a small oil level control plug in the transmission housing. One plug is hidden up in a recess under the center cavity. Remove all the plugs and tip the bike every which way and push it forward and backward to work all the old fluid out. Just pulling one drain plug will leave a bunch in there as there are many places for the fluid to get stuck. Fluid is cheap. You might even want to do it, ride it a bit, then do it again to flush out the junk.

To get the fluid into the top fill hole, I got a tiny funnel, but you can also attach a 10" or so piece of vinyl tubing to the end of a regular funnel. Trust me, you can't pour straight from the bottle and get it in that tiny hole when the muffler is installed. :doah:

You also want to decarbonize the muffler.and exhaust header. take the exhaust off and scrape out any carbon deposits in the header pipe. Not the easiest since it curves. Also, remove the back end of the muffler and pull out the black insert. It should come all the way out but can get stuck. Knock it around a bit to get the buildup out of it. You can also heat it with a torch and knock it around some more. Clean it as best you can.
 
#8
If you aren't 100% sure your engine is empty of fluid before adding 250ml (i.e. you didn't just rebuild the engine), remove the oil control level plug towards the rear of the transmission housing and fill with fluid through the top fill hole until fluid starts to run out of the oil control hole when the bike is on level ground.
 

WrenchDad

Active Member
#9
Holly crap sounds like you have no idea what your talking about:laugh:

First let me apologize for calling you WEBSACK I fat fingered it.

I don't think I need to pull the flywheel , just remove the nut and put the cup from the bulldog starter on. Also I don't have a non removable screen in my nylon screw on bowl, just a home made brass debris screen that is removable.
Yeah I don't think I'm getting all I should I'm probably getting 12mph maybe 15. my 80 pound 10 year old goes faster but I don't think it's 30mph. I'll check the carb and the clutches it may be slipping.
Thanks for all the help I'll keep you posted.
 
#10
...keep you posted.
NP. I might have rebuilt one or two over the years... :thumbsup:
I videoed a full Saxonette tear down and reassembly last year with intentions on posting it, but my camera had focus issues and it's all basically worthless footage. I have another engine to rebuild this winter. I'll try to do it right this time with a better camera.

12-15 mph....yeah, might be an issue somewhere. I'll try to clock one of my 6" bikes this weekend to see what is a reasonable speed.

Check OldMiniBikes for a replacement fuel valve. They sell one of the cast originals with the sediment bowl. They also sell a machined one that was an official replacement back in the 70's. I prefer that style if you are going to transport your bike on its side. The thumb wheel shuts tightly. Both have screens. I'd steer clear of the NOS gold ones with the clear sediment bowls. They tend to leak.

Good ones:
http://www.OldMiniBikes.com/images/T/D70-4666_MEDfile_150_store.jpg
http://www.OldMiniBikes.com/images/T/AZ8334-TN.jpg

Be sure to post pics of your recoil installation. Looking forward to seeing it.
 

WrenchDad

Active Member
#11
NP. I might have rebuilt one or two over the years... :thumbsup:
http://www.OldMiniBikes.com/images/T/D70-4666_MEDfile_150_store.jpg
http://www.OldMiniBikes.com/images/T/AZ8334-TN.jpg

Be sure to post pics of your recoil installation. Looking forward to seeing it.
My petcock is like the one you have pictured, It is yellowed but looks like that one. I have a thumb screw valve like pictured also, it's from a techumseh tank but looks just like that if the threads match up I think I'll switch to that.

I'll get some pictures of my recoil, it's at work right now, I have to have it modified abit to fit the case but I'll show what it looks like before any thing is done. I'll post when I do the install also.
 

WrenchDad

Active Member
#12
This is what the Bulldog recoil looks like and it utilizes the cup (cup came with it).
The ring with the bolt holes is slightly larger than the mount hole pattern in the case. so I will remove the ring and screen and have standoffs made that will bolt where the screen used to on the recoil and have the standoff drilled at the bottom to mach the mount holes in the case.
 
Top