Barn Find: My Huskee Hill Climber

kd0asx

New Member
#21
I wasn't able to find exhaust on the OldMiniBikes Warehouse website... the Tecumseh equivalent is actually the wrong one, and the original is shot IMO. I was able to find replacements on ebay for $150 and well no thanks.

That said, I'm more apt to stick with the original engine instead of going for something cheap and Chinese. No offense to those who did, but I really like the idea of the Tecumseh being on it. I dunno... I'd also like to ride it someday. ;)

There's a small engine shop up the road. I might give him a try. I also have an aftermarket carb on it because I suspect the original has a crack. It might be time to maybe see if it does and if not then rebuild that one and see what happens.
 

Attachments

kd0asx

New Member
#22
I'll investigate further and determine exactly where the leak is... I never thought about it running hot. I suppose it shows how new I am to this, but it does stand to reason with the muffler and all.

If was running lean, it could be from the aftermarket carb I put on it. I believe the original has a crack in it, but not sure. I'll have to investigate that. I put the aftermarket cheapie one on there just to get it running. I tried to richen it up a bit but by then it was pretty hot.

And it could absolutely be the breather. I don't know crap about that either... I took the plate off but didn't investigate any further. It could be that it's really dirty. It looked oily to me but that was a bit beyond me... I just wanted to see if it would run first.

Thanks for the help....
 
#23
I was a bit testy in my earlier comments. Sorry about that. Everyone has their own way of doing this.

Change the oil in it.

Since it's running, you are most of the way there. The maintenance manual is online in PDF. Pull the breather and with your lips, (I know, technical, lol) it should allow air to come in one way, and not the other. You probably need a gasket.

Start with carb jets at 1.5 out from lightly seated. If it wont stay running, turn in the idle adjust screw and keep adjusting until you're at the point where the RPM decreases when turning the low speed jet on the side one way or the other. Sweet spot. You will have to turn your idle adjust screw down as you do this.

The governor adjustment depends on where your spring is set and how worn it is. To adjust, you get full throttle on the linkage, then loosen the gov actuator arm and turn the bottom clockwise all the way then tighten. Takes three hands. It can be tedious, so you can simply set the arm straight with the governor shaft bracket and it will work...just not govern at max. safe RPM.

High speed jet on the bottom can be adjusted in the shop to give you some kind of acceleration, but I adjust mine once the engine is on the bike and I am able to ride it. (Load)

I and several others routinely ride these bikes with their old engines on them. By all means stick on a replacement engine if you feel better about it, but having the original engine there and an original bike....seems like a no brainer with that bike's family history.
 

kd0asx

New Member
#24
Don't worry... testy is good!

I was never going to get rid of the old engine... I was intending on fixing that up and sticking it in from time to time. My thought with a cheap replacement engine is I can have fun with the bike and beat the crap out of that engine while the other is getting fixed. If I were to sell the bike I'd sell it with the original running engine in it.

The frustrating part is that I can buy one of those engines for less than what it will probably take to get the old engine fixed right. But no matter what, I'm NOT drilling out the frame to make the hole pattern fit. I'm more historian than mechanic :) and I like to keep things as a bookmark to the past.

I will follow the advice that you gave above in the coming weeks (probably this weekend). I do need to figure out something for the muffler. I have no way of welding it back on myself at this point... no welder.

The old one is probably still salvageable but the "grill" part is corroded and broke out a bit. I did start it with it on to begin with and it was pretty loud and throwing sparks. Where I'm going to be riding this thing could have dry grass conditions in the summertime so it might not be the safest thing to use. And the NOS I was able to find online was $150 so if there are any alternatives I'm all ears.

So if I'm keeping this "historically accurate" it begs the question of how much this is worth? I don't want to devalue the bike by permanently altering it, but resale is a consideration. I wouldn't try to make a mint off of it but I would want to recoop my cost and have money to go toward the next project. I'd have no problem putting some coin in the engine if I knew I'd get it back some day. Thoughts?

Thanks again... I do appreciate the advice.
 
#25
There is a long running and somewhat "heated" discussion between vintage "purists" and those who are okay with deviating from vintage with resto-mods, or alternative engines.

Lets get passed that. (For those following along)

If "I" had a vintage mini bike that my wife had rode as a little girl 40 years ago, I would spare no expense at either restoring it to an original condition, or restoring it to a new condition, depending on what parts I had, and the condition of the overall machine. No cost would be too great.

A mini bike that "your" wife rode as a kid isn't as valuable to one "my wife" rode as a kid. So if you don't see the value in that, (all personal) then the only other scale you can use is "commercial value." And that value is not as great as the cost to repair or restore any aspect of this bike.

Perhaps you may consider putting it back together and storing it some more, and waiting until you have the extra funds for a restoration, or even purchase another bike and go from there.

It's a hobby. Never wise to place monetary value on it, because the numbers tend to be "red." An old (vintage) engine rebuild is always going to cost more than a newer replacement from China. (And I'll include certain crate engines called "GM" hailing heads from China) It is easy to spend $400 for a complete and in-spec Tecumseh engine. It's also possible to spend far less and have a nice running bike.

But a bike my wife rode 40 years ago as a little girl would never get ridden. It would be on a display shelf, never for sale. I've already said too much. This is your decision.
 

kd0asx

New Member
#26
Aha!

Funds really aren't an issue. My quandary is do I put $600 into a bike I'll only get $400 out of. Not that I'm to get rich but I could see this helping to fund the next project... but then again maybe I'll totally fall in love with it and keep it, who's to say.

I investigated further tonight and it might be a simple fix. Pics are below... most of the oil was coming out of the breather from what I can tell, with some coming out of the crank case cover at the bottom.

But first, I went to take the carburetor off and the intake pipe was loose enough to shake... well there's your problem! Or at least some of it. I absolutely know that I put it on as tight as I could without stripping out the Phillips heads. Maybe it shook loose when it got hot or something, or maybe I'm a complete idiot. Either way, it would explain a lot.

Here's the breather still on the engine:

IMG_3541.JPG

From here you can see where the oil dumped out of it. You can even see my finger smudge:

IMG_3542.JPG

And here's the breather off the engine... gasket looks good, but I figured there would be an element. I consulted the parts list that I have for the H35-45280H and they give two examples of breather assemblies. What I have is part number 31337.

And here's a pic of the engine with the breather off:

IMG_3544.JPG

On another note, I was using an aftermarket carburetor I got off ebay because the original looked cracked and I didn't want to chance it. I don't know if it's cracked or not, but I have the carb kit and I think I'm just going to finish it out, stick it on, and see what it does. Here's a pic where I tried to get a shot of the crack. It may be just some sort of blemish or something. You can see it just to the left of the choke running back and up:

IMG_3539.JPG
 

markus

Well-Known Member
#27
I rarely ever see even used 3.5hp dogleg muffs come up for sale, I wish they did, as I am always in search for them for my rebuilds. "HS" (4-5hp) ones pop up a lot, slanted engine versions more so than the rest.....none of those will work for your app though. You still see those floating around because they were mini bike specific, Tecumseh was able to use the style you have though on edgers and small industrial equipment after the mini bike craze quickly fizzled out so they got used up where the others sat on shelves collecting dust and rust :smile:

If the header part is still solid you want to save it, most ways will require welding though. you can use a still available muffler head and have it fitted to the header section and just about retain a dead match to original, or have a flange welded to the end and use a bolt on can or even a threaded female coupler welded to the end for the screw on muffs.

Another possibility that you can do depending on available parts is to modify the can. your exhaust is an actual Tecumseh made unit but a company called Taylor made those for Tecumseh in a U.S.F.S. approved spark arrestor version. The can size is the same, just a hair shorter, so if you can get the screen and cover you can modify your tired muff with a saw and a drill. Here's one I did for a project that called for an actual spark arrestor version muff on the bike:


this of course is subject to getting the parts, Jacks small engine does show them as available, but that does not mean that they are. They are of course discontinued parts, and most others show them that way or out of stock so I would verify that.

as you can see I used an NOS taylor screw-on as a donor, Those were up until recently very affordable (about 15-20 bucks) and from time to time they do pop up still priced like that coming out of old stock in mower shops etc, but not so much anymore as stock is fading out on them.

If you want to check with jacks or somewhere else the part numbers for the screen is 33171 and the cover is 33172. The screws are 650578, but those could be found at a hardware store.
 
#28
If you just want to ride it for now, replace the engine with a clone, and put that original one away for working on later.

6.5 HP (212cc) OHV Horizontal Shaft Gas Engine EPA Dig up a Harbor freight coupon, and get the price down even more.
Just for the record, Dave you were not the only one who didn't really like this response much at all.

OP, wow what an amazing find after 40 years!
Good for you for restoring back to original, I respect that.
 
Last edited:
#30
Okay... here's the latest.

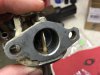
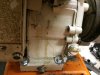
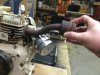
I bought a new breather, part number 31337B. Here's a pic of the parts:

IMG_3627.JPG

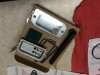
I installed that. Then I rebuilt the original carburetor and installed that. Then I put the original muffler back on.

It started relatively easy, and I was able to make carburetor adjustments right away. I got it where I thought it was okay... adjusting the bottom screw approximately halfway between where it wanted to stall. Adjusting the idle screw down from a heavy rev.

After about 15 minutes of this, it stalled. I figured it was due to the fact that I was still adjusting the carburetor at the time. But it took several pulls to get it to start again, and wouldn't stay running for more than a minute. Kept trying, wouldn't stay running for more than a minute now. Went to using starting fluid and finally it wouldn't run at all.

I pulled the spark plug and it looked dry. So I let it sit overnight.

I went out today and was able to get it started and it ran for only a few seconds and only when it had the choke on. No matter what I did it wouldn't run unless it was choked. I decided to change out the idle screw (I was using the original which looked pretty good but replaced it with the one from the carb kit) and readjust that a turn and a half out and not really any luck. After research on google, I figured the jets were plugged (though it was a new jet assembly and adjusting screw) so I put yet another one on (I had one left over from another carb kit). This time I used starting fluid to get it started, and it finally took off so where I could keep it running again. It would run for a few minutes, I could adjust the bottom screw for gas mix and the idle screw to where it was running okay again, and then it stalled out again. Again, tough time starting to the point where it wouldn't start at all.

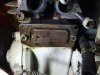
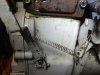
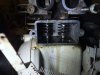
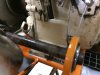
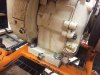
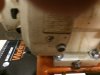
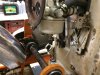
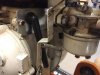
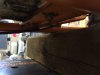
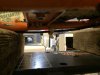
All the while, the engine is dripping oil from what looks like to be the front and the back. Pics below, but from the back of the engine it looks to be crankcase breather again (including dripping from the new tube) and now it looks like it's leaking from the governor where it is bolted into the block.

It's a mystery where it's coming from in the front of the engine. I suppose it could be the head, but it could also be a crack in the block too.

So it could be that I installed the crankcase breather all wrong. It could also be that the governor rod is leaking, or it could be that I have a head issue or a cracked crankcase. Either way, I'm flummoxed to the point that I'd rather take it to someone who knows what they're doing or buy a replacement engine... assuming I can find another Tecumseh H35 because I still want to keep it close to original. I can't imagine how hard to find or expensive that would be.

I guess I'll start researching small engine mechanics who specialize in engine rebuilds and restores. I'll also start shopping around for replacement Tecumseh H35 engines. Bottom line is I've reached the end of my knowledge on the issue and I could keep stumbling around but maybe it's just time to call upon a professional to fix it right.

Here's some more photos...

IMG_3634.JPG IMG_3635.JPG IMG_3636.JPG IMG_3637.JPG IMG_3638.JPG IMG_3639.JPG IMG_3640.JPG IMG_3641.JPG
 
#31
You can't adjust the bottom screw(high speed needle) with the bike idling. Set that one at 1 1/2 turns out to start with and that will get you going. You probably have the idle mixture close enough if you had it running already. Then you have to adjust the high speed needle with a load on the engine (ride the bike). If it only runs with the choke on its set too lean. Give it another try before you give up.

Chad
 
#32
I'm not sure this explains why it stalls out after several minutes, or why it dumps oil. Is there a direct connection or are there more issues than just the carburetor? That's what I'm currently contemplating.
 
#33
KD, I'd be more than happy to go through this engine for you at cost. Chad is no doubt closer, as are several qualified OldMiniBikes members. I'm just putting your shipping money where my mouth is.

You have more than one problem. The oil leak at the front of the engine could be a leaky crank seal on the flywheel side that is blowing oil via the fan towards the engine. Looking at your replacement breather, I cant understand how it seals. There are generally some retaining clips on the bottom as well as two tiny drain holes. I don't see any of that. The leaky governor shafts are notorious and can either be shimmed, or epoxy applied and redrilled.

An air leak can cause a carburetor condition that requires use of the choke, as well as clogged passages.

I'm sorry to see you going through this. Like I said, I'd be more than happy to go through this just because I ran my mouth earlier on what you "should" do, lol and because I applaud someone who gives things a try before dumping a vintage engine in the trash and heading to Harbor Freight.
 
#34
A kind offer indeed... I'm going to take a few days to think about it. If I push it I could turn frustrated into mad and do something REALLY stupid on a whim.... like start cutting into the frame to make something else fit or something. LOL.

I also want to talk to the small engine shop down the street. I've talked to the guy before and he was nice but aloof so I want to get a better read from him and see if he's up to the challenge and hip to my game. Stay tuned...
 
#35
After a few weeks at the local small engine repair shop, the owner called me and left a message... "your engine is ready. come and get it, it runs great."

So that's all it took Friday afternoon as 2:30 became the new 5 p.m. and I hit the road to pick up my engine.

The owner said that there were a few things wrong with it but nothing too bad. First, the governor rod needed to be replaced and a new shaft put in and drilled out. Second, it needed new "pan" seal and gasket... I'm guessing for the crank case. My guess is that's where the oil was coming out the front.

But the big thing he caught is that I must have installed the fuel line wrong because the little I had run the engine the flywheel had rubbed the gasline down to the threads, so it was literally a bomb waiting to go off. So I spent a little over $200 and now I have a good running engine and peace of mind. The main thing he said was that he had it running for about an hour with no issues.

I got it home and bolted it in, put the new chain on, and started it up. I set the idle a little bit higher... he said he didn't have to adjust the carb much so I must have been close.

So I ran it for maybe a half hour and it ran fine. No overheating, no oil spraying. Great power, good acceleration. So I think both the oil and the revving and overheating issues were governor related.

I have video of the finished product... here it is:

[video=youtube;de39xhsrsMM]https://www.youtube.com/watch?v=de39xhsrsMM[/video]

So other than taking it out for an hour or two and working the bugs out of it (no easy feat around here, since I don't have any land to drive it and I don't want to get busted on the streets), I'm going to call this baby finished.

I'm so happy I decided to stick with the original engine. Thanks to all for your encouragement and advice. On to the next project... I spotted something at an antique store that caught my eye. We'll see how cheap I can get it. :)
 
#36
Good evening all... I have a followup to this thread. I was able find a used but much newer Tecumseh H35 engine in my area through Craigslist for $50. The original is pretty shot and instead of spending hundreds to restore it, I decided to go with the newer engine. If I sell it, I'll sell it with the original engine too just in case someone wants to take a crack at it.

The engine swap took about 3 hours, including lost parts and a run to the hardware store. The result is a better engine and a much more rideable mini bike.

I've thoroughly enjoyed doing this project and actually sad that it's done. Now that fall's around the corner in Minnesota I'd like to find another project but we shall see what the future holds.

I've included a video for your enjoyment of the finished product. Thanks to all who gave me great advice.[video=youtube;-4w7pKcByIU]https://www.youtube.com/watch?v=-4w7pKcByIU[/video]
 
Top