I have enjoyed the restoration on a 2HP 60102 from 1975, still need to finish the cosmetics, paint etc, but it is running smooth.
With my success on that project, I got the itch to find a 5HP Briggs to work on that might be a fit for my Keystone project bike.
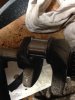
I ran across a 130202-0135-11 Briggs motor with mfr date 1981 which I pulled off an old tiller that was being scrapped.
I knew going in that it probably had a busted rod and after disassembly that's exactly what I found.
This is a learning project for me.
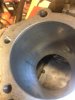
The cylinder does not look too terrible given what happened to this engine, opinions welcome.
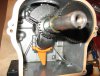
The piston and even the rings seem to be in good shape but I have not yet checked the gap, etc.
There are no breaks or cracks in the block or sump cover.
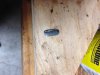
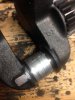
From my reading, the crank has what I understand are aluminum deposits from the rod heating up at time of failure on the crank journal.
My hope was to be able to get a replacement rod and be able to repair and use this crank.
Is that feasible and what is the best process? From my reading thus far I have seen advice ranging from emery or very fine wet sanding, muriatic acid, and lye.
Thanks in advance for any advice from the experts around here including whether using this as a starting point has chance of success in getting it operational.
With my success on that project, I got the itch to find a 5HP Briggs to work on that might be a fit for my Keystone project bike.
I ran across a 130202-0135-11 Briggs motor with mfr date 1981 which I pulled off an old tiller that was being scrapped.
I knew going in that it probably had a busted rod and after disassembly that's exactly what I found.
This is a learning project for me.
The cylinder does not look too terrible given what happened to this engine, opinions welcome.
The piston and even the rings seem to be in good shape but I have not yet checked the gap, etc.
There are no breaks or cracks in the block or sump cover.
From my reading, the crank has what I understand are aluminum deposits from the rod heating up at time of failure on the crank journal.
My hope was to be able to get a replacement rod and be able to repair and use this crank.
Is that feasible and what is the best process? From my reading thus far I have seen advice ranging from emery or very fine wet sanding, muriatic acid, and lye.
Thanks in advance for any advice from the experts around here including whether using this as a starting point has chance of success in getting it operational.

 I dispose of it in my neighbor's swimming pool, after his dog poops in my yard.