First build, the "Jimmy Gote"

#1
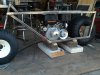
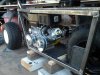
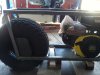
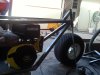
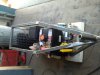
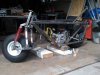
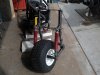
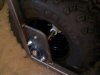
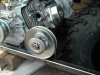
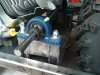
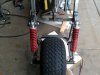
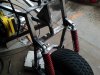
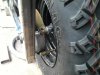
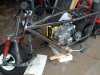
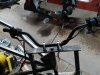
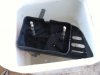
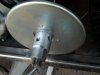
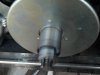
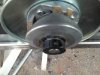
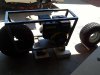
I got something done! First plan was to build it out of 1x2 ret tubing. Strong as hell, and I could round the corners and fill with flat strap, look cool! I made a wood mock up Ohhhh,, I see a few issues, either it has to be made real wide, or the motor has to be on blocks, and with 2 inch top rail I would need an inseam of around 50 inches to sit on it. Much playing, cutting wood, roofing stapler to hold it, and the wood now lives in the dumpster. 1 1/4 square tubing, .120 and I got a frame that I think will work. Ground clearance around 7 inches, seat height with 3 inches of pad around 30. Wheel base about 54". Rear hub will be flange bearings, 1 inch axle, go cart hubs welded on. Jack shaft for gearing. I bought an Ebay torque converter, rated for 8-13 hp. Said it would fit Honda clones with a bit of modifying. Ya well, that means either hanging it 3-4 inches below the motor, or scrapping the backing plate. Looking at it, it seems to be a Chinese clone of the series 30. I Will set it up with a longer belt, one that matches the series 40 and set the spring to the hardest setting and see if it lives. Anyone need a couple stock belts cheap? A couple pillow blocks, short 5/8 shaft, a sprocket going to another jack shaft, then to wheel, all will be good. Front forks will be leading link type, got shocks in for them, actual oil filled ones! I'll play with mounting them for spring rate, but should get 3-4 inches wheel travel when done. I think I like the yellow/black, may stick with it. Maybe call it the "Bumble Gote". With a torque converter any idea what final gearing I should be aiming for? Don't want high speed,but for trail riding. Let's see if this posts.
 

Attachments

#3
I thought I thought it out, but I think I was wrong .lol. One issue is it is wide at the front, so wide that with a seat touching the ground with my feet might be an issue. The engine barely fits. I will narrow the front of the frame some. I will then have to take the gas tank and air filter off to install the motor, then reinstall after its in. If I used a different air filter, moved the gas tank, and made a different exhaust I could gain several inches in height of the motor. I would have a stock motor. I will go play more this week.
 
#6
Building the leading link forks now. A few things I have learned. Seat height is related to seat width. Wider the seat, the lower the height needs to be. If you replace the gas tank, air filter and exhaust, you can save 4-5 inches of engine height. I choose not to replace those items as my experience has been one change leads to 20 more. Now I have to remove air filter and gas tank to install motor, no biggy. But if the world was how I would like, I would have a lower seat height and more ground clearance. I have about 7 1/2 inches of ground clearance now, which is ok, but 9 or 10 would have been better. In Arizona, most off road riding is on Forest Service land and off trail riding is a big no-no. So I think I am ok with 7 1/2. I ended up with 16 degrees rake and 3 1/2 inches trail. No off set needed on the fork tubes. I may kick the front axle out1 1/2-2 inches ahead of the rake line. More leverage and travel on the front wheel, and I think I can afford to loose a little trail. I need to gusset the hell out of it, but am waiting to mount the rear wheel and jackshaft. Found a 5 dollar hub at a yard sale that fits the front slicker than a mink's ass. Sand blasted it and painted, chased threads, need new bearings. A friend is going to use his plasma cutter to cut my triple trees for the forks out. 1/4" steel plate, 3"x 16", think I need to add a gusset to them? drilling and threading zirk fittings for all points I can lube, steering head, fork pivots. I got a chunk of DOM 1 1/4 x 3/4 tubing for the neck and pivot points. Bronze bushing fit real snug inside. I ran my calipers over it and it appears to be very accurate. With in a thousandths or so. The tube looks like a gun barrel,, got me thinking about a black powder pistol,, wonder what kind of pressure the DOM can stand? Need to order shafts and bearings next, mount rear wheel, jack shaft, brake, motor. finish with gussets, then strip, sand, fill a few welds, prime and paint! Another 2-300 hours and I'll be done!
 
#7
Ok, I got the forks done. Rear wheel mounted, I think I got the jack shaft figured out. The band brake will mount on the rear wheel. It is a 6 inch band brake, biggest I could find so should slow it down some. Plus on the rear wheel if I lose a chain I still got brakes. Was going to mount it on the jack shaft, but it's getting a bit crowded in there. I have a new found respect for some of you that build from scratch and make it look easy. My rear axle is go cart stuff. Flange bearings, 1" keyed shaft, go cart hubs for wheel and sprocket, brake is a 1" keyed hub also. Might not be the cheapest way to build a hub, but without a lathe or a buddy with a lathe, this works well. And is easy to adjust as you find flaws in your plan. Flange/ Pillow block bearings are heavy duty, cheap on Ebay, are self aligning and come with grease fittings. Plus you can just replace the bearings, I didn't find a slick way to use this method on the front however. The shocks I found are surplus from a riding lawn mower. Was hoping they would be stiff enough to mount 1/2 way on the swingarm for more travel. Tried it just clamped and they bottomed out real easy, so moved the mounts almost to the axle. Should give me around 2 1/2 inches of travel. And they are oil filled shocks, not just a shiny tube with a spring around it. See if I can post a few pics.
 

Attachments

#9
My goal here is to biuld a more robust version of a Tote Gote. Something that has a bit more power (13hp) more weight carrying ability, me and a hunting buddy, or me and 1/2 an elk. Wanted lights for those late rides back to camp. I have a Suburban 4x4 and pull a camping trailer, so a quad isn't really an answer. Next I will need to make some sort of carrier for the front of the burb, or on the back of the camp trailer. Thinking some variation of a handicap scooter ramp/rack that mounts on a hitch. I am open for ideas if anyone has some! I may be able to stuff this beast in the back of the burb, but not convinced I can do it on my own. I am thinking it might be like trying to put bird doo back in the bird, sounds possible, just not practical.
 
#11
This week my handlebars, mounts, throttle ( with too short cable) handlebar controls for lights, horn, starter and brake, a gear or two?, didn't open the package yet. So I should have bars on, maybe the jack shaft mounted, the sprocket and hub came in too, so I can mount that. Need to figure where the battery will go. Anyone know how many amps the generator puts out on a Champion 389? Owners manual is of no help, or their web site. Some clones are 3 amps, some 10 I been told. Hoping for 10. Need to put lights on it, head and tail, maybe a cig lighter to run my electric vest if it puts out enough juice. ( elk season can get a bit cold). I will try to post more pics this weekend.
 
#12
A few more things done. Rear wheel assembled for last time I think. Jack shafts sorted out, just waiting on a few shaft collars and idler sprockets for chain tensioners. Weird thing happened/ I ordered a 18 inch 5/8 1045 keyed shaft. And 36 inch 1/4 piece of key stock and a 3/16 pieces also. All from the same company. First two showed up, the 36" piece and the 24 inch piece, in two packages. Both were in separate 3 inch cardboard tubes,,,,, 8 foot long! Waiting on the 3/16 piece to show, I bet it will be on a pallet and need a fork lift.
Not being able to thread the end of the driven pulley jackshaft I opted to use a split shaft collar on the outside. Slotted the closest pillow block mount so I can slide it tight against it. Then drilled and tapped 2 5/16 set screws into the driven pulley hub. Plan on using Loctite on the shaft collars just cause. Been putting anti seize snot on the set screws so at some point I might get it apart again. Rubbing some inside the wheel , brake, sprocket hub also. Decided I needed to make an exhaust as the stock one just wasn't going to cut it. It would dump hot exhaust on the tire and jackshaft bearings, then toast my testicles. Found a pre bent 1" Electrical conduit is the same size as the exhaust port. So I think with some redneck engineering I may have a new pipe soon. Questions, looking at the front forks, the fork tubes are welded to 1/4 plate triple trees, 12" apart. Should I gusset them or add a bit of reinforcing? Thinking they might bend if I hit a pot hole at warp nine. And second question, 22x11x10 tires with a max air pressure of 24 lbs, how low can I run those for better ride and not tear them up? Not looking for a Cadillac ride, just don't want to be the next poster boy for Preparation H. A few more pics.
 

Attachments

#16
Few more pictures. I used a 1045 5/8 shaft for the TC jackshaft. 1045 is a hardened steel. I wasn't sure with a standard die if I could cut threads, and how I would hold the shaft while I did. I thought of welding a washer on the driven end as a stop, but welding harder steel can make it brittle. So I went with a split shaft collar, made that side bearing tower adjustable so I can slide it tight against the sprocket/ pulley. I also took the driven apart, drilled and tapped 5/16 set screws in it. Pictures should show what I did. Hopefully no harm will come of it. I had to cut down the air filter box and shorten the studs. The studs were imbedded in the plastic. So how to weld the new shorter studs without melting plastic? I am sure a lot of you know this trick, but I remember the first time I saw it. Fill a bucket with enough water to cover what you don't want melted and weld away. I may be able to do a test ride Sunday!.
 

Attachments

#17
I cut chains today, hooked up throttle, cut jackshafts and installed. TC belt should be here Fri or Sat, need to hook up brake or do the Flintstone thing on maiden voyage. Cut the air box down so it clears easier now. Wont be long and I will have to tear it apart to paint! I heard the elk are trembling in fear thinking of my new elk hauler!
 
#18
Oh a couple things I learned about pillow/flange bearings. They are self aligning to a certain degree. Actually pretty forgiving. And the bearings pop out and can be replaced without replacing the cast hub part. The bearings sit in a ball type socket and pivot quite a bit. Twist them about 90 degrees and they fall out, put new one in sideways, twist, and rock and roll! They also have a couple set screws on one side to clamp to the shaft. I have been adding a few split shaft collars just cuz. Something tells me pushing this beast would not be a fun time. Trying to think of what kind of a tool kit it should have, and what parts and stuff for a first aid kit.
 
#20
Interesting and creative build. Nice work. Yes, pushing this vehicle would be tough. It's nice to learn something new, like your method for keeping the part cool while welding.
 
Top