Keystone Deluxe Build

#1
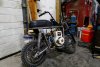
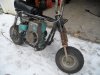
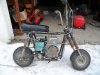
So back when I got this bike 7 years ago I made a thread to identify what it was, and I kinda wanted to just make a new post there like no time had passed at all, but it wasn't really in the right section for that, so here we are.:D

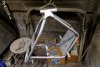
My dad got me this bike back when I was a goofy teenager, and being a goofy teenager I stripped the whole thing apart and then lost interest in it... Go figure.

Fast forward to last year, I pulled it all back out with the intent of learning to weld by building it, however I also had some other metal projects that I did that really taught me how to weld which consumed most of my time. This prompted me to just buy a Rupp Roadster 2 off of here instead(thanks danford1!).

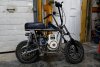
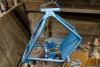
Fast forward again to a few weeks ago, my younger brother pulled all the parts back out again hoping we could build it for him, and finally after 7 years this bike is going to have a chance to be more then a pile of parts!

DSC_0129_DxO.jpg

DSC_0130_DxO.jpg

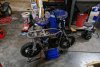
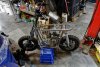
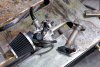
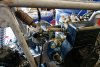
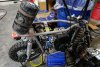
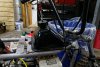
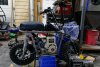
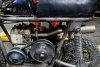
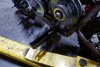
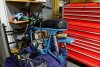
We are using a 2hp Briggs that came on the bike when we bought it, adapting it so when can use a knock off TAV30 on it, to a jackshaft and to some Chinese pit bike wheels I got for it. I have the jackshaft plates cut out and tacked on, need to clearance for the chain some but nothing too bad.
DSC_0131_DxO.jpg

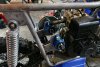
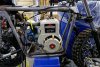
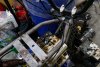
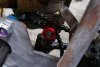
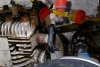
I got a 19mm Mikuni copy from Affordable Go Karts, and made a manifold for it last night. I'll try to see if I can get it running tonight.
 

pomfish

Well-Known Member
#2
I dig it.
Cool Rat Rod, short wheelbase with tall back shocks and real forks
Thanks for the update, look forward to the progress.

Later,
Keith
 
#4
DSC_0136_DxO.jpg DSC_0137_DxO.jpg

Put the carb and manifold on today, but I couldn't get it to run, it wasn't getting fuel. Tonight I took the bowl off the carb and using compressed air discovered the fuel feed was clogged. Got it cleared, put it all back together and, she lives! Needs some adjusting but it's good that it runs and idles.
DSC_0140_DxO.jpg
 
#5
Been able to get some more done the past week and a half. I found a proper 2HP cover off EBay, I think it looks really good! Pull rope is in a better location too. DSC_0181_DxO.jpg


Got a cheap gas tank off Scamazon and got it mounted up.


DSC_0182_DxO.jpg
DSC_0183_DxO.jpg


The biggest thing I have been working on is getting the rear brake caliper mounted. It took me three tries to get it to mount in a spot where the wheel can be moved into any position and the caliper still bites the rotor. But I got it and I think it looks/works good!


DSC_0185_DxO.jpg


I also got a roller for the chain mounted.


DSC_0187_DxO.jpg


This is where we sit now, it's getting closer! I need to finish up the front brake, get the engine modified for the TAV, get the seat mounted, do the exhaust, ect.


DSC_0184_DxO.jpg
 
#6
Brake rotors should be flipped, they're mounted backwards. They should sweep water and debris to the outside so it can be slung off. More importantly, you need to lower your jackshaft quite a bit or you're going to have chronic chain problems due to changes in chain tension/slack. As it is, the distance from the jackshaft to the axle will change quite a bit with suspension travel. Measure the distance with the shocks extended, as in the photo, then remove the shocks and move the swingarm up to where you think the suspension would bottom out and measure the distance. That will give you an idea as to how much the chain tension/slack would change. The jackshaft should be as close to the swingarm pivot as possible. With the suspension at mid-travel, you should be able to draw a straight line from the axle, through the swingarm pivot, to the jackshaft. The jackshaft should be somewhere close to the red circle I added to your photo.

DSC_0184_DxO.jpg
 
#7
Brake rotors should be flipped, they're mounted backwards. They should sweep water and debris to the outside so it can be slung off. More importantly, you need to lower your jackshaft quite a bit or you're going to have chronic chain problems due to changes in chain tension/slack. As it is, the distance from the jackshaft to the axle will change quite a bit with suspension travel. Measure the distance with the shocks extended, as in the photo, then remove the shocks and move the swingarm up to where you think the suspension would bottom out and measure the distance. That will give you an idea as to how much the chain tension/slack would change. The jackshaft should be as close to the swingarm pivot as possible. With the suspension at mid-travel, you should be able to draw a straight line from the axle, through the swingarm pivot, to the jackshaft. The jackshaft should be somewhere close to the red circle I added to your photo.

View attachment 307541

Hey Charles, thanks for the information, I appreciate someone willing to point out flaws! As far as the rotors go, I am pretty sure they only go on one way(I didn't put them on), and were intended for the other side, so at this point they kinda are what they are...:D

As for the jackshaft, you're a day late, I had my little bro weld up the brackets yesterday afternoon!:p Now that's not a big deal and I could cut them off, but I think I am going to roll with it for starters. If I tried to relocate it, I would have to remake the jackshaft mounts and the engine plate, because I can't just drop it as the swing arm gets in the way of the driven pulley. I do have a derailleur style tensioner, I can probably mount it up in such a way that I should alleviate some of the problems.

So in other words, I'm going to do what Derick from Vice Grip Garage does...

I'm going to do the right thing, and pretend I didn't see any of it.:cool:;)
 
#8
I haven't had a ton of time to work on the bike the past couple of weeks. Last week I was able to get the headset done, and my dad drilled and tapped the crankshaft for the TAV. But tonight I was able to get the chain on, the gas tank, and threw it together just enough that I was able to test ride it for the first time ever! There have been times over the past couple of years I have thought that it wouldn't happen.

I am going to have to remake some spacers for the rear brake and front sprocket, and I definitely see Charles's point on the chain needing extra tension with how we set it up, but I think I can make it all work. We shall see!
 
#9
I really like what you are building here. My winter project might be pretty similar to your bike.
Where did you get the wheels? I want some tall mini cycle wheels like that, but I prefer not to use Razor electric dirt bike wheels.
 
#10
I really like what you are building here. My winter project might be pretty similar to your bike.
Where did you get the wheels? I want some tall mini cycle wheels like that, but I prefer not to use Razor electric dirt bike wheels.
Thanks sparkwizard! I got them off Ebay, just look up pit bike wheels. There are all sorts of different options, drum brakes, disk breaks, grey wheels, black wheels, 10", 12", 14", ect.
 
#14
Can't believe it's almost been a month since I've updated...

I've slowly been chipping things off the mini bike to-do list, at this point I'm trying to keep it as roadworthy as possible so my little bro can ride it, get used to it, and see the things we need to improve.

We got the exhaust built, and I ceramic coated it.

DSC_0426_DxO.jpg

DSC_0428_DxO.jpg

We had some foot pegs off of an old 4wheeler, threw them on. I think they look a little obnoxious, especially with how far back I put them, but I wanted there to be better control when riding it, and they do feel really good so...

DSC_0425_DxO.jpg


It's coming together nicely I'd say, got to still adjust the rear brake, probably get the chain tensioner on it. Should be ready to tear it down, finish welding it and paint it soon!

DSC_0429_DxO.jpg

DSC_0430_DxO.jpg
 
#15
cowboyjoe8, Nice bike, I like the way you worked out the details (jackshaft, foot pegs, exhaust system, etc., etc.) Your lil bro is a lucky guy.
I'm sure that you both will enjoy riding it. Please keep us posted with pictures after its painted.
 
Top