Time to bring it back to life.

GustoGuy

Well-Known Member
#1
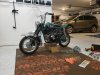
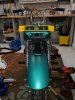
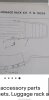
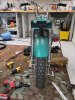
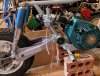
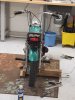
Right now I am lining up the rear wheel and the seat pan after making the mistake of letting my wife's nephew take it for a ride last summer. He flipped it over on the paved road he was riding on and crushed the fender and smashed the tailight and curled up the seat pan and pushed it to the left. I used my flatbed snowmobile trailer and a hand winch to pull the seat back into position. Now I need to align the rear wheel and I am putting on a new 12T jackshaft sprocket to replace the stock 11T one. Hopefully this will slightly soften up how hard it hits off the bottom because the bike is pretty much a beast and is un-ridable by children and adult novices. I need to fix some slight paint damages on the seat pan and I am going to install the Rupp luggage rack on the seat pan. I will post pictures of the progress. 20230822_225101.jpg
 

GustoGuy

Well-Known Member
#5
I will be putting on a Rupp luggage rack and I found the information on were to drill the holes on this brochure. Looking at the brochure it appears that the luggage rack is mounted on the inside of the seat pan. I will use rounded screws with a ressesed hex Screenshot_20230828-065511_Samsung Internet.jpg Screenshot_20230828-065511_Samsung Internet.jpg Screenshot_20230828-065511_Samsung Internet.jpg head to install it.
 
Last edited:

GustoGuy

Well-Known Member
#6
This is why you don't let newbies ride your stupidly overpowered Rupp. While I was able to get the seat pan and fender line up however when I was centering the rear wheel in the swing arm it seems like the swing arm was shifted towards the right maybe be about 1/8 to a quarter of an inch. I tried a bushing on the left side ( same side as the Drum brake) and got the wheel to center nicely within the swingarm but then the drum brake bracket seems to be off a bit within the rear brake bracket locking bolt. I was thinking about removing the wheel entirely and pulling it gently towards the left to see if I can get it to line up better.
 

GustoGuy

Well-Known Member
#7
Got Everything lined up nicely. Unfortunately I enlarged the original tailight holes when trying to come up for a solution to deal with the curled up and over seat pan. I decided to put some small fender washers in with JB weld 5020lbs strength adhesive. It should hopefully hold up well and I will look completely original when done. After I am done it will only be ridden by experienced riders who know how to handle motocross dirt bikes and streets bikes will be able to ride if I feel they can handle the extra power. 20230831_131644.jpg
 

Minimichael

Well-Known Member
#8
I have been in a similar situation with my rupp swing arm. I'd pull it off and straighten it to the frame — without the rear wheel in my field of view. You'll be able to see better, and may better able to judge and consider what amount of play is in the swing arm where it attached to the frame.
 
Last edited:

GustoGuy

Well-Known Member
#9
I have been in a similar situation with my rupp swing arm. I'd pull it off and straighten it to the frame — without the rear wheel in my field of view.[/QUOTE']


A built Predator 212cc lead to a newbie flipping the bike sure creates some extra work. A 4hp HS40 is what these bikes were built for. The extra power of the built Predator 212cc is very noticeable and thanks to Wreck it Ralph only a rarified few will ride the Rupp now.
 

GustoGuy

Well-Known Member
#10
I have been in a similar situation with my rupp swing arm. I'd pull it off and straighten it to the frame — without the rear wheel in my field of view. You'll be able to see better, and may better able to judge and consider what amount of play is in the swing arm where it attached to the frame.
I put in a nylon bushing from Blackwidowmotorsports.net. It is tons better than the rubber stock one which was dry rotted.
http://blackwidowmotorsports.net/_17292a_is_the_new_swing_arm_bushing_1971_75.html
 

Minimichael

Well-Known Member
#15
I don't know yet, as I haven't test rode it. But that is definitely the idea. The frame is currently up on a bench and jigged up for the welding I'm yet to get around to. I'll also likely begin test rides with a gx160, as opposed to the built gx200 in that mock up. I'm afraid the rupp frame may not be up to that much torque. Not like my Arctic cat ramrods.
 

GustoGuy

Well-Known Member
#16
I don't know yet, as I haven't test rode it. But that is definitely the idea. The frame is currently up on a bench and jigged up for the welding I'm yet to get around to. I'll also likely begin test rides with a gx160, as opposed to the built gx200 in that mock up. I'm afraid the rupp frame may not be up to that much torque. Not like my Arctic cat ramrods.
I riden mine a fair amount and the frame is holding up well. The only thing that wrecked it so far is my wife's nephew who wheelied it over. Now that was some damage.
 

GustoGuy

Well-Known Member
#18
That's good to hear. I figure a gx160 is probably plenty of engine for what I want to build. Relaxed bobber with a extended wheel base.
An OHV Honda gx160 will still have more power than an HS40. A built gx200 will be a monster Like my Predator with billet rod and flywheel and Mikuni carburetor. I have a Suzuki K10 Motorcycle fork on my bike. It actually has about 5 inches of true oil dampened suspension and weighs at least twice as much as the stock springer fork. I put on a 12 tooth jackshaft sprocket up from the original 11 tooth. The gearing on the stock Rupp Roadster 2 is far too low for a stock Predator 212cc let alone a built Predator 212cc.
 

GustoGuy

Well-Known Member
#19
Finish painting the rear fender and it lines up every bit as good as it did before the wheelie over. I will not be letting any novices ride any more because it took me quite a bit of work and I had to find time in my busy schedule to repair it. 20230903_174347.jpg
 
Top