
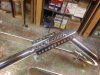
Nice fab work on the mounting bracket. I am sure you will figure the pin connectors out, but non responsive suppliers test a persons patients for sure!!!! I hate the "I already have your money, now piss off" attitude. I understand companies are busy and what not, but so many vendors do an excellent job in responding, so its not impossible as we know to simply respond.
Hey AJ,
I was just going over your post and sorry I didn't keep up with your progress I whish I would have chimed in, with the wax you are using it needs to be at least five or more coats and if I read correctly you are using polyester gelcoat with epoxy resin in your lay up, you need to use the PVA and you need to apply if as fine a mist as possible, with at least three or more coats or until you see a greenish tint on your mold. PVA it is water soluble. With that said when you lay up the next part leave extra amounts of wet out glass at each end of your part, when you go to remove the part from the mold use a couple of wooden wedges to start the separation and then submerge the whole part and mold in the waterand it will dissolve the PVA and release the part without damage to the part or mold. I will pm you some info.
C
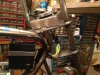
Looks like a jig saw puzzle Gary!! :laugh: I'm looking forward to seeing them oriented on the bike!! :thumbsup:
I think I am almost done making brackets and want to investigate the various ways that cables are retained and maybe weld a few brackets for those, too. I'm looking forward to the next pictures of your build!
I welded on some small pieces of cut tubing on one bike and ran the cables through...worked pretty good!! Also can weld on tabs with a hole drilled in it to fit a rubber grommet of appropriate size for your cable. Or drill into the frame and run some string at one end and shop vac at other...pull string through and tie onto cable and pull your cable through. And thanks Gary...I too look forward to posting more picts as that would mean that I actually got some more work done!! :laugh:
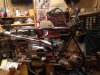
Gary you are doing one fine job on this build...:thumbsup: Keep it up young man !
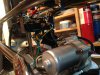
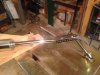
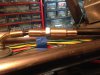
I dumped the shipping oil and put in the motor oil and confirmed the starter is turning the engine over real well. Still no smoke from any electricals, no blown fuse. Turned the cable ends and fittings from brass. It is so easy to machine! I included in the picture a test of my approach to soldering an end to a cable. I bent the cable strands at 90deg, fluxed and wetted them with solder, and with heat slid the fitting up against the strands, then applied a little more solder. Then I ground the excess strand lengths and solder from the fitting.
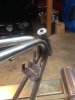
Thanks, KMC. I see you wrapped the exhaust of your Gilson. Can you please tell me what your experience with the wrap has been? It looks interesting.
Black header wrap
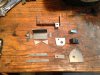
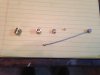
Due to the limited range of throttle adjustment offered by my twist grip, I made an inline cable length adaptor. The idea came to me after emailing with Eric at OldMiniBikes. I didn't do exactly what he had taken the time to show me, but just the conversation opened up my mind. I just submitted a question to the OldMiniBikes contact area and almost immediately Eric was helping me. Thanks for the first class response, Eric!
Due to the limited range of throttle adjustment offered by my twist grip, I made an inline cable length adaptor. The idea came to me after emailing with Eric at OldMiniBikes. I didn't do exactly what he had taken the time to show me, but just the conversation opened up my mind. I just submitted a question to the OldMiniBikes contact area and almost immediately Eric was helping me. Thanks for the first class response, Eric!
View attachment 96021
View attachment 96021