Shifter Minibike Build

#1
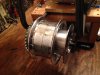
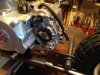
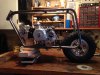
I have finally accumulated enough basic parts to do a mock-up of my shifter minibike project. This is my first minibike build. I'm using a frame built by Bad Dog and a Loncin 125cc motor/4-speed transmission. I went with the Loncin because I could get it with electric start. I have been very fortunate as Professor jdogg has been very helpful, answering all of my questions.

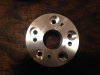
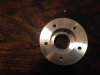
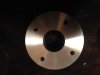
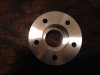
I plan on powder coating the paint: green frame, yellow wheels, oxblood red seat and grips. These are the colors of the old (like me) Lotus 25 Formula One car from 1962-63. I'm waiting for my tachometer to be delivered from a company who offers the choice of bezel style, color and font of the numbers. I just ordered 1/4" thick-4" diameter aluminum discs, which I will sandwich together in order to mate the driven sprocket to the rear wheel. Now I've got to order hydraulic brake components.

Mock up B 36.JPG

Mock up A 36.JPG
 
#7
Thanks a lot for your interest, guys! Thank you, Jason, for sending the template! I don' have any plans to drill any holes in the frame tubing yet. If I wanted to for mounting something, is that a bad thing to do?
 
#10
Looks like there might be enough room to mount a brake disc on the end of the sprocket on the motor. A couple of washers and longer bolts. Then just figure out where the caliper will mount. Flip the tire and then eliminate the jackshaft.
 
#11
Looks like there might be enough room to mount a brake disc on the end of the sprocket on the motor. A couple of washers and longer bolts. Then just figure out where the caliper will mount. Flip the tire and then eliminate the jackshaft.
You got me thinking on that one. I would be really slick, but there isn't enough room for the 4 5/8" caliper I plan on using. This caliper seems on the small side of those available. Your comment led me to trying my cardboard disc on the rear wheel and it looks like it could work nicely. I'm going to space the rear wheel sprocket from the 6" Astro wheel using a stack of 4" diameter aluminum discs. I could do the same on the other side for the caliper. These aluminum discs aren't cheap! Oh well, a cool thing about minibikes, I think, is that a person gets to build and wrench for a mere fraction of the cost doing a car. Also, no lifts and very little space required.

I moved my engine back in the frame, what with the extra room provided by loosing the jackshaft. The sprockets are at 11.5" c. to c. It looks to me that I wouldn't need to use a chain tensioner at that distance. Any thoughts about that? I'm going to look into the dimensions of any caliper that I might use, with respect to mounting and the frame-tubing-to-tire clearance.

Gumpit, thanks for your comment!
 
#12
I don't think you need a tensioner with that size chain. Looks to be 40/41/420 size. If it were a thin 35 then probably. But the bigger chain allows for more wiggle room... Think about your ultimate set up and try to make it work...
 
#13
I had a local machine shop make these sprocket and brake disc adaptors based on my drawings. They fit great! Whew!!!!! I’ll need to drill two asymmetrical holes in the sprocket because two of the original four holes would interfere with the five wheel bolt holes. Next I’m going to fab and weld the engine and brake caliper mounts. The parts have become scratched just from trial fitting. Oh well, the scratched areas won't show.

http://www.oldminibikes.com/forum/#http://www.oldminibikes.com/forum/#
http://www.oldminibikes.com/forum/#
 

Attachments

#15
Thanks for taking a look, Jason! I just mocked this up tonight as shown by the picture. At first, I freaked out about limited access to the tube valve stem. But after really looking at it with an air chuck in hand I think I'll be OK. Maybe I'll have to temporarily thread a braided extension on the valve stem when filling with air. Custom building looks to be full of adventures!
 

Attachments

Top