This post is about how I disassembled some Ceriani hydraulic shocks. The article on the Steens webpage by Mac is about the disassembly of the non-hydraulic Ceriani shocks which shared the same Taco H-032 part number as the hydraulic shocks, but were a different model. In his article Mac says it was an error that they weren't hydraulic, however there were actually two different types.
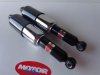
You can distinguish the hydraulic type Ceriani shock by the cast aluminum upper eye and the "valve keeper" type pieces which retain the spring and cover on the shock body
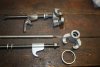
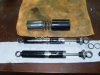
To disassemble the shocks I modified a car spring/strut compressor. I welded a piece of 5/8" steel rod on the single hook, which is strong but small enough to fit in the upper or lower shock eyes after the rubber and steel bushings are removed. I welded a bearing race on the two hooks with the "open" side facing down away from the hooks.
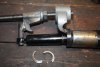
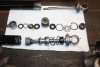
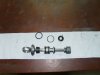
The first step in disassembly is remove the steel/rubber bushings from the eyes. I used one small and one larger socket and a vice to push out the steel bush and a screwdriver to push out the rubber. Next, remove the circlip at the top of the shock body, then lift the steel washer up and remove the O-ring under it, leaving them all loose on the shaft
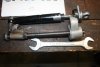
Then I assembled the strut compressor as shown in the picture so when the steel rod is inserted in the lower shock eye, and the bearing race is placed on the bottom of the lower spring cover(around the keepers). So when the nut under the the single hook is tightened against the pair of washers, the bearing race compresses the spring and the keepers can be removed.
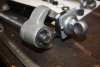
Next I reassembled the strut compressor as shown in the pictures so the race is under the top casting of the shock(with a notched plate inserted) and the steel rod is inserted in the lower eye. I turned the screw and also tightened the nut while also tapping on the sides of the shock body with a small hammer to pull the rod and internals out.
You can actually fully cosmetically restore a hydraulic shock by just removing the spring covers however one I had had a bent shaft and water had gotten inside and partially seized it so I needed to fully disassemble it to home the body and polish the piston so it it fully extended.
I tried to post all the photos which go with the text but I guess as a new member I'm not authorized. The pictures are in My Photos
You can distinguish the hydraulic type Ceriani shock by the cast aluminum upper eye and the "valve keeper" type pieces which retain the spring and cover on the shock body
To disassemble the shocks I modified a car spring/strut compressor. I welded a piece of 5/8" steel rod on the single hook, which is strong but small enough to fit in the upper or lower shock eyes after the rubber and steel bushings are removed. I welded a bearing race on the two hooks with the "open" side facing down away from the hooks.
The first step in disassembly is remove the steel/rubber bushings from the eyes. I used one small and one larger socket and a vice to push out the steel bush and a screwdriver to push out the rubber. Next, remove the circlip at the top of the shock body, then lift the steel washer up and remove the O-ring under it, leaving them all loose on the shaft
Then I assembled the strut compressor as shown in the picture so when the steel rod is inserted in the lower shock eye, and the bearing race is placed on the bottom of the lower spring cover(around the keepers). So when the nut under the the single hook is tightened against the pair of washers, the bearing race compresses the spring and the keepers can be removed.
Next I reassembled the strut compressor as shown in the pictures so the race is under the top casting of the shock(with a notched plate inserted) and the steel rod is inserted in the lower eye. I turned the screw and also tightened the nut while also tapping on the sides of the shock body with a small hammer to pull the rod and internals out.
You can actually fully cosmetically restore a hydraulic shock by just removing the spring covers however one I had had a bent shaft and water had gotten inside and partially seized it so I needed to fully disassemble it to home the body and polish the piston so it it fully extended.
I tried to post all the photos which go with the text but I guess as a new member I'm not authorized. The pictures are in My Photos