New member Project Farm Hog

#21
Maybe I'm all confuzzled, but somebody can correct me if I am wrong.
If you wanted to increase rake and trail, wouldn't you want a SMALLER rear tire, rather than going from a 19 to a 21 inch tire?
My Spidey senses are tingling here.....

EDIT...OOPS you said FRONT, my eyeballs saw REAR........you are correct, Sir!

I have only two paint choices, generally. JD green and Massey Ferguson red.
 
#22
No problem, I believe the tread and profile design of the tires I'm using is also having an effect on the steering. If/when I decide I want to change the steering characteristics I believe I have a few options available that do not involve cutting and welding.
I also posted a couple of pics in the Shop Tools forum of the saw I bought.
 

Harquebus

Well-Known Member
#23
Your bike pays homage to the old utilitarian mini bikes of yore.

Quads or UTVs have take over their role but a bike forces you into a more active role because you have to manhandle it. Everything else in this era is so easy and pushbutton-simple. On that note I'm surprised you didn't go for an electric start.
 
#25
Bought the fenders, coleman rb200/mega moto 212 plastic fenders, made some brackets and got them mounted. Worked out pretty good. I did make a small guard, from the plastic liner off of an old planter box, to put on the frame in front of the engine to catch the low flying stuff.. It's about an 1/8 thick and flexible so it should last a while.
Had to trim down the front sides of the rear fender to make it fit. Haven't decided if I am going to trim the existing mounting holes off the sides or just put some plastic plugs in them. I do plan on cutting the excess rear fender off. I figure about 1 to 1 1/2 inches past the tire.
mini bike 21.JPG mini bike 22.JPG mini bike 23.JPG mini bike 24.JPG
That's not mud on that guard. I figure once I go through the gas that is in the tank I'll take the bike apart inspect the frame, weld some end caps on, clean up any welds I don't like and finish painting the frame.
The shakedown is going well. Nothing unexpected has come up. I knew the bike was going to be heavy, plan on weighing it after I take it apart, so I'd probably be playing with the gears and the chinese tav2. Farm hog started with 10t/60t sprockets, changed to a 9t but was still getting to much belt slip and the tc was getting hotter than I thought it should. Right now I'm running with an 8t and a comet belt. Pretty good but not quite right. Don't plan on any other changes until after the paint is on.
 
#27
Doing a great job. I have never been a fan of square tube minis, ie. Hounddogs. But your bike has definitely changed my perspective. It is just downright nasty looking in a good way. Wicked cool Buddy!
 
#28
Hey thanks guys. I have to be honest though, this is my first rodeo. Most every decision I made was to play to my skill level. When I decided to do this I balanced what I knew I could do with what I thought I could vs. the tools I had on hand. I looked at a lot of pictures, watched a lot of video, read a lot of posts. I only bought the miter saw because 1. I would need perfect cuts to pull it off. 2. I know it's going to come in handy for other things and I've wanted one for a while now.
I thought about round tube but discarded that idea pretty quickly. If I can't weld in a straight line it gets ugly fast. One good thing is that I can weld a little better now than when I started this project. :D
The driving force behind my design was the seat. I picked that first. I had read that the coleman 200 ex seat was fairly comfortable for what the cost of it was. I didn't buy from coleman but minus the logo I'm pretty sure it's the same make. I am 5'7" and I wanted my feet firmly planted on the ground when I stood up and to be able to straddle the bike and walk it forwards or backwards as needed. I also wanted as much ground clearance as I could get. Was shooting for 9"-10" but erred on the side with about 8". Upright riding position and reach to handlebar played their part also. It's no coincidence that the back of the bike has a RB200ish look to it. I kind of like that design. There you go, I tend to get a little long winded when I am on the keyboard. :rolleyes:
 
#29
Farm Hog update. Bathroom scaled the front and rear. Approx. 180 lb. with full tank. With me 360 lb. total. :eek:
In an earlier post I said that I was going to wait until after the paint to mess with the gearing. I lied. :oops:. Originally I started with 10t/60t, by the time I joined this site it was 9t/60t. Too much belt slip. Went to 8t/60t and comet belt. Still not enough. Ordered a 72t sprocket. 9t/72t almost there. Changed the driven spring to the max torque hole, I'm there, but I'm not thrilled about losing overdrive. When it goes back together I'm going to try 8t driven sprocket for 9:1 and see if that allows me to go back to the middle hole and get the od back. Don't know what I don't know. Not prepared to do any engine work yet, outside of already backing the throttle stop screw out.
Been working on it for the past week (finally), got delayed by circumstances beyond my control. Moved the seat pan pivot point forward about 1 7/8". Welded some hitch pins to the rear seat support to keep the seat from bouncing around if I'm standing up. Welded on end caps on the open tubing where needed. Finished some welding on some seams, 25% of all welds not bad at all, 65% ugly but functional, 10% break out the grinder and redo.
Moved the kickstand bracket, actually had to make a new one since I ganked up the first one when I cut it off. Made it out of 3/16 and welded an 1/8 washer on the pivot hole to make it a little thicker, works great. Cut the kickstand and made it 4" longer with some 1/2 black pipe.
mini bike 25.JPG mini bike 26.JPG mini bike 27.JPG mini bike 28.JPG mini bike 29.JPG mini bike 30.JPG mini bike 31.JPG mini bike 32.JPG
Still have some work to do before I bat cleanup on the rust and start painting. I'm hoping to have it back together by Christmas.
 

Attachments

MJL

Active Member
#30
Cool build, I am looking forward to seeing it progress! I’m thinking about building a frame, but haven’t gotten there yet.

Is your belt fitting fairly tight on your TAV? I ended up slotting the bolt holes on my backing plate to snug my belt up. Just have to watch that it doesn’t start creeping. I fought with the TAV for a long time, bought a genuine Comet driver, tried all sorts of springs (driver and driven), but never got it to do what I wanted. Finally tried a Juggernaut/Torquezilla/Super 30 style and couldn’t be happier. Plenty of low end torque with 10/60 sprockets, easily climbs the steepest hills, rapid downshifts when you slow down, allows the engine rpms to climb through the torque curve. But I will say that there is no overdrive “cruising”. I haven’t tried tall sprocket ratios to see what I could get away with, but it is certainly higher than the Comet style.
 
#32
I like that.
The fit of the comet belt is good. just a little longer than the chinese one, which I thought was a hair on the tight side. I new my bike was going to be heavy, just wasn't sure how heavy. Now I know.
9:1 should make it right, if not, I'm going to be contemplating engine mods or swap to more displacement.
 
#33
I see light at the end of the tunnel and it's not a train.
I lined the center under carriage of the frame with the same plastic I used to make the engine shield. Worked out pretty good. 1 good thing about 11ga. I can tap the holes I drill.
mini bike 33.JPG mini bike 34.JPG
Quick trip to the paint booth.
mini bike 35.JPG
I was in a hurry yesterday. I hope I did a decent enough paint prep. The wind was also jacking with me bad. Not to mention all the little corners I was having to spray into. 2 cans of primer, 2 cans of paint.
"Why no honey, I'm not auditioning for the Blue Man Group. Why do you ask?"
I'm never going to win any awards for any type of finish work I try to do. I'm pretty happy with the way the paint job turned out. As long as paint does not start flaking off in 2 weeks I'll call it a win.
Going to let the frame hang out in the garage for a week before I assemble it. Should have it back together by the 22nd.
mini bike 36.JPG
 
#35
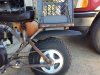
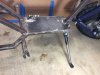
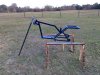
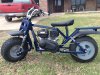
For all intent and purpose Project Farm Hog is done. I can't say finished. I've learned what most everyone here knows, you're never finished, but the plan behind the build is complete. Everything from here on out is a tweak or mod.
As I'd hoped, changing from 9t to 8t, for 9:1 ratio, on the driven sprocket allowed me to move the spring back to the center hole and get the overdrive back. Calculated top speed with 19' tires, 4000 rpm and overdrive ratio of 8:1 is 28 mph and I think I'm right around there. May buy comet driver and driven springs to play around with and see what effect it has on acceleration. Right now I'm pretty happy with the throttle response as is but there nothing to compare it to outside of my own testing.
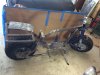
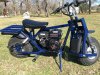
I did re bathroom scale the bike 83 lbs. front 92.5 lbs. rear. with a half tank of gas.
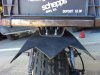
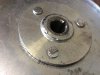
I ran into a couple of small issues while putting the bike together. The driver weights had a 2 gram imbalance. one weighed 144g and the other 142g. Grabbed a small drill bit off of the work bench and that fixed that. The other issue was when I had put the 8t on when I was using the 60t rear sprocket. Did not notice at the time that the 420 master link was gouging into the driven pulley a little bit because of the smaller diameter of the sprocket. Used the carbide bit in the dremel tool to grind down the lip on the backside of the pulley to take care of that.
mini bike 39.JPG
mini bike 40.JPG
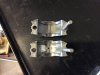
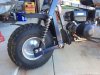
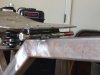
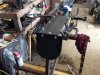
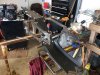
For the rest I bought a couple of 1" square plastic inserts to fit into the steering stops. 3/8" and 1/2" split wire loom to add some abrasion resistance to the hyd. brake line and wiring to the handlebars. Added some rubber coated 1 hole straps to hold the brake line in place, a little judicious use of some zip ties, and everything is good to go.
Oh, and I did manage to finish it for the 25th. Merry Christmas. :D I hope everyone had a Merry Christmas and will have a Happy New Year.
mini bike 37.JPG
mini bike 38.JPG

P.S. I want to thank all the members here past and present whose knowledge I gleaned from reading hundreds of post's that helped make my build a relatively hassle free experience. As always any comments, questions, and criticisms are welcome.
 
Top