This is what I got done today. As I am retired there is no reason to do anything that does not please me to do. The first pic shows the megaphone complete. A stay, bolted to the head, was added to forestall failure caused by the long megaphone flapping in the breeze. The next two photos are about the rear wheel chain adjusters. Slots, to fit the rear portion of the axle tabs, were cut in a couple of pieces of rectangular key stock. A bar could have been welded across the opening for the axle but that would hace required that the axle be inserted through the wheel bearing assembly to put the rear tire in the frame. This method takes a little more time to build but makes wheel removal easier. The last photo shows the split clamp , that secures the velocity stack to the carb, trial mounted. Today I acquired some aluminum parts at a truck repair shop. They are a pair of 3-1/2" dia. flanged "heads" made from aluminum. They are really block off plugs for a certain size of rubber tube. Also a hunk of 3-1/2" dia. aluminum tube. Told the guy that he had to give them for free or I'd spread bad storys about him. So most everthing is on hand to make a fuel tank.
Oldsalt's Caper Cycle. Custom Modified Class.
- Thread starter Oldsalt
- Start date
Old salt,I have a question about your carb.I have some extra 18mm and 22mm mikunis.Which is better for a stock 6 hp tec?Also,how far is too far to mount a carb from the engine?I have some manifolds that have a 50 -60 degree bend and are about 4-5 inches long.Is this too far for fuel and air mix? Thanks.
Today was tank day. The first attached picture is the fitting that the gas cap will screw into. It has been internally threaded and is being parted off to the proper length. The next picture shows the cap. It is being threaded to fit the tank fitting. A non standard 1-3/8 - 10 thread. The last pic shows the main tube, tapped for a fuel line fitting. A fuel line fitting that has some fine mesh screen soldered to it for fuel filtration. And the heads and the completed gas cap hith the "O" ring seal in place. I got the feeling this project will not be completed in time. Started much too late. But I'll keep working on it because its fun.
Got the foot pegs mounted. Cut them out of 3/8 X 1 bar and folded pieces of 10 ga. sheet to make the mounts. They should work O.K.
Also started on a seat. I'm going to try makeing it myself. A friend loaned me his original seat for a pattern and them asked that I make him a cover for it. Don't know that I'm up to doing a decent job but I'll give it a try.
Also attached is a pic of the parts for the kick stand. The leg is 3/8" sq. The hinge pin is a 3/16 rivet. Like the mounts for the folding foot pegs the mount is a piece of folded 10 ga. Should work if I get the spring in the right spot.
looking good oldsalt:thumbsup: what happened to your pics on page 1 of this thread? is that a roundish style seat you need for that bike? to do it right a sewing machine is required. let me know if you need any advice on making a seat.
One attached picture shows the board having the blind nuts pressed in. Another shows an original cover [fosselized] next to the smaller seat board that I made. The last pic shows the fuel tank completed.
Last edited:
After a few cussing sessons the seat is finished, or as finished as it is going to get. It sorta looks like a big black marshmallow sitting on top the frame. See picture. But I learned a few things by making it. I believe the old Singer is now operating properly, it stiches nicely. Took some time to figure out the thread tension adjustments and the pressure foot pressure and etc. The problem that remains is that I don't know how to cut out, sew, and install a seat cover.
what kind of foam you using?? when you sit on the seat do you bottom out on the wood?? if so first well start with the foam.
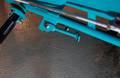
Today the scrub brake was almost completed. Decided to take a page out of Backyard Builder, Yellowhand, Delrey's and etc. book and try something different that what is usually used to accuate a plate on the rear tire. Usually we see a really long brake lever, sometimes over a foot long, running along side the lower frame rail. At its end is a 90 degree bend that has the plate attached to it. That design is simple and very easy to build but it seems to me to have a serious drwback. The lever arm is so long that the amount of travel at the foot end is far to much. Sure, the leverage is really good but how do you adjust the damn thing when the tire wears down [or the rear tire is reguired to move for chain adjustment]. The foot end of the lever would be getting rather close to the pavement. So I used a push rod enclosed in a tube [the tube supposts the rod so that it can't excessively flex]. One of the attached photos shows the mushroom end on the push rod and a lever arm, with a roller, that works against it. The end of the push rod that contacts the scrub plate is threaded to allow adjustment to compensate for wear. I don't think this project can be finished by the deadline but it sure is fun to build.
oldsalt, on my first build i use threaded rod ends with heim joints. work good for adjusting the length correct.
I really like your brake level under the frame.(slick):thumbsup:
another first(design) at oldminibikes.com:thumbsup:
looks alot better under the frame then on the out side of the bike:doah:


I really like your brake level under the frame.(slick):thumbsup:
another first(design) at oldminibikes.com:thumbsup:
looks alot better under the frame then on the out side of the bike:doah: