2016 MiniKenny Bonanza BC500 vintage open

It all looks good to me kenny. :thumbsup: you're on a roll now...keep up the good work !
Oh and that is one bad a$$ seat...nice work guys.
Oh and that is one bad a$$ seat...nice work guys.
Nice job on making those plugs! I know it's basic, but it takes time to get them right and the resulting weld is where it pays off- and obviously you know this.
Really coming together rather nicely:thumbsup:
I have a question about that chain rash on the back of the plate: Should I just ask my buddy to fill that in with weld bead? Or would that be a pain in the butt... I don't want to strain my relationship with the guy. :laugh:
He isn't available until tomorrow so if there is some grunt work I can do in advance to make it easier I'll do it.
If you could see the grin on my face ")

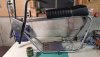
If you guys could see the grin on my face!! :thumbsup: :biggrin: I am down to using a hand file right now but I thought I had better snap a picture before you guys thought I swapped engine plates!! Oh yeah I'm pretty damn excited lol.
The link must have busted to the before picture, probably my fault lol. Here it is:
Last edited:
Like the wheels!
Making progress - kidney beans and new tires. I probably would sit on it and make vroom vroom noises but I don't have my seat yet. Its too uncomfortable, I tried! ut::laugh:
View attachment 82386
ut::laugh:View attachment 82386
show off
First off, thanks for all the encouragement and support :thumbsup:
I thought I'd better clean off a spot on the bench and show a couple of things that have me excited. :laugh:

First is my manchester1 seat! I've had it for a few days but didn't bring it down to the shop, I didn't want to get it dirty :laugh: It will be going back in the box until I need it now. Thank you Karen :bowdown: it is beautiful!
Second is I have my engine plate about smoothed out. I can still barely feel a couple of spots with my fingers but you really have to look and almost know the holes were there before to find them. :thumbsup: I had to remind myself that 80% of the repair will be covered by the engine anyway. :doah:
Thirdly I FINALLY got the fork lowers unstuck from some 1100 forks. I've decided that this bike will be a BC1100 now. :thumbsup: The hacked up forks that came with this can go with the hacked up frame I got these forks off for a future project.
Fourth I had a slight change of engine plans. That Honda is leaking oil from I don't know where, and it's only 160cc, and well those are just excuses. To me, Hondas have to be red, and once I saw the gold on my beautiful seat I knew this Bonanza has to be blue. I know I'm crazy.ut::laugh:
I want to be a little different (or maybe just copy Buckeye. :laugh I got a great deal on a ball bearing Intek 206cc engine off a pressure washer. Model 121432. The guy had it sitting outside for he didn't even know how long. I almost turned around and left but when I saw the 3 in the model number I decided to take a chance. I brought it home and removed the pump to make sure somebody didn't just swap valve covers. I dumped all the water out of the tank, (It barely even smelled like gas!) dropped and dumped out the carburetor bowl, wiped it out. There was some corrosion but not as much as I expected. Put that back on, oil looked ok but I changed it for good measure. Air filter had been soaked, all wavy and rusty, I had a new one so I changed it. Didn't even look at the spark plug. Put fresh gas in it and she fired right up!!! Sounds strong too.
I'm thinking clean and paint the engine tins. Maybe an animal cam and rod, possibly carb. I'll be shopping for stuff including a fuel tank now.
I'm also thinking this project will be nice enough to warrant sandblasting and powder coating. So I am welcoming any advice or recommendations on that subject. Wow this is a long post. If anyone is still reading all of this, I have a question: How do you protect the neck bushings during sandblasting? Is it removeable? Thanks for looking and any answers or advice you may have. :thumbsup:
First off, thanks for all the encouragement and support :thumbsup:
I thought I'd better clean off a spot on the bench and show a couple of things that have me excited. :laugh:
First is my manchester1 seat! I've had it for a few days but didn't bring it down to the shop, I didn't want to get it dirty :laugh: It will be going back in the box until I need it now. Thank you Karen :bowdown: it is beautiful!
Second is I have my engine plate about smoothed out. I can still barely feel a couple of spots with my fingers but you really have to look and almost know the holes were there before to find them. :thumbsup: I had to remind myself that 80% of the repair will be covered by the engine anyway. :doah:
Thirdly I FINALLY got the fork lowers unstuck from some 1100 forks. I've decided that this bike will be a BC1100 now. :thumbsup: The hacked up forks that came with this can go with the hacked up frame I got these forks off for a future project.
Fourth I had a slight change of engine plans. That Honda is leaking oil from I don't know where, and it's only 160cc, and well those are just excuses. To me, Hondas have to be red, and once I saw the gold on my beautiful seat I knew this Bonanza has to be blue. I know I'm crazy.
ut::laugh: I want to be a little different (or maybe just copy Buckeye. :laugh
I got a great deal on a ball bearing Intek 206cc engine off a pressure washer. Model 121432. The guy had it sitting outside for he didn't even know how long. I almost turned around and left but when I saw the 3 in the model number I decided to take a chance. I brought it home and removed the pump to make sure somebody didn't just swap valve covers. I dumped all the water out of the tank, (It barely even smelled like gas!) dropped and dumped out the carburetor bowl, wiped it out. There was some corrosion but not as much as I expected. Put that back on, oil looked ok but I changed it for good measure. Air filter had been soaked, all wavy and rusty, I had a new one so I changed it. Didn't even look at the spark plug. Put fresh gas in it and she fired right up!!! Sounds strong too. I'm thinking clean and paint the engine tins. Maybe an animal cam and rod, possibly carb. I'll be shopping for stuff including a fuel tank now.
I'm also thinking this project will be nice enough to warrant sandblasting and powder coating. So I am welcoming any advice or recommendations on that subject. Wow this is a long post. If anyone is still reading all of this, I have a question: How do you protect the neck bushings during sandblasting? Is it removeable? Thanks for looking and any answers or advice you may have. :thumbsup:
Attachments
-
 1.4 MB Views: 170
Looking real nice. I'm so jealous of anyone with a 'nanza. That is definitely on my short list of minis.
If you take your bike to a powder coater, just let them know what you don't want powder coated and they should be able to cover up any holes with rubber plugs.
As far as removing the bushings, I can't help you there as I don't know what those bikes use. Sorry.
Keep up the good work, it will be a beauty when your done!
I also believe that a real nice seat can make a mini bike. Look at some of those nice bikes with a home made seat. Makes the bike look like doo doo. Lol.
Last edited:
question
Well, no luck so far on getting the neck bushings to budge. Karen made it sound so easy :laugh: It probably is easy for someone as talented as her. :thumbsup:
So tapping with a hammer and long screwdriver from the opposite end for quite a while. Tried heating up the neck. They haven't moved at all. I have it soaking in penetrating oil now. I'm wondering if I need some kind of internal bearing puller? I don't have anything like that.
Sorry I made it sound easy.:laugh: I have removed them from 3 really rusty frames and was totally shocked how easy they came out. :laugh: Soaking them in PB blaster should help. I always thought they came out easy because they are not steel.ut: They didn't pop right out.......had to tap all around them.:thumbsup:
ut: They didn't pop right out.......had to tap all around them.:thumbsup:
If you have your frame coated, have them tape of the throttle side of the bars. The extra material will not be happy with your throttle tube! I will fit the throttle on there and mark a spot in from the housing. Have to scrape/sand the coating off is not fun! I know!
Sorry I made it sound easy.:laugh: I have removed them from 3 really rusty frames and was totally shocked how easy they came out. :laugh: Soaking them in PB blaster should help. I always thought they came out easy because they are not steel.ut: They didn't pop right out.......had to tap all around them.:thumbsup:
ut: They didn't pop right out.......had to tap all around them.:thumbsup: