Gilson Trail Bike Build...Resto well kinda sorta, maybe

#1
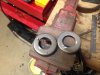
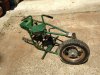
Delray was kind enough to offer me another Gilson, this time a Trail Bike, while we were at Windber. Brian said the forks were a little rusted but otherwise pretty much there. This bike has the rear fender mount, original gas tank, engine chain tensioner and most importantly, a complete brake assembly. The spoked wheels are in pretty good condition, though I'm going to have to find some spokes for one of the wheels. The drive sprocket is in great shape. This is a torque converter bike, so this will be my first experience with one. I've already been in contact with Unorthodox and RCGuy to get measurements for the inside mount jackshaft plates that are missing. My welder has parted with some 3/16" square tubing for the brackets and I ordered metal to make a couple of brake assemblies (one for Copperhead, in particular).

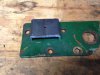
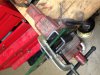
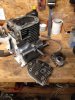
Gammatag was parting out a 323, so I grabbed a bunch of parts including a kick stand, solid front forks, and a partial brake assembly. I also grabbed the wheels for a future build. Harley's Poppa made me a great deal on a Tecumseh H60, and Joe51 is shipping a throttle control kit to me. Need to talk to Mr. Wulf about a custom exhaust to mimic the original. So, won't be entirely correct with the H60, but torque is torque and I hear these run pretty strong.

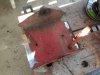
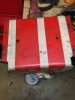
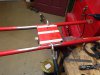
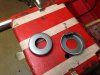
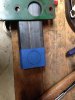
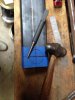
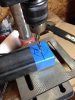
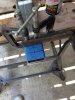
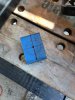
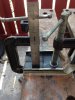
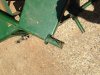
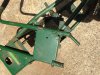
Below are pics of what we are starting with (well, most of the parts).
 

Attachments

#2
Replicating the forks

The spring cups, tree head and tubes of the original upper forks were pretty rusted out, as were the springs. I debated trying to restore it, but it's too far gone. I had picked up a set of 323 forks from Gammatag, and these are solid forks with the grips square to the head, and much shorter. To replicate the originals, I needed to carefully cut the tubes off the tree head.

To do so, I used my Dremel tool with a thin disc to cut away the welds and minimize the amount of material lost on the tree. Took a while, and some finagling but they came off with minimal damage. I mounted the tree in the vise, found the centerline, laid up some marks and carefully ground the mounting tabs to fit the tubes. I was able to maintain 6" between the forks. The tubes fit pretty nicely and leave enough room for a good weld.

I ordered a set of new spring cups that were 7/8" ID, so I needed to ease open the holes to fit around the 1" tubes. Again, I was slow and used the Dremel with a grinding tool to open them up. The fork lowers need to be cleaned up and straightened. The lower spring cups accommodate the new chrome springs I ordered perfectly. I just need to properly size the length of the uppers, cut and install the spring cups before welding.

My welder does have a tubing bender and we may try to replicate the Gilson prototype bike's handlebars in the old advertisement--angled slightly forward.
 

Attachments

capguncowboy

Well-Known Member
#3
I was wondering who had gotten that Allis Chalmers. I was tempted but decided to hold off since I had just gotten there when I was looking at it. I'm glad it went to someone that'll do it justice

I have an exhaust that I had fabbed up for a Gilson. It's not exact, but looks pretty good. I'm not sure if it'll suit your needs or not, but if you're interested, let me know.


The pipe I used was a 1", not the 2" the standard exhausts used. The shield has a single row of slots cut in it instead of the two sets. It also used a 3/4" NPT instead of the 1" NPT threads, so it requires an adapter to be used.
 
Last edited:
#4
I have an exhaust that I had fabbed up for a Gilson. It's not exact, but looks pretty good. I'm not sure if it'll suit your needs or not, but if you're interested, let me know.


The pipe I used was a 1", not the 2" the standard exhausts used. The shield has a single row of slots cut in it instead of the two sets. It also used a 3/4" NPT instead of the 1" NPT threads, so it requires an adapter to be used.
Thanks, let me get a bit further on this build!:thumbsup:
 

buckeye

Well-Known Member
#10


To pick on someone on you mean..:laugh:
Already got it done.:thumbsup:
For the Rat Rod shows.


Well, start a build log my good man....we need a thread to chatter on!:laugh:[/QUOTE]
 
#11
Nice work so far Pete :thumbsup: What do you think about the piston and head :doah: I guess that wasn't the motor I taped the coil wire on :shrug:
Randy, I was hunting around on e-Bay just to see what was out there...many of the heads listed have the same detonation dings. I dunno, I power washed the block today before I tear it down to see what's inside. Once I get the piston out, I'll have a better idea if it needs to be replaced.

As always nice work Pete..:thumbsup:.I'm tuned in for the build .
Thanks, Eric! I may need you and Mr. Wulf to offer up opinions as discussed above with Randy.


To pick on someone on you mean..:laugh:
Already got it done.:thumbsup:
For the Rat Rod shows.


Well, start a build log my good man....we need a thread to chatter on!:laugh:
[/QUOTE]

Golly Neds, my good man. Rat Rod it is.:laugh: I have a long seat for a 525 that you might be interested in--covers all the way back.
 
#12
You clearly don't need 8 Gilson's , I've spoke with your wife and she is in agreement that you should send one down south , she accepted my offer of $300 , let me know how you intend to ship it !
 

delray

Well-Known Member
#13
yes pete, i am baffled too with this brochure picture. handle bars are forward. bike must handle better and ride comfortable with them forward. also whats going on the back of that bike. looks like a gas tank.


that would be interesting if your welder can make a set that look correct to the ad........:thumbsup:
also check out the tires. they look big almost bigger then the 5.30 tires?
if i had to guess i would say them handle bars are straight up or very close....:rolleyes:
 
#14
You clearly don't need 8 Gilson's , I've spoke with your wife and she is in agreement that you should send one down south , she accepted my offer of $300 , let me know how you intend to ship it !
You are right....I need to thin the herd a bit...but that might be the ARCO, CAT or Ruttman first. The Gilson is so nice to ride especially for tall folk like me.

yes pete, i am baffled too with this brochure picture. handle bars are forward. bike must handle better and ride comfortable with them forward. also whats going on the back of that bike. looks like a gas tank.


that would be interesting if your welder can make a set that look correct to the ad........:thumbsup:
also check out the tires. they look big almost bigger then the 5.30 tires?
if i had to guess i would say them handle bars are straight up or very close....:rolleyes:
Brian--look even closer. The chain guards are different as are the tails of the frame and the rear fender support. No swing arms either! You're right on the tires, too. I've learned Gilson interchanged a lot of parts from their other products. The Sno-hogs I put on Copperhead are 5.00-6 x 15.5 and look about the same height as the ad. That quart sized tank woulda lasted 1/2 way to town for the Windber parade! (The green bike was about on fumes by the time we got back).
 
Last edited:
#18
Jack Shaft Bracket--probably the most tedious detail work

I started on the jack shaft brackets today...about 3 hours of time measuring, cutting and shaping and still a ways to go. Unorthodox had bent up the brackets at his uncle's shop, and looking at them, I knew I couldn't do the same with 3/16" stock. He and RCGuy were kind enough to send measurements and photos, so I decided to make up the plates a little differently.

The bearing mount is made out of 3/16" tubing that I cut to length and split with the sawzall. Before cutting, I grabbed the swing arm plate to eyeball the size needed. The bracket has to hold a 1 3/8" bearing for the jack shaft. I wrapped the pipe in blue tape to give me a pretty rectangular surface to do measurements. I found the center and drilled a pilot hole for the bearing. It will be drilled out later with a 1 3/8" carbide tipped hole saw that I picked up from Amazon--it should go through the thick plate with a lot of cutting fluid and patience.

Once I cut the tube to size, I split it in half and cleaned it up to an inside depth of 1/2". I still have to finish file the mating surfaces. I have some 3/16" plate that I'm going to cut to size tomorrow for the bolt tabs. To center the brackets on the swing arm bracket, I'm going to sandwich the swing arm bracket between the two jackshaft brackets (see pic). I'll use a #12 screw and washers to align the pieces on each side (this is why the bearing mount has not been drilled out). Once the tabs are done, they will be welded to the u-brackets both inside and out. A little grinding and they'll be done.

This is probably the most tedious part of the build. There is not much wiggle room and working to get the pieces accurate is pretty hard when you do it with hand tools. But it can be done. I am going to have to get new bearings for the swing arm, as the original oblong bearings fused to the swing arm and one broke off. Thankfully, they are available but for a hefty price.
 

Attachments

#19
Looking good Doc. I bought the frame and swing arm for the bike that you got the fork from. I might grab some measurements from you later on. I might make my own forks if I cant find a set on here. We shall see. Where did you get the upper spring cups from?
 
#20
Looking good Doc. I bought the frame and swing arm for the bike that you got the fork from. I might grab some measurements from you later on. I might make my own forks if I cant find a set on here. We shall see. Where did you get the upper spring cups from?
Here's a link: SPRINGS - Old School Mini Bike Parts & Stuff

I'll be glad to send you measurements. Gammatag sent his 323 parts far and wide!:laugh:
 
Last edited:
Top