Well, it's been a while since I've been here, but it ain't because I haven't been busy .....
A while back, I picked up the plans for the Tom Thumb, thought it would be a cool project to try. Recently, I decided to put my welding skills to the test (I've actually been on this project a couple of weeks) and try to build one myself. The catch is, it's not just any Tom Thumb. This is all custom-built from scrap metal I had just laying around, plus parts from several junker bikes and gopeds.
So it begins ..... the Re-Cycle.
Image hosting, free photo sharing & video sharing at Photobucket
Height: 20" at handlebars, 15" at seat
Length: 28"
Width: 8"
Wheels: 4" goped wheels
Drivetrain: 47cc pocketbike engine with CVT
Required:
-Needs to be short enough to fit under the tonneau cover of my truck so it can be fully closed and locked - max 16".
-Front end easily removable to accomplish this, perhaps removeable handlebars.
-Use pocketbike engine and goped wheels for drivetrain - #25 chain.
-EXTRA CHALLENGE: make it all from recycled metal laying around. Only purchased items can be drivetrain and wheels.
Image hosting, free photo sharing & video sharing at Photobucket
Image hosting, free photo sharing & video sharing at Photobucket
Image hosting, free photo sharing & video sharing at Photobucket
The frame is made of four tire irons welded together, the inside of the wrench ends filled with - what else? - car lugnuts. The engine plate used to be part of an office keyboard track, with a curved slot cut out for carburetor clearance, and the crossmembers on the frame were bicycle kickstands.
The head tube is a small section of pipe with car lugnuts on either end, and a large 1/4" gusset plate to tie it into the arms of the frame.
Image hosting, free photo sharing & video sharing at Photobucket
Image hosting, free photo sharing & video sharing at Photobucket
http://i404.photobucket.com/albums/pp127/SpyGuy/Welding And%
Image hosting, free photo sharing & video sharing at Photobucket
Comparison - that's a full-size Cag/Daytona frame the bike is sitting next to:
Image hosting, free photo sharing & video sharing at Photobucket
Image hosting, free photo sharing & video sharing at Photobucket
(** Note: Earlier photos show a different head tube, made from a small section of 3/8" water pipe inside two sleeves, attached to one arm of a 3-piece bicycle crank. This design didn't work out very well, as the pipes wouldn't take a good weld and hold together. After several hours of frustration and easily-broken welds - not to mention enough cussing to make a sailor blush :censure::cursing:- out came the cutting wheel. :grind:**)
Image hosting, free photo sharing & video sharing at Photobucket
Image hosting, free photo sharing & video sharing at Photobucket
Image hosting, free photo sharing & video sharing at Photobucket
Image hosting, free photo sharing & video sharing at Photobucket
Image hosting, free photo sharing & video sharing at Photobucket
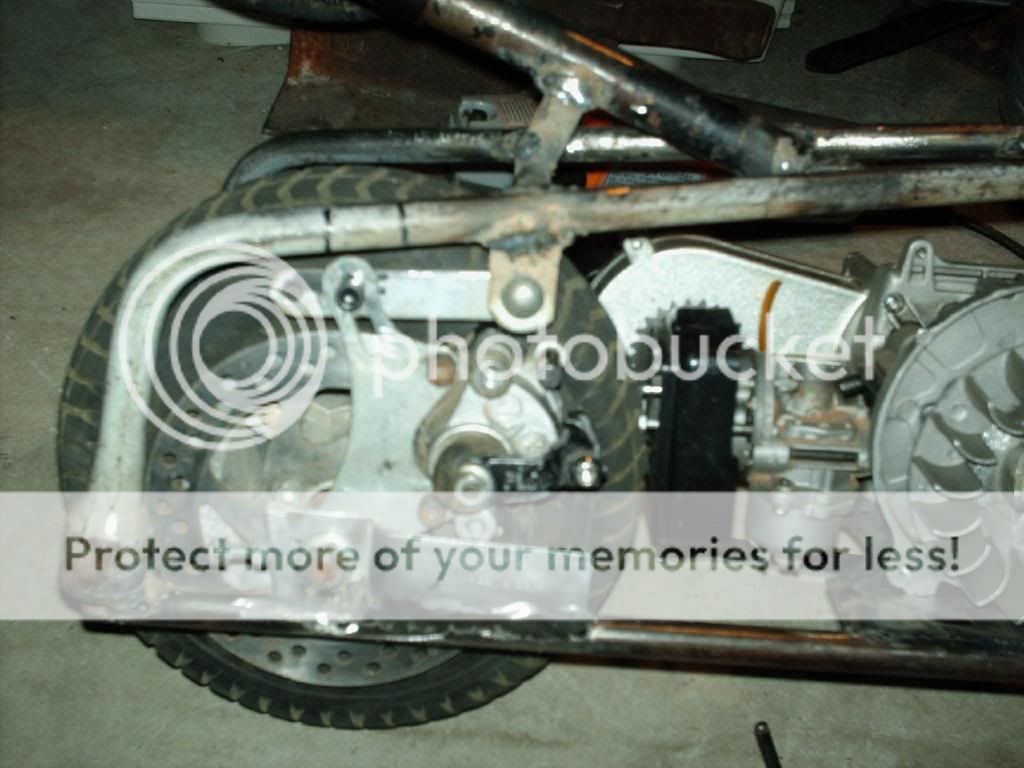
The rear wheel mounts are cut-down training wheel mounts. A funny thing about goped wheels - the axles are fastened INSIDE the wheels, and can't be slid out like regular pb wheels (or if they have, I haven't found out how yet.) To accomodate this, slots were cut in the axle mounts with a 4" angle grinder and cutting wheel.
Image hosting, free photo sharing & video sharing at Photobucket
Image hosting, free photo sharing & video sharing at Photobucket
Image hosting, free photo sharing & video sharing at Photobucket
The front forks are also tire irons, with 1/4" steel plate for triple trees, and chopped-down training wheel mounts, doing the same trick with the slot. (Been using a LOT of cutting wheels - that 1/4" plate is tough stuff!)
Image hosting, free photo sharing & video sharing at Photobucket
Image hosting, free photo sharing & video sharing at Photobucket
Image hosting, free photo sharing & video sharing at Photobucket
Image hosting, free photo sharing & video sharing at Photobucket
Image hosting, free photo sharing & video sharing at Photobucket
Image hosting, free photo sharing & video sharing at Photobucket
(Yah, I know, the front forks aren't gonna turn with that big plate like that. I just didn't get a picture of the bottom end cut out yet.)
Hey, starting to look like a bike now! :thumbsup:
Image hosting, free photo sharing & video sharing at Photobucket
Image hosting, free photo sharing & video sharing at Photobucket
Image hosting, free photo sharing & video sharing at Photobucket
Well, let's drag out one of the Cags, and see what we've got here .....
Image hosting, free photo sharing & video sharing at Photobucket
Image hosting, free photo sharing & video sharing at Photobucket
Image hosting, free photo sharing & video sharing at Photobucket
Yup, those are tire irons in the picture, too - exactly what I used to build this little beast.
Gas tank is a stock Cag/Daytona tank, secured with a big ol' hose clamp in pure redneck style. Yup, that IS a bicycle seat! The pipe it's mounted on used to be a set of mountain bike handlebars, cut and notched to fit on the new frame, and supported by a really big nut.
Image hosting, free photo sharing & video sharing at Photobucket
Image hosting, free photo sharing & video sharing at Photobucket
Image hosting, free photo sharing & video sharing at Photobucket
Kinda hard to believe those are the same size wheels, huh?
Image hosting, free photo sharing & video sharing at Photobucket
Just to give y'all some reference points on this bike to show how REALLY small it is ...
-From the ground to the top of the head frame is between 12"-13". In comparison, a standard vehicle license plate is 12" from side to side.
-Each of those wheels stands 9" tall, from ground to top of tire. A standard stock Cag/Daytona tire/wheel combo is over 11".
-The top of the gas cap on the yellow bike (btw, that's a Cag) sits at 22" from the ground. My handlebars are 2" shorter.
Future plans for the bike include brake and throttle levers, upper engine mount, brake bracket mount, shorty exhaust pipe with goped can, footpegs, and kickstand. Gusset plates for additional frame strength are also in the making.
To be continued ..... :smile:
A while back, I picked up the plans for the Tom Thumb, thought it would be a cool project to try. Recently, I decided to put my welding skills to the test (I've actually been on this project a couple of weeks) and try to build one myself. The catch is, it's not just any Tom Thumb. This is all custom-built from scrap metal I had just laying around, plus parts from several junker bikes and gopeds.
So it begins ..... the Re-Cycle.
Image hosting, free photo sharing & video sharing at Photobucket
Height: 20" at handlebars, 15" at seat
Length: 28"
Width: 8"
Wheels: 4" goped wheels
Drivetrain: 47cc pocketbike engine with CVT
Required:
-Needs to be short enough to fit under the tonneau cover of my truck so it can be fully closed and locked - max 16".
-Front end easily removable to accomplish this, perhaps removeable handlebars.
-Use pocketbike engine and goped wheels for drivetrain - #25 chain.
-EXTRA CHALLENGE: make it all from recycled metal laying around. Only purchased items can be drivetrain and wheels.
Image hosting, free photo sharing & video sharing at Photobucket
Image hosting, free photo sharing & video sharing at Photobucket
Image hosting, free photo sharing & video sharing at Photobucket
The frame is made of four tire irons welded together, the inside of the wrench ends filled with - what else? - car lugnuts. The engine plate used to be part of an office keyboard track, with a curved slot cut out for carburetor clearance, and the crossmembers on the frame were bicycle kickstands.
The head tube is a small section of pipe with car lugnuts on either end, and a large 1/4" gusset plate to tie it into the arms of the frame.
Image hosting, free photo sharing & video sharing at Photobucket
Image hosting, free photo sharing & video sharing at Photobucket
http://i404.photobucket.com/albums/pp127/SpyGuy/Welding And%
Image hosting, free photo sharing & video sharing at Photobucket
Comparison - that's a full-size Cag/Daytona frame the bike is sitting next to:
Image hosting, free photo sharing & video sharing at Photobucket
Image hosting, free photo sharing & video sharing at Photobucket
(** Note: Earlier photos show a different head tube, made from a small section of 3/8" water pipe inside two sleeves, attached to one arm of a 3-piece bicycle crank. This design didn't work out very well, as the pipes wouldn't take a good weld and hold together. After several hours of frustration and easily-broken welds - not to mention enough cussing to make a sailor blush :censure::cursing:- out came the cutting wheel. :grind:**)
Image hosting, free photo sharing & video sharing at Photobucket
Image hosting, free photo sharing & video sharing at Photobucket
Image hosting, free photo sharing & video sharing at Photobucket
Image hosting, free photo sharing & video sharing at Photobucket
Image hosting, free photo sharing & video sharing at Photobucket
The rear wheel mounts are cut-down training wheel mounts. A funny thing about goped wheels - the axles are fastened INSIDE the wheels, and can't be slid out like regular pb wheels (or if they have, I haven't found out how yet.) To accomodate this, slots were cut in the axle mounts with a 4" angle grinder and cutting wheel.
Image hosting, free photo sharing & video sharing at Photobucket
Image hosting, free photo sharing & video sharing at Photobucket
Image hosting, free photo sharing & video sharing at Photobucket
The front forks are also tire irons, with 1/4" steel plate for triple trees, and chopped-down training wheel mounts, doing the same trick with the slot. (Been using a LOT of cutting wheels - that 1/4" plate is tough stuff!)
Image hosting, free photo sharing & video sharing at Photobucket
Image hosting, free photo sharing & video sharing at Photobucket
Image hosting, free photo sharing & video sharing at Photobucket
Image hosting, free photo sharing & video sharing at Photobucket
Image hosting, free photo sharing & video sharing at Photobucket
Image hosting, free photo sharing & video sharing at Photobucket
(Yah, I know, the front forks aren't gonna turn with that big plate like that. I just didn't get a picture of the bottom end cut out yet.)
Hey, starting to look like a bike now! :thumbsup:
Image hosting, free photo sharing & video sharing at Photobucket
Image hosting, free photo sharing & video sharing at Photobucket
Image hosting, free photo sharing & video sharing at Photobucket
Well, let's drag out one of the Cags, and see what we've got here .....
Image hosting, free photo sharing & video sharing at Photobucket
Image hosting, free photo sharing & video sharing at Photobucket
Image hosting, free photo sharing & video sharing at Photobucket
Yup, those are tire irons in the picture, too - exactly what I used to build this little beast.
Gas tank is a stock Cag/Daytona tank, secured with a big ol' hose clamp in pure redneck style. Yup, that IS a bicycle seat! The pipe it's mounted on used to be a set of mountain bike handlebars, cut and notched to fit on the new frame, and supported by a really big nut.
Image hosting, free photo sharing & video sharing at Photobucket
Image hosting, free photo sharing & video sharing at Photobucket
Image hosting, free photo sharing & video sharing at Photobucket
Kinda hard to believe those are the same size wheels, huh?
Image hosting, free photo sharing & video sharing at Photobucket
Just to give y'all some reference points on this bike to show how REALLY small it is ...
-From the ground to the top of the head frame is between 12"-13". In comparison, a standard vehicle license plate is 12" from side to side.
-Each of those wheels stands 9" tall, from ground to top of tire. A standard stock Cag/Daytona tire/wheel combo is over 11".
-The top of the gas cap on the yellow bike (btw, that's a Cag) sits at 22" from the ground. My handlebars are 2" shorter.
Future plans for the bike include brake and throttle levers, upper engine mount, brake bracket mount, shorty exhaust pipe with goped can, footpegs, and kickstand. Gusset plates for additional frame strength are also in the making.
To be continued ..... :smile:
 :hammer: