HSSK50 small block mods

delray

Well-Known Member
#1
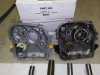
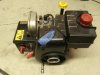
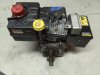
been sitting on this motor for a while now and had little down time to start on this build for a future project bike or two? not sure which one i'm going to put it on first....:scooter:. both bikes came with lights and this engine has the lighted coil on it.
22.jpg
19.jpg

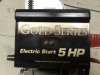
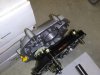
this engine was purchase with a bunch of parts also so it came out to be only $5 for it.

16.jpg
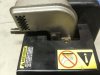
it appears from looking at the muffler it may have low hours on it?
14.jpg
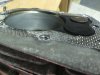
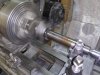
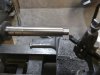
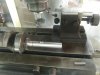
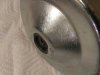
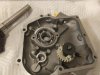
the bore was nice and straight. so it will just get a quick hone and new rings.

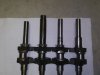
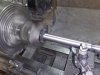
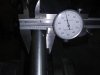
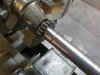
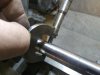
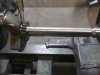
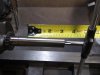
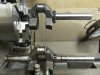
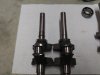
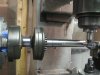
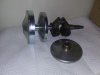
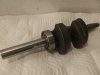
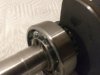
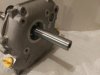
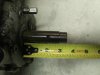
here is the ugly part why no one wants these motors. crankshaft is crazy long with a 1inch shaft and a step down at the end.
20.jpg
21.jpg
17.jpg
 

delray

Well-Known Member
#2
pull out one of my newer NOS bearing side covers and compared it with a older vintage rupp bearing cover. there are a few different things about them but for the most part they will still work for my project.
11.jpg
8.jpg
yep i think i might of just given it away what i am going to do...:cool:
 

mustangfrank

Well-Known Member
#3
Have to remember that "Gold Series" label in the Spring when everyone is dumping snowblowers again cheap, can't always see an alternator connector in crappy CL pictures.
 

delray

Well-Known Member
#4
starting from the left: standard length bearing crank,hssk50 bushing crank,rupp bearing crank,ohh bushing crankshaft(same length rupp's)this can be also change into a bearing crank with just a grove machine into it for the snap ring. yes the ohh user's a 1inch bearing I.D
23.jpg
 

delray

Well-Known Member
#5
Have to remember that "Gold Series" label in the Spring when everyone is dumping snowblowers again cheap, can't always see an alternator connector in crappy CL pictures.
they are a dime a dozen in my state.;) also have found some 90's sears engines that come with a lighted coil,but no light on them. the snowblowers where that dark green with gold letters(craftsman). so double check them too.
 

delray

Well-Known Member
#6
ok here is where the mod's start to begin. off to the lathe with the HSSK50 crank.
10.jpg

lot of material to take off.
7.jpg

still more to take off
9.jpg


after getting the first part of the area in spec's(.7864-.7860) where the bearing going to ride on. i went ahead and cut a grove for the snap ring.
2.jpg


next step i had to machine the area for the seal to ride on and that area run's just little smaller dem's .781-.779 and then cut down the rest of the area to .750 i actually cut this area to .7492 when test fitting a clutch or even a torque converter it seem to slide on nice and snug. i also notes when measuring couple other cranks this area was at .7490
4.jpg
1.jpg


here is how much extra material i cut off the end of the crank. .435 material
6.jpg


drilled and tap the threads little deeper and yes i am making it a rupp style crank with just under 3inch's long.
5.jpg

before taking the crank off the lathe i polish the new area with some emery cloth. so everything was kept on the high side knowing the emery could easily take off .001 material in time.
hs-40and hssk.jpg
crankshs-40andhssk.jpg
 
#8
ok here is where the mod's start to begin. off to the lathe with the HSSK50 crank.
View attachment 273281

lot of material to take off.
View attachment 273282

still more to take off
View attachment 273283


after getting the first part of the area in spec's(.7864-.7860) where the bearing going to ride on. i went ahead and cut a grove for the snap ring.
View attachment 273285


next step i had to machine the area for the seal to ride on and that area run's just little smaller dem's .781-.779 and then cut down the rest of the area to .750 i actually cut this area to .7492 when test fitting a clutch or even a torque converter it seem to slide on nice and snug. i also notes when measuring couple other cranks this area was at .7490
View attachment 273293
View attachment 273286


here is how much extra material i cut off the end of the crank. .435 material
View attachment 273287


drilled and tap the threads little deeper and yes i am making it a rupp style crank with just under 3inch's long.
View attachment 273288

before taking the crank off the lathe i polish the new area with some emery cloth. so everything was kept on the high side knowing the emery could easily take off .001 material in time.
View attachment 273289
View attachment 273290
 

delray

Well-Known Member
#11
Pretty slick, slick...thanks for sharing, you've given me more motivation to make space for a lathe and educate myself.
yes a lathe is nice to have and they really don't set you back when it comes to purchasing one. only thing i can't do is bore my own blocks,but that might change soon with few more tool items/fixtures for my mill.
mustangfrank if you like seeing what i did with a hssk50 crank. your going to want to get a lathe for sure when you see what i'm going to do next. another one off first that i believe no one has done yet.....:scooter:
 

mustangfrank

Well-Known Member
#12
yes a lathe is nice to have and they really don't set you back when it comes to purchasing one. only thing i can't do is bore my own blocks,but that might change soon with few more tool items/fixtures for my mill.
mustangfrank if you like seeing what i did with a hssk50 crank. your going to want to get a lathe for sure when you see what i'm going to do next. another one off first that i believe no one has done yet.....:scooter:
Right on, I'll probably never do anything too advanced just gets old having to make runs to a machine shop for little projects.
 

delray

Well-Known Member
#14
this morning i grabbed couple comet units and test fitted them to the crank and they fit like a grove. very happy with way they fit. nice and snug on the crank and keyway. now i'm just waiting for the new bearing to come and see how that fits. keeping the bearing surface on the high side. so if it's to tight i can easily bring that measurement down.
27.jpg
 

delray

Well-Known Member
#15
here is something else to see when the torque converter is fully installed on a rupp style crank. it almost comes to the end. making the driver much more stable on the crankshaft then it would be with a stock standard length crank.
crank end.jpg
 

delray

Well-Known Member
#16
bearing came and it was spot on for fitting. glad i kept my measurements on the high side. less chance of having the inner race spinning on the crank.
29.jpg

snap ring also was right on too with no end play.
28.jpg

looking good,real happy how everything turn out.
30.jpg

bearing number i use was a 6204-2rs. just pulled the seals off and good to go.
6204-2rs.PNG
31.jpg
 

delray

Well-Known Member
#18
I like this build, I have a newer style Tecumseh 5hp build too but it is not set up with a roller crank. Are you going to put a roller bearing on the other side?
rob, i am not on this one. going on one of my vintage bikes that came with lights. i need the lighted coil and this engine is a cast steel flywheel so going to keep it under 5000rpms....lol
maybe on the next build....;)
 

delray

Well-Known Member
#20
If you start retapering Billet Briggs flywheels to fit these HS50s I want one :)
need to start looking into a billet flywheel one of these days. just when i think i have little time to work on some of this stuff now i got some friends calling and want me too go flat track ice racing.......:scooter: so this build may slow down just little.
 
Last edited:
Top