New member Project Farm Hog

#1
Good evening, My name is Jim, 62, retired electrician. I live on 10 acres in Grimes county, Texas. About a year ago I decided I wanted something to tool around the fence line and across the pasture and what passes for my neighborhood, my closest neighbors are my in-laws about a 1/4 mile away. I didn't want to spend my money on a new, or used, atv or utv.
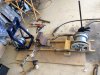
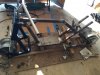
After seeing a couple of Coleman minis at Tractor Supply I was kind of interested but after a little research I decided that wouldn't quite do for me. Everything I looked at was going to need to be modified in one form or another to suit my needs. That is when I decided to try my hand at building my own frame.
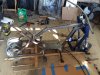
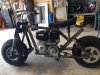
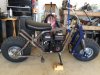
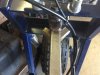
So, without further ado, not quite ready for prime time, and for your viewing pleasure, or not. I present Farm Hog. She,s a porker.


mini bike 16a.jpg mini bike 15a.jpg
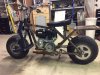
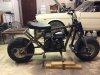
Weight unknown, 47" wheelbase, 22.5* rake, Approx. 3" trail, 450 lb spring shocks, approx. 27" seat height, 8" ground clearance
Quick steering but stable at "speed".
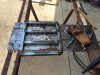
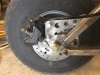
Any questions, comments, observations, and criticisms are welcome. I plan to go more in depth about this build at a later time. As it stands now I am riding her around on a shake down cruise for a couple of weeks to see if anything breaks, and to see what I want/need to finish welding, change or modify, like the kickstand, before I tear her down for painting. Fenders are a must have. Bovine excrement is everywhere I ride.
Regards, Jim.
 
Last edited:

pomfish

Well-Known Member
#2
Welcome to Mighty OldMiniBikes Jim.

She looks Beasty, I like it, great job!
Now, I know you are baiting us with the partial shot of the 65/66 Mustang ragtop, so give some more pics and details of that too.
First 2 cars for me at 16-18 were 65 289 Fastback auto followed by 66 GT 289 4 speed Fastback so have some affinity for early stangs.
Later,

Keith
 

panchothedog

Well-Known Member
#4
Welcome to the forum. Very nice looking bike for a home built job. Looks rugged, like a farm working vehicle should. Get those fenders on there man,
doesn't sound like fun riding without them.
 
#5
Welcome to Mighty OldMiniBikes Jim.

She looks Beasty, I like it, great job!
Now, I know you are baiting us with the partial shot of the 65/66 Mustang ragtop, so give some more pics and details of that too.
First 2 cars for me at 16-18 were 65 289 Fastback auto followed by 66 GT 289 4 speed Fastback so have some affinity for early stangs.
Later,

Keith
Thanks. Early 65. Ok, I'll do that, but it will be a few days.
 
#7
Thanks. In the interest of full disclosure, I have to admit that most every decision I made was based on what I thought I could build with the tools at hand, my meager welding skills, and cost.
Originally I was going to go with forks but after looking around, watching some videos and thinking about it a whole lot, I decided to go with the leading link. Easier for me to fab. Especially after watching that Ground Hog Garage guy on youtube. I went with the springer seat instead of a swingarm for the same reason. I didn't want to bite off more than I could chew. This is my first time ever building something like this.
The only major tool purchase I made was the Evolution 7 1/4 compound miter saw. I knew I would need a lot of precise cuts and and the chop saw wasn't going to do it.
 

Lizardking

Well-Known Member
#9
Cool beans!! Welcome to the oldminibikes.com show!!!!!

Throw some orange paint/powder on it for some visual pleasure!!!

Squared tube mini bikes are underrated..
 
#10
Well I have some time to kill while it's raining. My apologies for not having pics of the front end build.
Total steel used for the whole bike: Sourced locally, 20' of 1"x1" sq. 11ga, 10' of 1"x1.5" rect. 14ga, 3' of 1"x1/8" flat, 3' of 1 1/4"x1/8" flat, 2' of 3/16"x2" angle, 2' 1/2 black iron pipe. Sourced online, 2' of 3/16"x6" flat, 2' of 1"x2" rect. 14 ga, 6" of 1 3/4" O.D. x .188"x1.375" DOM tubing.
When I fabbed the front end I made it about 1/2 wider than the wheel and bought a long enough piece of 1/2 black iron pipe to make any length spacers I might be needing. The U brackets on the down leg are hand made. I tried to find some pre-made ones that would work but no joy there. When I bolted the front end to the wheel, making sure everything was level, I used a couple of plumb bobs in the upper and lower neck tube holes to check against the center line I had drawn on the cheapo frame jig. Wound up having to cut the U bracket off of the left down leg, shorten the leg by about 3/16" and weld the bracket back on to get everything lined up.
Welding the rear wheel plates to the bottom frame on my cheapo frame jig.
mini bike 1.JPG
I had a decent pic of the rear upper supports all c clamped together prior to tacking but I can't find it. My Bad.
Having serious reservations about welding 14 ga to the neck tube I took some of the 1 1/4x1/8 flat and welded some collars onto the 1x1 1/2 rect at the neck tube and bottom plate to reinforce them and not blow holes in the steel.
mini bike 1.JPG
mini bike 2.JPG
mini bike 3.JPG mini bike 3.JPG
It's coming together. I new I was going to have alignment issues with the engine so I coughed up for the adjustable aluminum engine plate. I knew I was going to use some kind of chain guide/tensioner because of my design but I have not settled on which way I want to go so I just made up a temporary guide until I make a final decision.
Kung Fu Tav2 with 9t/60t. Also need to move the seat pivot forward about 1 3/4".
mini bike 4.JPG mini bike 4.JPG
mini bike 5.JPG mini bike 5.JPG
Also after test riding I found some 2" handlebar spacers online to raise the clamps up. Here are pics of the rear rack, seat pan, caliper bracket, and steering stops.
mini bike 6.JPG mini bike 6.JPG mini bike 8.JPG mini bike 8.JPG mini bike 9.JPG mini bike 9.JPG mini bike 12.JPG mini bike 12.JPG mini bike 14.JPG mini bike 14.JPG
 
#13
Sweet, looking ride that looks like it could go through a blockwall. Only critique I might have is the rake angle on the forks. It looks a bit steep and might be prone to dropping into potholes. Still, its a very nice job.
 
#18
Sweet, looking ride that looks like it could go through a blockwall. Only critique I might have is the rake angle on the forks. It looks a bit steep and might be prone to dropping into potholes. Still, its a very nice job.
Heh, that was a little mistake. It was supposed to be 25* rake instead of 22.5 or 23. I had the neck tube mounted in the forks because I knew if I welded the neck to the frame before I attached it to the forks I was going to mess up. I had the forks propped up to the rake angle I wanted, I thought.
I decided to space the rear wheel up 1" so when I put the tires on and took it off the jig the bike would have a slight incline from the rear axle to the front of the main frame. I didn't double check my angles before I started welding the neck tube to frame support. Oops.
The bike steers very quick but it is still stable. If I decide that I need a little more rake and trail to slow it down some I am just going to put a 21x7-8 tire in front instead of the 19 that's on there now because I am NOT going to cut that and redo it. Live and learn.
 
#19
Orange paint I don't think so. I think I'll just stick with the navy blue rattle can. :D
That front fork is awesome !

I think the blue looks great...and gives the forks a very finished factory made look.

And I do mean that as a compliment.

Very nice work on your whole bike !
 
Last edited:
Top