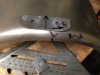
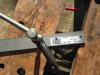
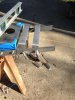
Why do you need that square tubing?I would just set the stock straps aside for when you find the correct tank and in the meantime I would make new straps that hold the tank tight to under the seat. I lined my straps with some thin rubber so the straps would scratch the tank. You could even put some rubber on top of the tank so it's less likely to rotate in the straps since it's round.
New Project: Wards 525 "The Wilderness"
- Thread starter Dr. Shop Teacher
- Start date
- Tags 525 project wards wilderness

Why do you need that square tubing?I would just set the stock straps aside for when you find the correct tank and in the meantime I would make new straps that hold the tank tight to under the seat. I lined my straps with some thin rubber so the straps would scratch the tank. You could even put some rubber on top of the tank so it's less likely to rotate in the straps since it's round.
Looks great, and it just so happens I am at this stage of mockup also. I am curious, do you think there is a possibility of the tank wearing through from vibration where it contacts the notched out square tubing? I'm going to copy your setup and give credit where credit is due. :thumbsup:
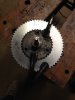
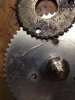
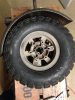
Weed whacking a Drive Sprocket and reckoning a Front Fender
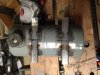
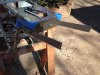
My OldMiniBikes order came on Wednesday, and today I was able to play a little bit. I could have bought a universal drive sprocket, but I just don't like the look and besides, it's the easy way out. The original sprocket (36 tooth) has a 1.47" pilot hole and the new (60 tooth) has a 1.375" pilot hole. The final drive ratio will end up being 6.33:1, giving me a little better bottom end with the HS50 that is going on the bike.
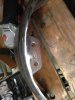
To center the new sprocket to the original sprocket, I got creative. I had a 1.375" dia diamond hole saw that fit the pilot hole of the new sprocket perfectly--nice and snug. Then the old sprocket was placed over the new...there obviously was a gap that needed to be evenly filled to center the bolt pattern. To fill the gap, I used two pieces of .080" weed eater line. This was a good choice because the trimmer line has just a little compressibility. I fit one length in to cover half of the perimeter of the pilot hole, and then the other half of the perimeter. Perfectly centered. I then used a 3/8" bit to locate the centers of the bolt pattern, drilled pilots and then drilled the 3/8" bolt holes. Exactly right and double checked with the brake drum.
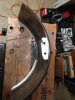
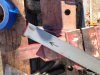
The front fender is going to be interesting. I had looked to see what Unorthodox had done with his front fender, so I ordered a fender from OldMiniBikes. I really don't like how the rear of the fender flares out on the front wheel on the original bike. Since I can't be completely original, I'm going to replicate the original shape of the fender but allow it to wrap a little tighter to the tire. I'm also going to move the mounting holes on the fender back a little further. I wish i could do the same with the rear, but ain't happening.
My OldMiniBikes order came on Wednesday, and today I was able to play a little bit. I could have bought a universal drive sprocket, but I just don't like the look and besides, it's the easy way out. The original sprocket (36 tooth) has a 1.47" pilot hole and the new (60 tooth) has a 1.375" pilot hole. The final drive ratio will end up being 6.33:1, giving me a little better bottom end with the HS50 that is going on the bike.
To center the new sprocket to the original sprocket, I got creative. I had a 1.375" dia diamond hole saw that fit the pilot hole of the new sprocket perfectly--nice and snug. Then the old sprocket was placed over the new...there obviously was a gap that needed to be evenly filled to center the bolt pattern. To fill the gap, I used two pieces of .080" weed eater line. This was a good choice because the trimmer line has just a little compressibility. I fit one length in to cover half of the perimeter of the pilot hole, and then the other half of the perimeter. Perfectly centered. I then used a 3/8" bit to locate the centers of the bolt pattern, drilled pilots and then drilled the 3/8" bolt holes. Exactly right and double checked with the brake drum.
The front fender is going to be interesting. I had looked to see what Unorthodox had done with his front fender, so I ordered a fender from OldMiniBikes. I really don't like how the rear of the fender flares out on the front wheel on the original bike. Since I can't be completely original, I'm going to replicate the original shape of the fender but allow it to wrap a little tighter to the tire. I'm also going to move the mounting holes on the fender back a little further. I wish i could do the same with the rear, but ain't happening.
Attachments
-
 1.5 MB Views: 21
 -
 2.5 MB Views: 22
 -
 2.2 MB Views: 21
Fender Tabs
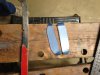
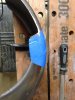
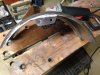
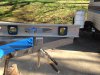
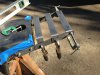
Made up fender tabs for the front fender today. I used a scrap fender originally for the ARCO as the donor sheet metal. I made the tabs quite a bit larger than stock to give my welder enough room to butt weld in place. I cut the tabs to rough size, clamped them and drilled two 1/4" holes to mount on the forks. I then bolted the two tabs together to grind them into shape. I am going to leave the tabs larger to mitigate the stress around the bolt holes. The bolt holes will be about 1/2" lower than stock to add some meat to the tabs. Finally, I did a mock up to be sure the tab location allowed for adequate clearance to the tire. Get welded tomorrow. (Weird how the photos loaded randomly)
Made up fender tabs for the front fender today. I used a scrap fender originally for the ARCO as the donor sheet metal. I made the tabs quite a bit larger than stock to give my welder enough room to butt weld in place. I cut the tabs to rough size, clamped them and drilled two 1/4" holes to mount on the forks. I then bolted the two tabs together to grind them into shape. I am going to leave the tabs larger to mitigate the stress around the bolt holes. The bolt holes will be about 1/2" lower than stock to add some meat to the tabs. Finally, I did a mock up to be sure the tab location allowed for adequate clearance to the tire. Get welded tomorrow. (Weird how the photos loaded randomly)
Attachments
-
 1.9 MB Views: 21
 -
 2.3 MB Views: 18
 -
 2.3 MB Views: 15
 -
 2.4 MB Views: 16
 -
 1.6 MB Views: 16
 -
 1.2 MB Views: 20
Last edited:
Fender Tabs complete
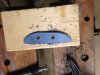
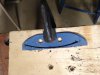
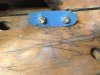
Ran over to my welder today and had the tabs butt welded to the fender. He did a nice job skip welding and suggested that I leave the bead on the inside of the fender for strength. I did, but cleaned up the front rear inside edge. Got it home, taped it up and ground it to shape. I'm really pleased how it turned out...very Gilson-esque. Also had the brackets tack welded on the tank. Now it won't move and I'll still shim it with rubber (he didn't get them perfectly square). The attachments are in reverse order .
.
Ran over to my welder today and had the tabs butt welded to the fender. He did a nice job skip welding and suggested that I leave the bead on the inside of the fender for strength. I did, but cleaned up the front rear inside edge. Got it home, taped it up and ground it to shape. I'm really pleased how it turned out...very Gilson-esque. Also had the brackets tack welded on the tank. Now it won't move and I'll still shim it with rubber (he didn't get them perfectly square). The attachments are in reverse order
.Attachments
-
 2.2 MB Views: 34
 -
 2.2 MB Views: 22
 -
 2.2 MB Views: 26
 -
 1.5 MB Views: 26
 -
 2 MB Views: 31
Parcel Rack
I had posted a question as to whether anyone had a close up of the optional "parcel rack" that Gilson offered in addition to a padded sissy bar. I had an advertisement showing the parcel rack but no real dimensions. So, I decided to eyeball one from scratch. Figured it would make the bike stand out as something different. As always, I work with what I have for tools and this was prepped using a drill, sawzall and angle grinder. Here's what the parcel rack looks like in the ad:
I had posted a question as to whether anyone had a close up of the optional "parcel rack" that Gilson offered in addition to a padded sissy bar. I had an advertisement showing the parcel rack but no real dimensions. So, I decided to eyeball one from scratch. Figured it would make the bike stand out as something different. As always, I work with what I have for tools and this was prepped using a drill, sawzall and angle grinder. Here's what the parcel rack looks like in the ad:
Attachments
-
 13.6 KB Views: 82
Parcel Rack #2
I started with 1/8"- 1 1/4" flat stock and clamped one piece in it's approximate position. This allowed me to set a level line from the top of the frame and gave me an intersecting point. Then I made the two supports and drilled them to line up to the Gilson mounting holes. I set the supports off the frame with a thick washer to allow for powdercoating and bolted in place. I started closest to the frame and worked to the rear of the rack. I bent the flat stock cold with a 20 oz hammer (having to redo one because I got off of 90 degrees--a tip: always aim for the middle of the metal when bending by hand and adjust the angle by moving the hammer in the direction of the mis-bend).
I added an 1/8" to the width of the material to compensate for the bend and clamped in place using a level to square the cross brace to the top of frame. Once the first and second cross braces were in place, I moved to the end. This one I made differently. Each end has a 90 bend and was measured to fit between the two supports as opposed to fitting on top like the two others. This will give a bit of extra strength at the corners. Once this was made, I clamped it in place and squared up the parcel rack.
The first and second cross braces were scribed and, now working toward the front, I removed each brace and rough cut the angle with the sawzall. Finish fitting was done with the angle grinder and before I moved to the next brace, the finished brace was clamped in place. I'll take the frame and the parcel rack to the welder on Monday (I'm keeping it on the bike to keep it square). Once it's welded, I'll do finish shaping with the angle grinder.
Attachments
-
 2.7 MB Views: 14
 -
 2.4 MB Views: 13
 -
 3.1 MB Views: 13
 -
 2 MB Views: 13
 -
 2.3 MB Views: 14
 -
 4 MB Views: 18
 -
 3.2 MB Views: 23
 -
 3.2 MB Views: 25
That is going to be one sweet 525 Pete. My 525 mockup starts at the beginning of 2016. The VT 525 is ready for disassemble and powdercoting. Gonna be a fun spring 2016.