ok, I suppose I could surf the internet and get my answers, but I know there is much talent on this forum and I wish to find out if any of you can answer my questions regarding smelting...since my nephew moved in with me, I am trying to expand his horizons and I wish to learn new things as well......and he is interested in metal working.......we will be taking classes together soon.........so we are about to build a small foundry. my question is this........I have a fiberglass piece I wish to cover with aluminum.......is that possible or will the heat melt the figerglass? anyone?

Reynolds Wrap Aluminum Foil? Me thinks the hot aluminum will send your fiberglass piece up in smoke at the 1221 degrees F melting temperature. A better suggestion might be to copy your fiberglass piece in foundry sand and then make a cast copy of it in aluminum. Look up the "cope and drag" method of sand casting.
Rick
Rick
thanks guys..........I kinda thought that was the case and will do some more search Rick on the cope and drag method you talked about......thanks guys........and for not making me feel totally stupid...........just never thought about the gas thing........but it makes total sense at that temp..........
it will melt and give off toxic gases.
please read up and educate yourself before melting alum and its side hazards, moisture etc etc.
there are some good forums on the subject, read up and have fun, and oh yeah, tin can metal is trash, get some old trans cases, pistons, rods and old blocks, intakes, rims etc etc and then you will have something worthy after your efforts.
I built my first furnace out of an old water heater inner tank and the crucible was an old 10# fire extinguisher body.
Last edited:
Kilns in ebay are about $500 or less.
But TX had a great low budget idea and good advice about gasses!
One thing I have seen done is where something is shaped out of Styrofoam, placed on a cope and drag type sand cast and when the hot metal goes into the casting it takes the place of the Styrofoam. That might work with fiberglass but I've never seen it done.
Good thread ... makes me think of cool things to cast!
lost foam casting is cool. I have burned 7 times now and each time I get better, now I can carve something like a skull shift knob, basically as nice as you can carve the better the item of course, and you glue a foam sprue (path for the molten alum) to the bottom of the knob and set it in super fine sand, I use sugar sand, and I made a clamshell out of metal to use on top of the sand to pour into that creates head pressure (makes for a nice solid, no air bubble pour) and also makes a nice alum ingot for remelting later. basically, pour into it and the alum melts and replaces the foam and solidifies into whatever shape you carve.
I'm teaching myself so I can make some cool finned alum side covers and valve covers etc for my race mini
I'm teaching myself so I can make some cool finned alum side covers and valve covers etc for my race mini
Last edited:
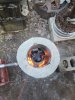
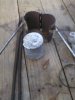
heres my hobo furnace, its an inner tank from an old water heater cut in half, then a basic 10"wood stove exhaust pipe in the center. there is a pipe that comes in the bottom from the side, it is connected to a $9 hair dryer from the dollar store that I rig to blow air, no heat. I place the crucible on a bed of 4" or so charcoal and then stack it around the crucible (old fire ext. body) and soak with lighter fluid, fire it off an then turn the hair dryer on once it gets going and wallah, massive alum melting heat, it will melt all the stuff in the picture in about 10-15 minutes to molten red
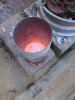
heres the crucible with the dross scooped off the top already and its settled ready to pour into the mold
heres the crucible with the dross scooped off the top already and its settled ready to pour into the mold
heres the crazy big eyed shift knob I carved up for the mini, its made of a foam block I made by gluing 1/2" strips of foam together, then carved up, the crazy "look into my eyes" look was done with a dremel

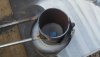
heres the mold placed in the sugar sand, the smoother the sand, the smoother the surface of the alum when done, this is a small tin can filled with the foam item placed in upside down and a sprue or piece of foam glued to the bottom to give the alum a path to fill and also a place to vent from, picture looking down through the metal clamshell I made, you will see its purpose next
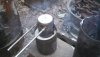
here we are with the alum poured and cooling, before it dries completely, you can use the clamshell handles and just tilt and break the sprue path off the bottom of the ingot in the clamshell. this makes a nice ingot to remelt and provides head pressure on the mold as it sets
heres the mold placed in the sugar sand, the smoother the sand, the smoother the surface of the alum when done, this is a small tin can filled with the foam item placed in upside down and a sprue or piece of foam glued to the bottom to give the alum a path to fill and also a place to vent from, picture looking down through the metal clamshell I made, you will see its purpose next
here we are with the alum poured and cooling, before it dries completely, you can use the clamshell handles and just tilt and break the sprue path off the bottom of the ingot in the clamshell. this makes a nice ingot to remelt and provides head pressure on the mold as it sets
here we have the ingot produced, the clamshell was easy to use and open with the hose clamp, just something crude I made, others on the smelting forums are using soup cans open on both ends to pour through and then cutting them open later, I figured this was easier and re-useable as well.
and the crazy eyed shift knob with the sprue cut off the bottom and a little cleaning up, has its flaws, but it was my 4th pour and its all in how good you can carve and create, anywho, there you have my experience with smelting, hope it helps.

and the crazy eyed shift knob with the sprue cut off the bottom and a little cleaning up, has its flaws, but it was my 4th pour and its all in how good you can carve and create, anywho, there you have my experience with smelting, hope it helps.
Last edited:
