Briggs and Stratton 3hp Restoration

#1
Hey all,

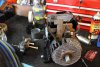
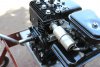
I have decided to postpone the 5hp, and do a 3hp. It's a runner, but not by much. It smokes oil AND fuel.

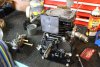
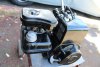
The tank is pretty nasty inside, the rust comes off when you touch it :hammer: Just tried the gravel and water shake around thing, seems to be working :laugh:

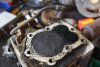
I have the motor in bits, and I have washed the block. Unfortunately, the crankcase has a small split in the side, that will need to be fixed.

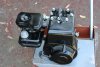
I cannot get the original grey paint, so I will be doing it in black. I will try to get the decals from the states :thumbsup:

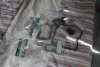
Is an 80202, made in 1977. It will be getting new gaskets and seals all round. :thumbsup:
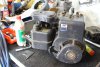
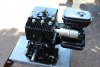
IMG_3176.JPG
 
#2
I shake with nuts and bolts. And I use gas. Not sure water is that effective. Prob not good for it. Good luck with that one. Should look great when you're done. Post updates.
 

bandit 40

Active Member
#3
I put ( A LOT ) of BB'S In one of my tanks and took it to a local body shop and asked if they could put it in there paint shaker for a cycle. This worked great.
 
Last edited:
#7
Lots of carbon tells me way too rich and/or pulling oil past the rings.

It does not matter what the rings look like. Measure them.

Is the intake/carb wet with oil inside? Too much blowby will push oil into the carb. Another reason to measure the rings and bore.
 
#8
There was oil on the head and piston, as well as the gasket. It was running too rich as well, but I could not get it adjusted to run right :shrug:
 
#9
I also have a B&S 80202, the tank was all rusty inside.
I bought a gallon of WD-40 brand rust remover soak from Home depot. Same as Evaporust. Removed the tank and overhauled the carb with an Ebay kit.
I Poured 1 1/2 quarts in the tank and tipped the tank around in a vice, I moved it every 12 hours to give the soak a good chance to eat up the rust in every spot.
The soak is not supposed to damage or eat metal in any way. However after a few days the tank it had a few drops leaking out from where the bracket is spot welded. It may have been too long or it may have had some deep rust pits at that point. So now I need to seal it with POR15 or Damon redkote.
I have a cobbled together tank cleaning machine I made for a vintage Honda I restored, it worked great. If you need help you can send it to me with return postage and I'll clean it out for you.
Either way you should hone the cylinder and use new rings before reassembly. It's a shame to reseal everything, but, ignore worn cylinder.
 

Attachments

#10
To clean inside of tank - put some small bolts & washers in it & wrap a blanket around it real good & bungie it in a circle(round) then throw it in the Dryer for 5 minutes , wa la all done..
 
#11
I switched the head with another one of my engines because the main shroud bolt hole was split... Since it smoked like a tractor I may aswell swap the piston assembly too :wink: Still gotta buy paint
 
#12
Switched the piston, and put in the new seals. Going to use a short gas tank and carb, which is like new inside. Also got things painted today. More to come :thumbsup:
 
#19
Check the link below. Probably cost a lot to ship to Aucks, but you should have some somewhere. (Check maritime industry or boat/yacht supplies)

You don't need high temp paint on these engines. Any spray paint will hold up to the heat. However, if you spill petrol on any of it, it will dissolve. That is why we use catalyzed paints. (Paint with hardeners) Urethane clear is fuel-proof. Paint advertised as "fuel resistant" will still dissolve. VHT is a very good paint. But not fuel proof.

SprayMax 3680061 Urethane Clear coat
 
Top