"Gangsta" CAT350SS
- Thread starter Dr. Shop Teacher
- Start date
- Tags cat350ss gangsta

Front Fork Repaired
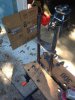
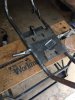
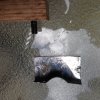
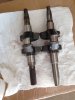
Received the new triple tree on Thursday, and got the fork prepped for welding. Took it over to the shop to get it welded. Today I removed all the flash rust and got it in primer. Tomorrow I'll put the silver metal flake base coat on. Had to order paint for the bike as it was not available locally.
Received the new triple tree on Thursday, and got the fork prepped for welding. Took it over to the shop to get it welded. Today I removed all the flash rust and got it in primer. Tomorrow I'll put the silver metal flake base coat on. Had to order paint for the bike as it was not available locally.
Attachments
-
 2.4 MB Views: 27
 -
 2.4 MB Views: 24
 -
 2.3 MB Views: 23
Frame and engine plate repaired and primed
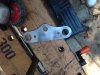
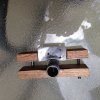
Had the engine plate repaired at the same time as the fork. Welding shop did a nice job closing the extra holes and grinding down.The first thumbnail shows all the holes in the plate. I will have to re-drill one hole for the chain guide. Like the forks, I had to get the flash rust off before primer. The frame, too, is ready for metal flake base in the morning.
Had the engine plate repaired at the same time as the fork. Welding shop did a nice job closing the extra holes and grinding down.The first thumbnail shows all the holes in the plate. I will have to re-drill one hole for the chain guide. Like the forks, I had to get the flash rust off before primer. The frame, too, is ready for metal flake base in the morning.
Attachments
-
 437 KB Views: 24
 -
 2.2 MB Views: 25
 -
 2.4 MB Views: 23
What to do about a rear fender....an option
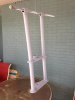
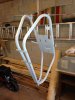
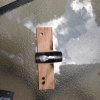
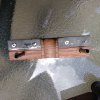
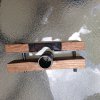
I spent most of Saturday dreaming up a way to stamp a fender bracket using heat and a bench vise. Unless a member comes through with a rear fender, I'm going to have to come up with a way to adapt a universal fender to the Gangster. So, I started to fabricate a jig using 2x2 oak, 1/4" tension pins, 1/2" flat steep and 1 1/8" diameter black pipe. I did a mock up Saturday to see what adjustments I'd need to make. Here's what it looks like:
I spent most of Saturday dreaming up a way to stamp a fender bracket using heat and a bench vise. Unless a member comes through with a rear fender, I'm going to have to come up with a way to adapt a universal fender to the Gangster. So, I started to fabricate a jig using 2x2 oak, 1/4" tension pins, 1/2" flat steep and 1 1/8" diameter black pipe. I did a mock up Saturday to see what adjustments I'd need to make. Here's what it looks like:
Attachments
-
 3.2 MB Views: 25
 -
 2.8 MB Views: 30
The jig in action....
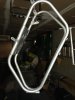
The tension pins serve to keep the jig aligned and somewhat stable. I have to support the jig with scrap in the vise. I learned from the mock up that the pipe has to extend above the jig to assure the metal starts to form an arc. It's trial and error to get the right amount of pipe exposed. I used galvanized Simpson truss plates (a. they were cheap and, b. about the same gauge as the real thing). The big deal about using galvanized metal is that you must vent the area in which you are heating the metal. The zinc melts and off gasses noxious fumes (I used a box fan set on high). I was able to get the plate red hot before putting it in the jig using a propane torch. Obviously, the wood will char, so I used a hard wood. While the end result is not perfect, a little hammer work and some filing will get the clamp into presentable shape. So this is doable, somebody with a milling machine can make a good jig and with a press cold stamp these all day. I suspect there would be quite a market for them.
The tension pins serve to keep the jig aligned and somewhat stable. I have to support the jig with scrap in the vise. I learned from the mock up that the pipe has to extend above the jig to assure the metal starts to form an arc. It's trial and error to get the right amount of pipe exposed. I used galvanized Simpson truss plates (a. they were cheap and, b. about the same gauge as the real thing). The big deal about using galvanized metal is that you must vent the area in which you are heating the metal. The zinc melts and off gasses noxious fumes (I used a box fan set on high). I was able to get the plate red hot before putting it in the jig using a propane torch. Obviously, the wood will char, so I used a hard wood. While the end result is not perfect, a little hammer work and some filing will get the clamp into presentable shape. So this is doable, somebody with a milling machine can make a good jig and with a press cold stamp these all day. I suspect there would be quite a market for them.
Attachments
-
 2.8 MB Views: 31
 -
 3.1 MB Views: 28
 -
 2.8 MB Views: 30
Doc, I noticed last night when disassembling a Cat that the brackets have a slight draft angle where they seat against the frame tubes. I'm not sure you care about this but it's something for you to think about when you break out the hammer and dolly to do your finishing work. Very cool and inspiring work you've done with the bracket by the way! Now if we could come up with an easy way to stamp the darn fenders, we'd all be in good shape!
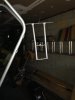
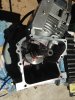
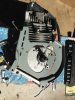
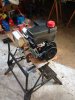
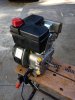
Building a TEC OHV195
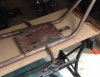
I decided to go with a late model TEC just to be different. I had an oiler 6 hp Powersport that I could scavenge parts from. I ordered one of the long blocks off e-Bay with a tapered crank. The OH60 had the donor crank, intake, coil, blower housing, carb and linkage. Now, it's been 25 years since I last put together a motor so it took most of the day to do. Still doesn't run yet as it's got a weak spark and I'm pretty sure the air gap is off because the coil is good-I set the gap at 0.013 and it should be 0.0125--close I guess don't count. I plan on ordering a Torque Tube from Robertson's and it's going to need a new recoil starter. I did spend time cleaning the PTO end of the crank and at the flywheel. I did remove the flash from the manifold casting and wire wheel it to make it shine. Once the motor is running, I'll break it down to paint the blower housing and polish the block a little bit.
I decided to go with a late model TEC just to be different. I had an oiler 6 hp Powersport that I could scavenge parts from. I ordered one of the long blocks off e-Bay with a tapered crank. The OH60 had the donor crank, intake, coil, blower housing, carb and linkage. Now, it's been 25 years since I last put together a motor so it took most of the day to do. Still doesn't run yet as it's got a weak spark and I'm pretty sure the air gap is off because the coil is good-I set the gap at 0.013 and it should be 0.0125--close I guess don't count. I plan on ordering a Torque Tube from Robertson's and it's going to need a new recoil starter. I did spend time cleaning the PTO end of the crank and at the flywheel. I did remove the flash from the manifold casting and wire wheel it to make it shine. Once the motor is running, I'll break it down to paint the blower housing and polish the block a little bit.
Attachments
-
 2.6 MB Views: 19
 -
 2.8 MB Views: 18
 -
 2.6 MB Views: 19
 -
 2.2 MB Views: 19
 -
 2.2 MB Views: 17
 -
 2.1 MB Views: 15
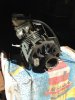
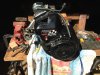
Finally, the Tecumseh is alive
Took most of the afternoon, but I got the Powersport running this afternoon. This builder has discovered he's old...give me a flathead Briggs or a TEC and I can make it run. Learned a lot today: discovered that the valve train in the long block had not been assembled after trying everything else to get it running (I know I should have looked there first) and how to assemble and set lash, learned how compression release works (twice) as the spring kept popping out meaning the crank case cover came off three times before I got it fixed, that there's no fix for weak spark from a solid state coil (45.00 later), and got the governor adjusted right before I started the engine. I'd been hesitant to try any mods to OHV engines since I didn't know much about them, so this project has given me a little confidence. Now that it runs, I'll degrease it and start cleaning it up. I may polish or paint it.
Took most of the afternoon, but I got the Powersport running this afternoon. This builder has discovered he's old...give me a flathead Briggs or a TEC and I can make it run. Learned a lot today: discovered that the valve train in the long block had not been assembled after trying everything else to get it running (I know I should have looked there first) and how to assemble and set lash, learned how compression release works (twice) as the spring kept popping out meaning the crank case cover came off three times before I got it fixed, that there's no fix for weak spark from a solid state coil (45.00 later), and got the governor adjusted right before I started the engine. I'd been hesitant to try any mods to OHV engines since I didn't know much about them, so this project has given me a little confidence. Now that it runs, I'll degrease it and start cleaning it up. I may polish or paint it.
Attachments
-
 2.7 MB Views: 29
 -
 2.6 MB Views: 28
Man I hope for the best for you Pete. Bike looks great as always. I hoping you'll be back to Windber with better weather so we can ride!!
Sent from my Texas Instruments Speak and Spell...[emoji2]
Sent from my Texas Instruments Speak and Spell...[emoji2]
No photos today as you couldn't see what I did anyway. Blower housing was sanded, cleaned and primed, Chain guard (a short ARCO, which I really like, thanks OldMiniBikes!) the same, and the fenders were primed. I bit the bullet and pulled the good fender I had on Furball to use with Gangsta CAT. The frame, forks, fenders, blower housing and chain guard all got the metallic base coat (Duplicolor) which will be wet sanded either tomorrow or Saturday depending on how tired I am after my trip to the back surgeon. The candy (a Duplicolor metal cast that I had to order) goes on after that then Eastwood 2K urethane. Have a surprise in store for the fenders and chain guard as will be the color. I hope it looks as bad @$$ as I think it will.