Sachs 50cc Recoil Repair

#1
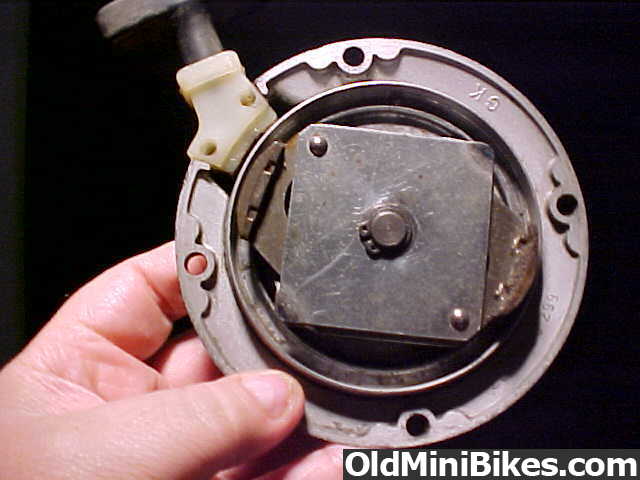
I have a couple of Sachs recoils for my Arctic Cats. One is original and working, the other has been pieced together thanks to eBay. The one from eBay is missing the pads as well as the small steel support blocks that provide a wider surface for the pads to bond to.

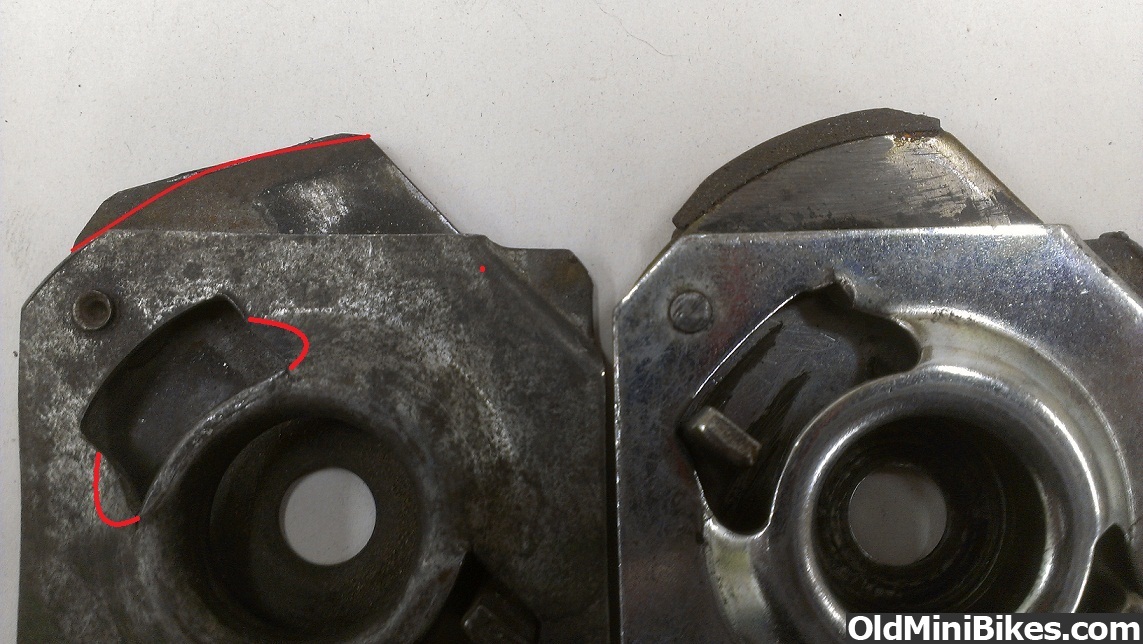
There have been other threads here that mention this rare recoil and its tendency for the pads to break off, thus the shortage of recoils. I have not found any posts on how to repair these pads. All I know is that you can use JB Weld to bond new material on.

What's throwing me off is that the small steel support blocks highlighted in the picture of my good recoil are missing on the broken one. I don't see any evidence of how they were originally attached, even when looking at my original. It's almost like they were spot welded or induction welded.

Should I fabricate new ones before attaching the pad material? Weld them on? Any tips on shaping the pad material once it's bonded on? Suggestions on finding a small amount of pad material? Do I use JB to build up the support area rather than adding steel?

I know I can pay to have this repaired but like a lot of people on this site, I get a lot of satisfaction fixing stuff myself if I can.

Is there anyone out there who has done this or had one done? Thanks!

Here's my good one:


Here's the dog lever arm I removed from my broken recoil. Note the missing pad AND steel support block that should be on the short edge below the hole in this pic.
 

MikeBear

Active Member
#2
Hummmm, I fixed a recoil for my Fox Saxonette with JB WELD and some minibike brake band material from a band-brake, but it wasn't missing the metal dogs. I'd say yours got worn down so far they vanished completely. I'd bet you could heli-arc some pieces back on (make them hack-sawed off from a piece of old car drum brake). That should be strong enough that all you'd have to do is some filing and fitting afterwards.

Otherwise this guy can help you, if you have lots of money. The recoils for these are worth their weight in gold:

Bob
R. L. Fragoman
Box 157
Memphis, NY 13112
(315) 689-7047

minibikeman1@gmail.com
He makes a living selling parts for the Fox bikes, and bought the old stock after Fox shutdown. Your bikes use the same engines.
 
Last edited:
#3
Thanks MikeBear,

Yes, I know Bob, and "gold" is definitely the right term for his pricing, even compared to other resellers of NOS parts. Jeff M. over in Windber offered to service the pads for $5 a tip, and I may go that route, but that may not include the replacement of the steel supports. A fellow member here that I know is an expert welder for a living so I bet he could help me replace those parts in prep for bonding new material.

Do you have any pictures of ones you've done?

How did you shape the pad material to have that crescent shape once you bonded it, or did you? It needs to be profiled to match the radius of the cup it presses.
 

MikeBear

Active Member
#4
I filed them into shape with a wood file after building them up in layers with JB WELD. One of the old files called a "four in hand file". It's not really all that hard of work, it just takes a bit of time and proper mixing for hardness of the JB WELD.

Nicholson Half-Round 4-in-Hand Rasp and File,Rasp Cut,American Pattern,8" Length: Amazon.com: Industrial & Scientific

Great file, everybody should own at least two of them!

I don't have any pics of mine after fixing it, but I do have these pics somebody sent me for reference:


Here's the bike before installing the repaired recoil:


This was as I bought it, before I did any restoration. The paint is Mopar "Plum Crazy" like used on old Challengers and Barracudas.
 
Last edited:
#5
Nice looking Fox! Thanks also for the extra info. I happen to have that exact file, along with a dozen or more others. I thought about using my bench mounted belt and disk sander to shape the pads if the filing doesn't work. Very easy to take off just a little at a time and keep things square on the table.

Here are some more pictures I took to compare my working recoil brake disk assembly, the broken one without pads, and the one you sent me a picture of that looks nearly new.

Note how the one on the right looks like it has been ground down. Maybe this was re-lined or serviced at some point. Also, the stamped opening for the lever arms to stop against is much larger in one vs. the other. The one on the left is more rectangular and the one on the right flares out. The design was obviously changed at some point.


Note how the support block is ground to a radius and tapers off on each end to a point. On the left, I put a line where this arm would have to be ground down to to make it match the one on the right. I don't plan on doing that because the next picture shows that I could probably use a straight support block. The lever on the left also shows traces of what looks like adhesive on top of the surface, which is weird because I thought the steel support block would have been there. Did they make some of these without the steel support block? Maybe the pad sort of rabbeted over the edge?

Can anyone out there confirm if the surface where the pad was bonded was straight (like the broken one on the left) or curved (like the working one on the right)?

In this picture of a nearly new recoil, note how the support block is thicker and more rectangular on the ends. It's hard to tell but it looks straight where the pad bonds, not ground to an arc.


Any thoughts on attaching new metal support blocks? I'm guessing JBWeld isn't going to hold those but maybe I'm wrong.
 

MikeBear

Active Member
#6
You'll have to have the metal supports welded on to make them strong enough. There's no way gluing them on will be strong enough for that purpose. Any good welder should be able to do that job easily, and then you can just grind and shape it as needed. Then glue the new pads on, and shape them after they have well and truly hardened up.
 
#7
Since posting this a while back, I have since learned a little more from Mr. Fragoman. Frankster's recent success getting his Saxonette running reminded me that I had never posted this updated info.

In the picture below, the dog assembly on the left is an aftermarket. Still old, but aftermarket. It had the straight edge, not curved. it also never had the metal support block. Notice also the difference of the lever cutouts. The dog assembly on the right is OEM. Material on the aftermarket was notched and bonded to the metal arm. The OEM version has the metal support block welded to it, shown in a couple of previously posted pics above.


Here is a picture that Bob F. sent to me of his refurbished dogs. He uses the aftermarket levers, grinds down the arc, and bonds a thick piece of material to it. The material is cut out in an L-shape so it can be bonded to the edge and side, making it stronger. As previous noted, JB Weld is the glue of choice.


I picked up a lifetime supply of brake shoe material a while back (1 truck shoe) for about $15 from a brake shoe shop but haven't had time to give it a shot. Hopefully one of these days I'll stop buying bikes and finish fixing what I have.
 
#8
Any Recoils around . or any recoil springs around??? In great need , I am rebuilding a 1972 Prowler mini bike in memory of my father who just passed away of bone cancer .
 
Top