Tec H30 flywheel key help needed

#1
Hey everybody,

First 56yr old newbie question regarding flywheel key problem that I cannot figure out:anon.sml:

I had a spark problem on my H30 that required me to pull the flywheel to investigate. I traced it to a cut condenser wire that I fixed, but when I put everything back together, I could not get that spark again. Two broken flywheel keys later, torquing to 33lbs of course, I have decided to ask for professional help:scared::hammer:

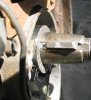
My photo shows the notched key inserted in the keyway but will not go any further under the breaker cam lobe than shown. Is is supposed be like that before torquing the flywheel down? What am I missing that I have sheared off two previous flywheel keys?

Any assistance is most greatly appreciated!!!!:laugh:
 

Attachments

capguncowboy

Well-Known Member
#2
Make sure your points are clean and set correctly. Also, to keep from shearing the flywheel key, you'll want to tighten the nut down to 450 inch-pounds. Otherwise, it'll shear or bend the key and you'll be running out of time

And make sure that key is in all the way. It looks like it's out a little bit.
 
#3
Make sure your points are clean and set correctly. Also, to keep from shearing the flywheel key, you'll want to tighten the nut down to 450 inch-pounds. Otherwise, it'll shear or bend the key and you'll be running out of time

And make sure that key is in all the way. It looks like it's out a little bit.
:thumbsup: Sound advice. I just commented in another thread concerning a similar issue. Please note the Belleville Washer comment as well as the use of a grinding compound on that crank taper. Easy to do, and your crank needs it. :)

http://www.oldminibikes.com/forum/tecumseh-engines/122184-hs50-build-post1000185.html#post1000185
 

CarPlayLB

Well-Known Member
#4
The rust and scale on that crank are not your friend. Take Dave's advice. Valve lapping compound is cheap and will do you favors here! Make sure to clean it very well when you are done!
 
#5
:thumbsup: Sound advice. I just commented in another thread concerning a similar issue. Please note the Belleville Washer comment as well as the use of a grinding compound on that crank taper. Easy to do, and your crank needs it. :)


Thanks for the great advice and I read the above post...

what is the correct procedure to mount the flywheel and key? key first then flywheel? or reverse? I knew about the Belleville washer as I paid attention to when it came off:smile:
 

capguncowboy

Well-Known Member
#6
Yes, key first. make sure it's in as far as it'll go. Then the flywheel.

Back to your original issue with not having spark: Clean the points and make sure you don't have a ground somewhere in the coil or condenser. Als check the kill switch wire
 
#7
Cowboy is right on your points...they need to be cleaned with electric cleaner or alcohol, especially If you have sanded them or filed them clean.
 
#8
ok, so now I am having trouble getting the key under the cam breaker, won't go in all the way just like the pic shows. Should I get a few more keys to try different ones? The ones I get are from my local dealer and I don't think they are OEM Tec :eek:ut: :hammer:

I don't want to force it (duh), but should it just slide in even though it is notched? Do I put it in on an angle to clear the inset on the lobe? sigh.........
 

markus

Well-Known Member
#9
ok, so now I am having trouble getting the key under the cam breaker, won't go in all the way just like the pic shows. Should I get a few more keys to try different ones? The ones I get are from my local dealer and I don't think they are OEM Tec :eek:ut: :hammer:

I don't want to force it (duh), but should it just slide in even though it is notched? Do I put it in on an angle to clear the inset on the lobe? sigh.........
its sitting correctly in your pic, the lobe has its own keyway on it and is flush with the outside. The keyway has the notch in it for the open space between the flywheel and points assy when the wheel is seated, to clear the points dustcover.

Is this a steel flywheel engine, If so look closely at the glued on magnets and make sure they have not come loose and moved and if you moved the entire magneto assy (loosened up the 2 7/16" head bolts) and moved it at all you may have taken it it out of time. The steel flywheel engines shear keys pretty easy when they have a timing issue, the older aluminum ones not so much.
 
#10
its sitting correctly in your pic, the lobe has its own keyway on it and is flush with the outside. The keyway has the notch in it for the open space between the flywheel and points assy when the wheel is seated, to clear the points dustcover.

Is this a steel flywheel engine, If so look closely at the glued on magnets and make sure they have not come loose and moved and if you moved the entire magneto assy (loosened up the 2 7/16" head bolts) and moved it at all you may have taken it it out of time. The steel flywheel engines shear keys pretty easy when they have a timing issue, the older aluminum ones not so much.
Markus, the flywheel is steel and the magnets are mounted OEM and are not loose at all. Never touched the magneto at all. Points are set, the taper has been polished as per instructions from earlier replies :doah:

The key is sitting correctly as you say, but does it not need to go under the lobe, or just by torquing the flywheel, will it seat correctly? this is what the crux of my problem is...................................

thanks
 

markus

Well-Known Member
#11
As stated in previous post, its installed correctly in your picture. Its physically impossible for the key to go under the lobe unless the lobe is damaged or installed backwards. You should put the points dustcover on before the flywheel key goes on, if it still has and undamaged gasket you will understand why the stepped section is there.
 

markus

Well-Known Member
#12
Gonna add this, once you get the flywheel on the recoil starter cup usually has 3 indents, or maybe a little tab that goes in a hole, or something to that nature. Make sure its seated where it needs to be. Cant tell if you have the big nut or small nut crankshaft as they swung both ways on that depending on year for the points/steel flywheel engines.

Small nut (11/16" socket) the nut has a special shoulder to it that seats and centers the concave Belleville washer as you install, you install the washer like this Flywheel =) = nut The indents in the cup will usually also aid in centering the washer but it pays to keep and eye on all of it as you tighten it down to make sure it does not get off center.

Big nut (3/4" socket) They dropped the centering shoulder on the nut and the curve of the washer is not nearly as prominent as the earlier ones were, its almost non existent actually so you gotta look at that and do your best to get it on there in correct orientation which is the same way Flywheel = ) = nut.

something similar was being discussed in another thread, there are probably torque specs there or you can find them online.
 

markus

Well-Known Member
#13
Gonna add this, once you get the flywheel on the recoil starter cup usually has 3 indents, or maybe a little tab that goes in a hole, or something to that nature. Make sure its seated where it needs to be. Cant tell if you have the big nut or small nut crankshaft as they swung both ways on that depending on year for the points/steel flywheel engines.

Small nut (11/16" socket) the nut has a special shoulder to it that seats and centers the concave Belleville washer as you install, you install the washer like this Flywheel =) = nut The indents in the cup will usually also aid in centering the washer but it pays to keep and eye on all of it as you tighten it down to make sure it does not get off center.

Big nut (3/4" socket) They dropped the centering shoulder on the nut and the curve of the washer is not nearly as prominent as the earlier ones were, its almost non existent actually so you gotta look at that and do your best to get it on there in correct orientation which is the same way Flywheel = ) = nut.

something similar was being discussed in another thread, there are probably torque specs there or you can find them online.
:doah: disregard the centering shoulder part for the small nut STEEL flywheel engines, Now that I have a cup-o-coffee through me I realize that ONLY applies to the earlier Aluminum wheels.
 
#14
:doah: disregard the centering shoulder part for the small nut STEEL flywheel engines, Now that I have a cup-o-coffee through me I realize that ONLY applies to the earlier Aluminum wheels.
Thanks for that Markus. I've never encountered a steel wheel version, and didn't know this.
 
Top