First Scratch Built Bike

#41
Thanks to everyone for your kind words :thumbsup:

My decals arrived today and they really finish off the restoration.

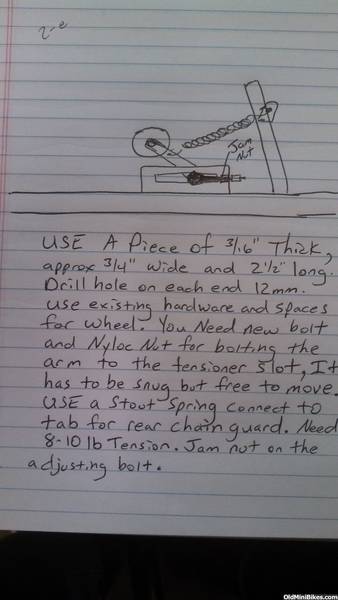
Tomorrow I need to figure out the chain tensioner, and line up the motor. Anyone got tips on marking out the engine holes for drilling?

I have not been updating this project because I've been sick, full of school work and generally busy. But I try and get as much time as I can in the garage. I can't wait to test ride this thing, so there's more motivation to get her done!

-Jackeo21

 
#42
Hi there! Sorry you've been sick---the flu bug is hitting the states already and people are dropping like flies. Here's what I would do. You need to start from the clutch sprocket position and work in. Mask off the motor plate all the way across with tape (if you've not clear coated the frame, remove some of the stickiness of the tape first or use blue painter's tape). With the rear wheel positioned where you want it, use a straight edge to locate the left (outside edge) of the clutch sprocket on the motor plate then draw a line front to rear on the motor plate. Next mount the clutch on the engine, secure it and place engine on bike--use a square to line up the outside edge of the clutch sprocket to the reference line. Square the engine base to the reference line you made on the motor plate, and then mark front and rear the centerlines of the 4 engine holes. Remove engine, connect the lines front to rear and now you have slot locations. Slots are about 2.55 to 3.75 cm (1"~1.25") in length and a slightly larger diameter than the bolt you'll use to secure the engine. Make sure you can slide engine back to attach chain and slide it forward to tighten chain.

How's that for Shop Teacher instructions? Good Luck!
 
#43
Couldn't have gotten better instructions anywhere else! Thanks for that, Dr. Shop Teacher. Very detailed.

I managed to Drill the engine holes, but not without issues. There is not enough room for slots, as the air filter hits the frame, and there is no room to move the engine forward on the plate. This meant I needed to come up with a new plan. I got a skateboard wheel of my friend, and used a sliding axle mount off of a petrol scooter we dismembered for this project. Some 6mm rod and a few nuts later, we have an adjustable chain tensioner :thumbsup: Hope to get this welded tomorrow.

Also, just to make my day a lot better, the air filter threads (to hold the filter on) gave out, after 38 years of service. Hopefully I could use some threaded rod and a wingnut to secure it.

Here are pics of my plan

-Jack....eo21


Last edited:
#44
Glad to be of help....a couple of suggestions. Photo looks to show the tensioner in a fixed position. That would work fine if the chain was not prone to stretching. If you can rework your mounting tab so that it is slotted on an upward angle say at 15 degrees toward the rear sprocket, you can adjust your chain tension by sliding the wheel along that slot. You can add a second "locking" bolt in the tab to hold the tensioner where you need it. I can make you a sketch if you like.
 
#46
Thanks for the sketch! I never thought of making the tensioner slide vertically :laugh:

We decided to do it straight up, closer to the engine. The wheel moves up and down, and puts good tension on the chain.
I managed to fire up the engine, and spin the rear wheel. The tensioner works well, as does everything else. The new chain quickly stretched, so a re-adjustment was needed.

Next step is to sleeve the handlebars, as they are too small for grips. Then I am pretty much ready for a test ride :thumbsup:

Also, I got a tour around my engineering classes today, I even fixed a briggs! I was leaving school with my buddy and we saw the teacher trying to start a new 3.5 OHV intec briggs. (the school has many). It was rebuilt by some students 2-3 years older than us. After 45 mins of throttle adjustments, fuel spills and carb inspection, I found the problem. Someone used the air filter gasket on the engine side of the carb, creating a massive leak. :doah: After that gasket was replaced, it ran fine. The teacher was surprised that the younger students were better at fixing motors than the senior students :laugh:

Anyway, here is the tensioner.


-Jack.....eo21
 
Last edited:
#47
You may consider one more tweak to your design , this I've done on quite a few DB mini's , spring loaded is the only way to go !! Your design should work fine too !
 
#48
You may consider one more tweak to your design , this I've done on quite a few DB mini's , spring loaded is the only way to go !! Your design should work fine too !
Chipper's got the best of both worlds here. His is auto adjusting, which is especially good because deceleration will cause the chain to chatter on the non tension side and pop off the sprocket.
 
#50
I agree you need a better tensioner design . as soon as you hit the brake itll bend that right over. Take as many links out as you can. use a half link if you have to and get the chain as tight as you can. Then take up the remaining slack with the roller but put it on a nice thick bracket as close to the frame as you can so it doent have leaverage to bend. I think youre going to want a grove in the roller for the chain so it doesnt walk to the side and come off. It may have not come off in youre testing but when it gets some slop in it it probrobly will tend to roll off the sides
 
#51
Nice job on your frijole. Im 13 and "mechanicaly inclined" too. I will be starting an intek 206 I/C (with lots of goodies) project soon for a homemade go kart that i am building.
 
Last edited:
#52
Nice job on your frijole. Im 13 and "mechanicaly inclined" too. I will be starting an intek 206 I/C (with lots of goodies) project soon for a homemade go kart that i am building.
Cool to have people my age on the forum, I believe I am the only active young... member here (not sure), other than you. Your kart will go pretty quick with a hopped-up intec! I would make a kart but have no where to ride it so it makes it sort of useless :thumbsup: What mods were you thinking of doing to your 206?
 
#53
I got the bike working! She is slow at take off, but can do some decent speed once it gets going. I think I will sell it with a muffler, due to not wanting a bad minibike reputation in my area! The tensioner works ok, so I'm good with it :thumbsup:

Sanding and priming/painting has begun. I will upload pics of it when it is completed, of course.

Check out my 3HP build thread for the colour choice, duplicolour metalcast red. Post Number 22, http://www.oldminibikes.com/forum/briggs-and-stratton-engines/119883-3hp-restoration-hot-rod-3.html

Stay tuned

Here are your pictures.


#54
Nicely done, young man! :thumbsup:What size rear sprocket are you using? That may be the problem with slow starts. With the small Briggs, you should have at least 60 teeth but 72 would be better. The ideal ratio is 6:1--a 12 tooth clutch and a 72 tooth drive sprocket.

BTW, I'm see your work shop looks like mine! I have stuff everywhere!:laugh: Look for the project by SC's kid--he's doing a CAT and I think he's about your age, too.
 
#55
Nicely done, young man! :thumbsup:What size rear sprocket are you using? That may be the problem with slow starts. With the small Briggs, you should have at least 60 teeth but 72 would be better. The ideal ratio is 6:1--a 12 tooth clutch and a 72 tooth drive sprocket.

BTW, I'm see your work shop looks like mine! I have stuff everywhere!:laugh: Look for the project by SC's kid--he's doing a CAT and I think he's about your age, too.
Thanks Doc,

The taco uses a 12 tooth clutch, with about a 48 tooth sprocket. I am selling this bike so it doesn't really matter to me, it goes well and gets good speed.

I'm thinking of doing another frijole, in a more hot rod style. 4 inch red colour rims, white wall tyres, black frame, straight pipe and of course a number plate chain guard! I have a 72 tooth sprocket I can use for that bike, along with a comet 35 pitch clutch, about 11 tooth. :thumbsup:

When I used the 72 tooth on my tru-test, it had a low top speed but could do wheelies on take-off. That bike has a 5hp.

My question is if I were to use a 72 tooth sprocket with a smaller engine, would I get decent torque/speeds? A 3hp with such a large sprocket sounds slow...:shrug:

Oh yeah, our garage is tiny, you can barely fit in a car when it's empty. This hasn't stopped us from buying a welder, 3 bench grinders, a pipe bender, a drill press and many more things. We can fit 2 minibikes though, just a bit annoying :laugh:
 
#56
Well yes, you give up some speed with a larger sprocket but it compensates for the low horsepower at start up. If you are looking for higher speed >48 kph (>30 mph), you need more hp and a few more revs. It's all about torque out of the "hole" to get going and horsepower at the top end. So, my CATs have 66 tooth sprockets (original spec) and 12 tooth clutches. With the 6.5 clone engines they will pull wheelies but cruise comfortably around 30-35 kph.

Personally, 48 kph is about the max I want for my safety. I'm 6' 4" and weigh about 200 lbs, so the short wheel bases of minis makes me want consider how balanced I'll be at speed. And, really anything over 35 kph, you do need a helmet. Hope this helps!
 
#57
My question is if I were to use a 72 tooth sprocket with a smaller engine, would I get decent torque/speeds? A 3hp with such a large sprocket sounds slow...:shrug::
The top speed will be the same with any governed engine. It just takes longer to get there. I ran a small frame Cat 250X mini bike with a Briggs 2.5 HP engine and a 11 t clutch and 72t rear. (That bike originally came with that engine and that sprocket ratio) I weigh 16.5 stone. Probably went nearly 40 kph. It went fine up the paved hills. I think it's a great gear combination.

Only down side is that on sharp turns, you may hit the ground with the sprocket.
 
#58
Finished!

Well, I am very proud to announce that the Taco Frijole Copy is completed! it has been at least 6-7 months now and I have been eager to say that! Although the metalcast paint chips pretty easily (found out the hard way), it is one stunning bike in my opinion! Unfortunately, she will head up for sale tomorrow, allowing us to fund 2 new Tru-Test Projects (lil indian) :thumbsup:

The frame is painted in metalcast red, the engine, duplicolour silver high heat. I think that the colour combo looks good. all she needs now is a new muffler, as the current vintage one get fumes and carbon on the fuel tank :hammer:

I rode it round for about 15-20 minutes. Could have more torque, but otherwise could do a decent 50kph with me on it (63kg)(138Ib) Motor runs really nice, but is leaking out oil from somewhere. Oil is coming from one head bolt, but they are all tight :confused: Ill wipe it up and check it tomorrow.

Thanks to everybody for your great support and motivation, and help with this project. I will list it for around 350 USD, but this is not available to US buyers! :laugh:

I am happy with it. Really cool to see that it was made out of a tv aerial, some old tubing, a rotary hoe motor, bathroom-ware and lots and lots of ideas!

Here are some pics I got today. Some are of the Taco, Tru-Test and Rat Rod 40' Dodge.

Thanks again,
Jackeo21 :thumbsup:

Here are your pictures.


Last edited:
#60
Great little bike Im sure youll have no problem selling it they cant be too easy to come by down there. That metalcast paint does scratch easy when you first spray it but after a while it hardens up and is much better.
 
Top