Great MiniBiker Build-Off:DELRAY ENTRY
- Thread starter delray
- Start date
I use an electric knife and a GOOD pair of shears...I use the carpet padding cuz its a bit cheaper and easier to work with but its only 5/8 thick ..I usually use 6 or 7 layers on a seat. I also cover the foam with poly batting. It makes the seat a little softer on top. Good spray adhesive is a must...3M or Camie.
ok,i was kind of thinking you might be using a electric knife.
the thickness of the foam i was using was about 1 1/8inch thick. i think the next time i will do one with a thin layer of soft foam. maybe the seat will look little more smoother :thumbsup:
gto i found it on ebay real cheap. next time i will get some different thickness,so i can dial in my height. thickness of my foam work good for my project,but i can see where a person my have to use different size foam for there application.
hey guys i know im kinda new here to OldMiniBikes.com.....but i was reading and checking out peoples build off bikes...and delray you have a nice looking bike but according to the rules of the class your in....it states you cannot make some of the mods your making....ex:exhaust, motor plate, and rear end ......but maybe im wrong if so i appoligize
1. Vintage / Stock
Must represent vintage bikes. (i.e no pocket rockets here!) No frame modifications.
50's, 60's, 70's era
Suspension:
No Springs, No suspension! (Better get a good seat)
Engines: Flathead 2-5HP maintaining stock appearance. No aftermarket parts- Carb, Air Cleaner, Kick Starter - Use stock muffler/Factory Header
Briggs & Stratton: Carbs mounted on tanks must stay that way.
Tecumseh/Others: Frame mounted tank - Engine mounted fuel tank OK
Drive system: Centrifugal Clutch - Jackshaft if needed.
Brakes: Drum, Scrub & Disc brakes.
Seat: Vintage style. Foam pad seat on plywood. Personal touches OK!
Tires/Wheels: No larger than 6" rims. Tire size doesn't matter.
Last edited:
dthaman1,the rules state the bike has to be vintage appearance when finish and no frame modifications. for example i have not cut and stretch the frame,only move the motor mount. you can run a header pipe. lots of the vintage bikes had them:thumbsup: (factory header appearance)
most of my stuff that i had to do on my build i had to fab it because no one makes anything for it or fits it. so really it does look like i am building a modiflyed bike more then a stock bike. i tryed at first to help on the rules,but no one really cares?
i wont be able to finish my bike by may,so no one will have worry about me being judge:thumbsup:
i think maybe next year if we do this build again? that the rules need to be hammered out little more?
my build is not to win anything,but more to show everyone my build-off and maybe to help give some of the guys on ideals on how to make something for there bike too:thumbsup::hack::grind::weld:best thing about this build is we get to share are ideals on how we build are bike:thumbsup:
 ......dthaman1,thanks for asking......maybe next year you can entry a build:thumbsup:
most of my stuff that i had to do on my build i had to fab it because no one makes anything for it or fits it. so really it does look like i am building a modiflyed bike more then a stock bike. i tryed at first to help on the rules,but no one really cares?
i wont be able to finish my bike by may,so no one will have worry about me being judge:thumbsup:
i think maybe next year if we do this build again? that the rules need to be hammered out little more?
my build is not to win anything,but more to show everyone my build-off and maybe to help give some of the guys on ideals on how to make something for there bike too:thumbsup::hack::grind::weld:best thing about this build is we get to share are ideals on how we build are bike:thumbsup:
......dthaman1,thanks for asking......maybe next year you can entry a build:thumbsup: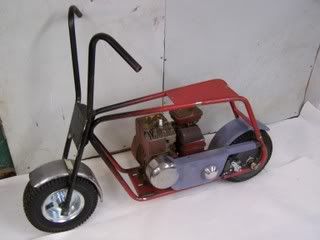
Excuse me guys,
I, myself, am not involved, and am not posting my progress, to be in a contest, maybe one of my mini's might make it to the mini of the month deal, but I really have no interest in being in a contest that would judge weather I used the right parts with the right frames cause to be honest with you all, I love them briggs 5hp's, I don't like The tecumsa's, I really dis like 2 cycles, unless they're SUPER BAD!!!, and I'm going to install those 6.5 HARBOR FREIGHT motors on what I decide to sell, because I ain't about to part with a good Briggs, I have collected quite a few over the years, I will be takeing them apart and "going through" them, then painting them to suit me, no i won't part with any of my briggs!!!
dave
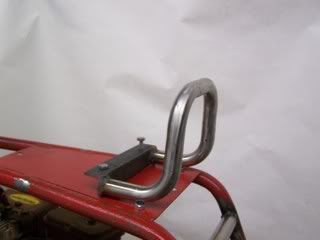
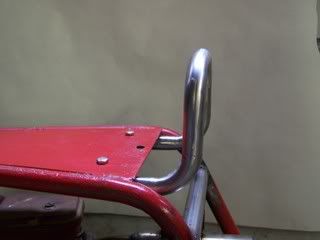
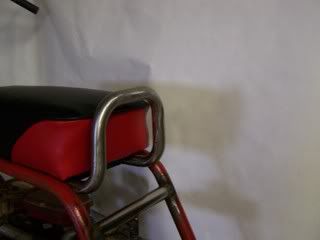
I fab up a small sissy bar today. i kept it small,just big enough to keep my nephew from sliding of the back seat. i might also make a small nerf pad around the top bar. little softer on the tail bone:doah:
also makes a good place to pick up the bike:thumbsup:
fab up some small tubing and welded it to a peice of angle iron and drill some holes and counter sink couple small holes under the seat(wood) for the bolt heads to sit in and bolted it up:thumbsup:
also makes a good place to pick up the bike:thumbsup:
fab up some small tubing and welded it to a peice of angle iron and drill some holes and counter sink couple small holes under the seat(wood) for the bolt heads to sit in and bolted it up:thumbsup:

delray
Sorry that you won't be able to finish the mini by the cut off date. I am in the same boat, there's no way that my Caper Cycle will be finished in time. A previous commitment got hot and precluded going any further on the mini...it will have to wait till after August. But I enjoyed every minute I spent on it. Never before was it necessary to think up a minibike project based on a catagory and then build it. That was a new and plesant element. I sure hope there'll be a build off next year. For sure I'm gonna be thinking about what I want to do. How about a Prostreet catagory?!
Sorry that you won't be able to finish the mini by the cut off date. I am in the same boat, there's no way that my Caper Cycle will be finished in time. A previous commitment got hot and precluded going any further on the mini...it will have to wait till after August. But I enjoyed every minute I spent on it. Never before was it necessary to think up a minibike project based on a catagory and then build it. That was a new and plesant element. I sure hope there'll be a build off next year. For sure I'm gonna be thinking about what I want to do. How about a Prostreet catagory?!
same to you oldsalt,i will still get the bike done,but not by may. i can see why my bike looks like it could be modify with all the fabrications,but hopefully when finish it will look like a vintage style minibike. well maybe for a month or so and then my nephew will make it look like something else:doah:
........................:hack::hammer::weld::grind:
........................:hack::hammer::weld::grind:fender brace,
fab up a small brace for the front fender. notes in the past on some minibike fenders that don't have any lower rear bracing, the fender likes to crack where it is bolted on top. just to much vibration for only two bolts.
brace was made up with a peice of 1/4 steel rod and couple thick washers welded to the ends of the rod and two small holes drilled into the lower forks to bolt up to and also welded to nuts on the rear brace and drilled two holes on the back lower fender to bolt it all together:thumbsup: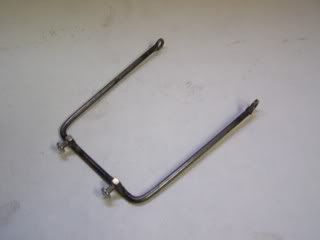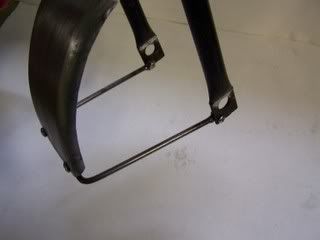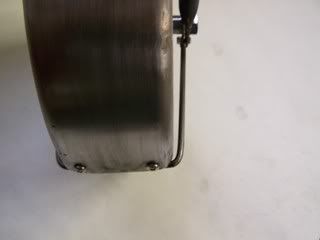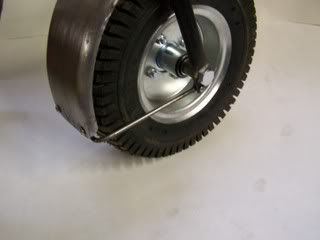
I hope your nephew appreciates your effort!
Not only is he getting a real nice oldschool mini, but re-worked with all of the kinks worked out, bells and whistles added, nice job delray!:thumbsup: I plan on keeping 3 of the bikes I'm redoing, The 2 choppers, and the bonanza, just because I want to modify them to the max and your thread is so informative, I may just use some of your ideas, love the generator set up, was wondering if the set up could be used on the side of the clutch thats always spinning, then as long as the motor was running, you'd have lights, would you think that would be possible???? The honda motor style with the gas tank mounted on top, cylinder chamber at an angle is to tall to fit in the chopper frame so i was thinking of removeng the tank, and using the mounting tabs for something else like your generator set up, or something like it, then mount the tank to the frame.
dave
dave,not really sure if the generator would work good on the clutch unit. the generator bearing(bronze bushing) may not take the load after awhile. you would have to modify it with a high speed sealed bearing. so the bearing would take the load. something like i did.
i think for a generator set up? maybe a engine with the extra pto small shaft(camshaft area) may work the best. so you can still have lights while idling.
another thing to keep in mine is it takes less energy(volts)to run led lights then a standard blub.
for example i can hand spin my rear tire and make the led light come on.
with out trying to spin it real fast.
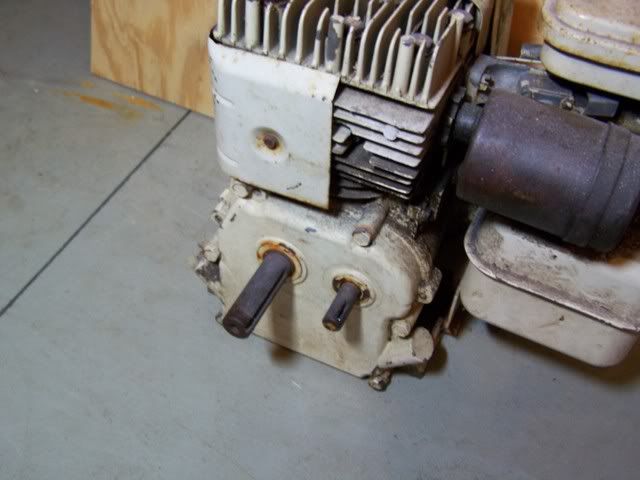
here is a engine i may try out on my next generator build.:thumbsup:
thinking about using a smaller sprocket set up. maybe a #25 chain. on the extra pto shaft it will spin slower then the crankshaft. i should not have worry about any chain problems?
i think for a generator set up? maybe a engine with the extra pto small shaft(camshaft area) may work the best. so you can still have lights while idling.
another thing to keep in mine is it takes less energy(volts)to run led lights then a standard blub.
for example i can hand spin my rear tire and make the led light come on.
with out trying to spin it real fast.
here is a engine i may try out on my next generator build.:thumbsup:
thinking about using a smaller sprocket set up. maybe a #25 chain. on the extra pto shaft it will spin slower then the crankshaft. i should not have worry about any chain problems?
Del, would a comet clutch fit both rightways and backwards with the extra shaft? Just curious, I don't have one or anything, just thinking of options for the generator. Couldn't you use something like a bearing mounted friction drive, like you did on your other bike kinda, only mounted on the front of the engine housing. Using the outer face of the clutch as the contact patch for the generator? I guess at idle though it wouldn't be spinning, hmmmm never mind, lol. Plus, it would probably get kinda hot from the heat off the clutch.
Delray
I have sorta looked into how to get a reliable drive off the crank. I believe the best way is to use an XL series "timing" belt. The type with teeth that run on belt "sprockets". An XL belt has teeth on 1/8 inch centers and is available in a wide range of lengths and in three widths: 1/8, 1/4, and 3/8 inch. My interest was [and is] the ability to drive a magnito. The flyweel could be almost non existant and the mag mounted in front of the engine and provided with a means change the ignition timing. The clutch would have to be spaced from the engine almost a half inch if a 1/4 inch belt width was used. Driveing a generator would be even easier. All the parts are in the McMaster-Carr catalog. Or drop in at any industral power transmission supply outfit.
I have sorta looked into how to get a reliable drive off the crank. I believe the best way is to use an XL series "timing" belt. The type with teeth that run on belt "sprockets". An XL belt has teeth on 1/8 inch centers and is available in a wide range of lengths and in three widths: 1/8, 1/4, and 3/8 inch. My interest was [and is] the ability to drive a magnito. The flyweel could be almost non existant and the mag mounted in front of the engine and provided with a means change the ignition timing. The clutch would have to be spaced from the engine almost a half inch if a 1/4 inch belt width was used. Driveing a generator would be even easier. All the parts are in the McMaster-Carr catalog. Or drop in at any industral power transmission supply outfit.
Delray, I seem to remember swaping out the extended camshaft, and side cover, for the shorter cam and side cover with no hole in it, because the clutch didn't fit right, or the cam shaft was in the way of the chain, however, if you just use a small sprocket on the crankshaft, and put the clutch, maybe on the jackshaft that might work, I'm sure if someone can work it out it'd be you, or Salt, he seems to have a good ideal, too, was thinking of using led lights cause of the low voltage requirements, and the high light output, better than a normal bulb, and so many colors, I'm sure once I get caught up on my bike building, I will take some time to research a charging system for a mini bike, and go-cart, love the ideal of having lights and a starter.
dave
dave
belt system would be good:thumbsup: i have look at some of the smaller belts. i think maybe a belt set up might work better with the extra small pto shaft. but i am afraid to see what the belt parts would cost? maybe i will have to look into that? can't be that bad. still cheaper then trying to buy a use lighted coil tecumseh engine$$$
......... small belt set up would be kind of neat:thumbsup:
......... small belt set up would be kind of neat:thumbsup: